30 abril 2013

Seven Deadly Sins Challenge Day 3: Gluttony

Hi Girls!
New week, new Deadly Sin! This one is Gluttony, one of my favourites because I love food!!! I love eating all the nasty greasy food I should not be eaten because It's unhealthy, but well, I don't have enough money to eat fast food everyday, so I think I'm behaving well. Also one interesting fact is that when I have been eating a lot of meat my body "tells" me that I need vegetables and I surprise myself doing just a salad for dinner and enjoying it!


Hola Chicas!
Nueva semana, nuevo Pecado! Este es Gula, uno de mis favoritos porque me encanta la comida!!! Me encanta comer toda la comida grasienta y asquerosa que sé que no deberá comer porque no es sano, pero bueno, no tengo suficiente dinero como para comer comida rápida todos los días, así que creo que me estoy portando bien. También una cosa curiosa es que cuando llevo mucho tiempo comiendo carne mi cuerpo me "dice" que necesito verduras, y me sorprendo a mi misma cenando solo una ensalada y disfrutándolo!


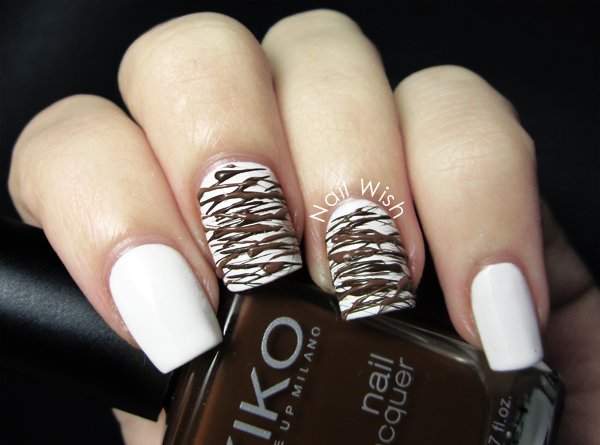
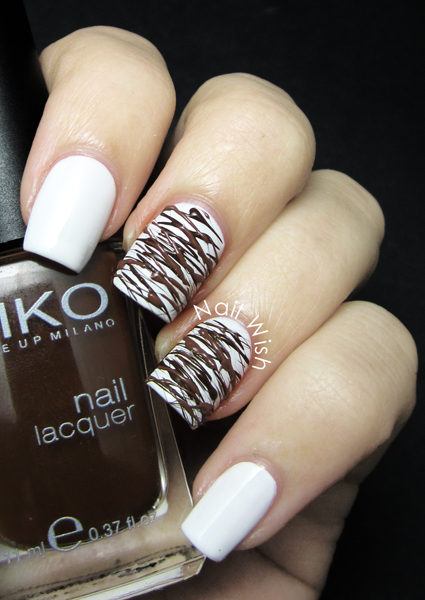
The prompt for the first manicure says: "Delight yourself with a Sugar Spun manicure".
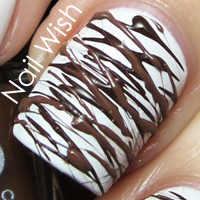
And that's what I did, but more than sugar I wanted it to look like melted chocolate, and I think it does! I used Flormar 400 for the base, and Kiko 323 for the melted chocolate. I wanted to see two different kinds of chocolate, dark and with milk, so for the second one I mixed the white and the brown.


Las instrucciones para la primera manicura dice: "Date el gusto con una manicura Sugar Spun".
Y eso es lo que hice, pero más que azúcar quería que pareciera chocolate derretido, y creo que lo parece! He utilizado Flormar 400 para la base y Kiko 323 para el chocolate derretido. Quería ver dos tipos diferentes de chocolate, negro y con leche, así que para el segundo mezclé el blanco y el marrón.


For all of those who don't know how to do the Sugar Spun technique I will give you some directions, but I warn you I'm not even near of master this technique...

1. Prep your base colour and let it dry completely.
2. Put a big blob of the colour you want to use for the sugar spun on a piece of paper and start stirring it with a toothpick until it becomes sticky and starts making strings when you pull out the toothpick.
3. Start pulling the polish strings on the top of your nail, try to cover the nail evenly, or the part where you want the sugar spun look (It depends on your design)
4. Apply topcoat (or not)

On this manicure I did't used topcoat because I wanted the texture, and if you apply topcoat you even the surface of the nail.


Para todos los que no sepan como hacer la técnia del Sugar Spun os voy a dar algunas instrucciones, pero os aviso que a mi no se me da demasiado bien...

1. Prepara tu color de base y dejalo secar completamente.
2. Pon un poco de esmalte en un papel y comienza a removerlo con un palillo hasta que se ponga pegajoso y empiece a hacer hilos cuando sacas el palillo.
3. Comienza a sacar los hilos de esmalte y a ponerlos encima de tu uña, intenta cubrir la uña uniformemente, o la parte en la que quieras el sugar spun (depende de tu diseño)
4. Aplica una capa de topcoat (o no)

Ene esta manicura no he utilizado topcoat porque queía aprovechar la textura, y si aplicas topcoat se iguala la superficie de la uña.


I hope you liked it and find the directions useful, if you don't there are lots of amazing video tutorials on Youtube :) Now I'm going to eat a big piece of chocolate, and you should do it too!!!!


Espero que os haya gustado y que os sirvan las instrucciones, si no hay un montón de videos muy buenos en Youtube :) Ahora me voy a comerme un trozo enorme de chocolate y vosotros deberíais hacerlo tambien!!!

25 abril 2013

Seven Deadly Sins Challenge Day 2: Lust

Hi Girls!
Yay! I'm so excited with this challenge that I'm even going ahead! Being responsible and stuff... doing all the manicures before the posting date... I hope I will keep doing it until the end because you all know how I am always late when I have to do a challenge.
Well, the second prompt for Lust says: "Let your body talk and feel free to do whatever you want" so I did something more Lust Inspired...


Hola Chicas!
Yay! Estoy tan emocionada con este reto que voy incluso por delante! Siendo responsable y eso... haciendo todas las manicuras antes de la fecha de subirlas... Espero seguir así hasta el final porque ya sabeis como siempre voy tarde cuando estoy con un reto.
Bueno, las segundas instruciones de Lujuria dicen: "Deja te tu cuerpo te guíe y siéntete libre de hacer lo que quieras" así que he hecho algo más inspirado en la Lujuria...


Corsets! The first time I saw THIS Robin Moses' Design I knew someday I will do something inspired on it... And I love the result, although when I did these nails I had short nails I thought they looked really good, and I also was really happy because I could use my new Silver Acrylic Paint for the first time!


Corsets! La primera vez que vi ESTE Deseño de Robin Moses supe que algún día haría algo inspirado en él... Y me encanta el resultado, aunque cuando hice estas uñas las tenía cortas pensé que quedaban muy bien, y también estaba muy contenta porque pude usar mi Pintura Acrílica Plateada por primera vez!


Here you can see it on full detail with this macro shot. I first applied one coat of Yves Rocher Pastel Brillance, then, with a stripping brush and brown acrylic watered down, I made the lines for the background. The next thing was to freehand the corset with black, white, pink and silver acrylics. Finally I topped everything with one coat of Seche Vite.


Aquí podeis verlo a todo detalle con esta foto macro. Primero apliqué una capa de Yves Rocher Pastel Brillance, luego, con un pincel delineador y acrílica marrón reabajada con agua, hice las líneas del fondo. Lo siguiente fue dibujar a mano el corset con pintura acrílica negra, blanca, rosa y plateada. Finalmente lo cubrí todo con una capa de Seche Vite.


When I tried the silver acrylic I had a feeling and started playing mixing it with other colours, and it seems that if you do that every colour would turn into it's pearl shade! For example: Pink + Silver = Pearl Pink, or White + Silver = Pearl White!! I can't wait to try other colour combinations and see what I can do with them...


Cuando probé el acrílico plateado tuve una corazonada y comencé a jugar mezclandolo con otros colores, y parece que si lo haces cada color se convierte en su propio tono perlado! Por ejemplo: Rosa + Plateado = Rosa Perlado, o Blanco + Plateado = Blanco Perlado!! No puedo esperar para probar otras combinacines de colores y ver que puedo hacer con ellas...


Last pic I promise!! Haha, I hope you are enjoying the challenge, we have already lots of amazing manicures! Just have a look through all the links below!
See you!


Última foto, lo prometo!! Jaja, espero que esteis disfrutando del reto, ya tenemos muchas manicuras increíbles! Solo tienes que echar un vistazo a los links de abajo!
Nos vemos!

23 abril 2013

Seven Deadly Sins Challenge Day 1: Lust


Hi Girls!!
I am so excited today because we are on the first day of a Challenge created by me and with the help of the amazing Alice from OneNailToRuleThemAll (OMG I love her blog name!!!!!). We will be posting one or twice a week (depends on how busy we are) during seven weeks  to make the Seven Deadly Sins. We are are going to be a good number of amazingly talented bloggers (that gives me a lot of fangirl moments) and I hope you enjoy it as much as we are going to do it. Also I forgot to say that the beautiful girls that represent each of the Deadly Sins on our Logo, Instructions and Banners are made by the amazing DeviantArt Artist called Dahlig.


Hola Chicas!!
Hoy estoy muy emocionada porque estamos en el primer día de un Reto creado por mi y con la ayuda de la inreíble Alice de OneNailToRuleThemAll (OMG me encanta su nombre del blog!!!!). Vamos a publicar una o dos veces a la semana (dependiendo de lo ocupada que esté cada una) durante siete semanas para hacer los Siete Pecados Capitales. Somos un buen número de bloggers con talentos increíbles (que me da muchos momentos de fangirl) y espero que lo disfruteis tanto como lo vamos a hacer nosotras. También tengo que decir que se me ha olvidado contaros que las chicas tan guapas que representan cada uno de los Pecado Capitales en nuestro Logo, Instrucciones y Banners están hechas por la Artista de DeviantArt llamada Dahlig.


We are going to start with Lust and the first prompt of the challenge says: "Be a bad girl and make something you have wanted to do soo badly". So I decided to make quilted nails! I had always loved this look because it's elegant and eye catching, but it looked really complicated and I never tried it... So, today is the day! I followed DullLikeGlitter's Tutorial and I used Yes Love Pastel Pink and Essence Matte TopCoat. Then I stick silver beads to every joint.


Vamos a empezar con Lujuria y la primera intrucción del reto dice: "Se una chica mala y haz algo que hayas querido hacer desde hace muucho tiempo". Así que decidí hacer uñas acolchadas! Siempre me ha encantado este look porque es muy elegante y llamativo, pero parecía muy complicado de hacer y nunca lo había intentado... Así que, hoy es el día! He seguido el Tutorial de DullLikeGlitter y he utilizado Yes Love Pastel Pink y Essence Matte TopCoat. Luego pegué las bolitas de caviar plateadas en cada unión.


I loved how it looked, even it's not perfect because in some places I pressed too hard and you can see my nail through the polish... I think the nail that looks better is the ring finger because the squares are perfect and the have that quilted look that I love!
I hope you like it too and don't forget this week would be another manicure inspired on Lust, and I promise the next one would be more accurate with the sin....


Me encantó como quedó, incluso aunque no esté perfecta porque en algunos sitios presioné demasiado fuerte y se puede ver mi uña a través del esmalte... Creo que la uña que mejor está es la del dedo Corazón porque los cuadrados están perfectos y tiene ese aspecto acolchado que me encanta!
Espero que os guste también y no os olvideis de que esta semana habrá otra manicura inspirada en la Lujuria, y os prometo que la próxima será más adecuada al pecado...

21 abril 2013

Reto Zodíaco: Tauro

Hi Girls!
Today I start a new Challenge and it's theme is Zodiac Signs. The creator of the idea is Nati from Nataliciosa.com and about 20 bloggers are doing it. We are going to take it easy and make each sign on their corresponding dates, so this challenge it's going to take a whole year!
The ones that are born between April 21st and May 20th are under the influence of Taurus, they are supposed to be stubborn and grumpy, but quiet and patient.


Hola Chicas!
Hoy comienzo un reto nuevo y su tema es los Signos del Zodíaco. La creadora de la idea es Nati de Nataliciosa.com y alrededor de 20 bloggers están participando. Vamos a tomárnoslo con calma y hacer cada signo en sus fechas correspondientes, así que este reto nos va a llevar un año entero!
Los nacidos entre el 21 de Abril y el 20 de Mayo están bajo la influencia de Tauro, y se supone que son cabezotas y gruñones, aunque también son calmados y muy pacientes.


I decided to go with a simple and easy manicure because I wanted to focus on the background colour. I used Yes Love Pastel Blue as the base and then applied one coat of one of my little nail treasures, Essie Shine of the Times, then I freehanded the Taurus Sign with White and Black Acrylics. I used this picture made by Nati as my inspiration.


Decidí hacer una manicura simple y sencilla porque me quería centrar en el color de fondo. He utilizado Yes Love Pastel Blue como base y luego he aplicado una capa de uno de mis tesoros, Essie Shine of the Times, luego dibujé a mano el Signo de Tauro con Acrílicas Blanca y Negra. He utilizado esta imagen que creó Nati como inspiración.


I promise I will put more effort on the next one, but now I'm on to simple and neat manicures and I also was just waiting for an excuse to wear my Essie polish again. Hahaha...
Let's see more pictures!!


Os prometo que me esforzaré más la próxima vez, pero ahora mismo me tiran más las manicuras simples y llanas y también estaba esperando una excusa para usar mi esmalte Essie otra vez. Jajaja...
Vamos a ver más fotos!!


The last one is my absolute favourite because it shows all the colours of the flakies. Do you agree with me?
I hope you liked it, here you can see the other challengers, I am sure they have made some amazing work!


La última es la que más me gusta de todas porque muestra todos los colores de los flakies. Estais de acuerdo?
Espero que os haya gustado, aquí podeis ver a las otras participantes, estoy segura de que habrán hecho un trabajo increíble!

19 abril 2013

Round Golden Studs from Born Pretty

Hi Girls!!
I have totally abandoned this for almost a whole month! Well, it seems that I'm now back on my feet again and I won't leave for long...
I've had those studs for a long time and I was dying to try them but I was just out of inspiration and wanted to do something really special and elegant, that's why I chose this colour combination and the use of stripes.


Hola Chicas!
He abandonado esto totalmente durante casi un mes entero!! Bueno, parece que ya me he recuperado del todo y que no me ire en mucho tiempo...
He tenido estos studs desde hace un tiempo y estaba deseando probarlos, pero no tenía inspiración ninguna y quería hacer algo realmente especial y elegante, por eso finalmente he escogido esta combinación de colores y el uso de las líneas.


First of all I have to say that this manicure has been a pain in the ass to photograph, I don't know how but the white was so bright next to the blue that burned every picture I took... These were the best pictures I could take and I have to tell you that they don't do justice to the manicure...


Lo primero que tengo que deciros es que esta manicura ha sido un auténtico coñazo de fotografiar, no sé cómo pero el blanco era tan luminoso junto al azul que quemaba cada foto que hice... Estas fueon las mejores imágenes que conseguí sacar y os aseguro que no le hacen justicia ninguna...


These golden studs were given to me by Born Pretty Store for review and I have to say that I love them! They are 1.5 mm and they stick really well to the nail. They have a flat rubber back that makes really easy to pick and place them. To make this manicure I only used clear polish to glue the studs and they lasted without problem for a week.


Estos studs dorados me los envió Born Pretty Store para que los probara y tengo que deir que me encantan! Son de 1.5 mm y se pegan muy bien a las uñas. Tienen una parte de atrás de goma plana que hace que sea muy facil cogerlos y colocarlos. Para hacer esta manicura sólo he usado esmalte transparente para pegarlos y duraron una semana sin problemas.


I used Barry M Denim, Barry M Golden Foil (I love this brand) and Flormar 400. I freehanded the stripes with a thin nail art brush, but if you think this is too difficult you can make it with tape. Then I applied a topcoat, placed the studs and finished with Seche Vite on top.


He utilizado Barry M Denim, Barry M Gold Foil (Me encanta esta marca) y Flormar 400. Yo he hecho las líneas a mano con un pincel de nail art fino, pero si creeis que es demasiado complicado lo podeis hacer con celo. Luego he aplicado una capa de topcoat, colocado los studs y terminado con Seche Vite.


I don't have any problems with my top coat washing out the golden from the studs, but I have heard that some topcoats can do this, so be careful with it. As you can see the amount of studs is Amazing! I think I'm going to have studs for my whole life... the only thing I could say that I don't like about them is that a lot of them are stick to each other and are a little bit difficult to remove.


Yo no he tenido ningún problema con el top coat llevándose el dorado de los studs, pero si que he escuchado que algunos topcoats pueden hacerlo, así que tened cuidado con esto. Como podeis ver la cantidad de stud que vienen es Increíble! Creo que voy a tener studs para toda mi vida... lo único que puedo decir que no me gusta de ellos es que muchos vienen pegados entre sí y son un poco difíciles de despegar.


You can find this product here on the Born Pretty Store website, and remember that they have FREE WORLDWIDE SHIPPING! Also you can use my code to get a 10% discount on your purchase.
I hope you liked them, because I can tell you they are worth it and I am thinking about buying the silver ones, so I can have them both...
See you soon!!


Podeis encontrar este producto aquí en la web de Born Pretty Store, y recordad que tienen ENVÍO GRATUITO A TODO EL MUNDO! Además podeis usar mi código para tener un 10% de descuento en vuestra compra.
Espero que os hayan gustado porque creo que realmente merecen la pena, y ya estoy pensando en comprar los plateados para poder tener los dos...
Nos vemos pronto!!
Related Posts Plugin for WordPress, Blogger...