Mostrando entradas con la etiqueta Pink. Mostrar todas las entradas

14 febrero 2017

I am BANANAS about you!


Hello and Happy Valentine's Day!!
I think it is one of the first days that I achieve to have a Valentine manicure for the actual day. This time I not only have done it on time, but I freehanded the design!


Hola y Feliz San Valentín!
Creo que es uno de los primeros dias que consigo tener una manicura de San Valentin para el dia que es. Esta vez no solo lo tengo a tiempo sino que lo he dibujado a mano!

26 agosto 2014

Dots! Dots! Dots!

Hi Girls!
This is a fun manicure I have been wanting to do for a while. I have already said a few times on this blog that I love the look of decorations over nude nails and a glossy finish like gel manicures, and now that my nails are super short because they are breaking all the time!! this design seemed perfect to try.


Hola Chicas!
Esta es una manicua divertida que he estado queriendo hacer durante un tiempo. Ya he dicho algunas veces en este blog que me encanta como quedan las decoraciones sobre las uñas sin nada y con un acabado glossy, como las manicuras de gel, y ahora que mis uñas están tan cortas ¡porque se rompen todo el rato! este diseño me pareció perfecto.

07 diciembre 2013

Saturday Swatches


Hi Girls!
Today for the Saturday Swatches' post we have another Polish Addicts Nail Polish. Cotton Candy Shop is the name of this very special polish (I love when they have names...) and I got it on my first Mystery Box from the PANC website.


Hola Chicas!
Para el Saturday Swatches de hoy tenemos otro esmalte de Polish Addicts Nail Polish. Cotton Candy Shop es el nombre de este esmalte tan especial (Me encanta cuando tienen nombres...) y lo conseguí en mi primera Mystery Box de la página de PANC.

13 noviembre 2013

Inspiration Day: Robin Moses


Hi Girls!
Today I am starting a new section called Inspiration Day, I have been struggling with inspiration lately and I thought this could be a good idea to help me with that. And also there are so many amazing manicures out there that I really want to try all of them! I am not sure if this will be permanent, let's just see if you like it or not.


Hola Chicas!
Hoy comenzamos con una nueva sección llamada Inspiration Day, he estado ultimamente peleándome con la falta de inspiración y he pensado que sería una buena idea como ayuda. Y por supuesto también hay una gran cantidad de manicuras tan increíbles que me encantaría probarlas todas! No estoy segura de si será permanente, vamos a ver si os gusta o no.

01 noviembre 2013

Stickers from Born Pretty Store


Hi Girls!!
I know yesterday was Halloween and I didn't posted my Halloween costume, but the thing is that here all the Halloween parties start today because of college, so I will do that tomorrow!! Today I brig you some awesome Stickers from Born Pretty Store.


Hola Chicas!
Ya sé que ayer fue Halloween y no subí mi disfraz de Halloween, pero lo que pasa es que aquí todas las fiestas de Halloween comienzan hoy por culpa de la universidad, así que lo subiré mañana!! Hoy os traigo unas Pegatinas de Born Pretty Store.

27 septiembre 2013

Guest Post: Popping Nails

Hi Girls!
Charlie, from Popping Nails  is a lovely girl that I met during the Seven Deadly Sins Challenge, I loved all her work and I wanted you to know her because if you love nail art you will also love her blog. Just look what she has done for today!! So freakin' cute!! Just perfect for me, I love it...


Hola Chicas!
Charlie, del blog Popping Nails  es una chica lindisima que conocí en el Reto de los Siete Pecados Capitales, me enecantó todo su trabajo y quería que vosotros pudierais conocerla porque si os gusta el nail art os va a encantar su blog. Solo mirad lo que ha hecho para hoy!! Es increíblemente monoso!! Perfecto para mi, me encanta...

------------------------------------------------------------------------------------------------------------


Hi everyone first let me introduce myself, I'm Charlie from the blog Popping Nails. I was part of the Seven Deadly Sins Challenge with Helena and when she asked me to do this guest post for her I jumped at the chance as I loved her work during the challenge. I wanted to do something special for these nails and whenever I need to do that, I go back to what I'm best at which I describe as character nails. I had had the idea of doing Disney nails for a while so I thought I'd take my opportunity now.


Going from my thumb across I have Mickey Mouse, Daffy Duck, Donald Duck, Minnie Mouse and Pluto. I personally think Donald turned out the best but I'm thrilled with the overall look. To create Mickey and Minnie Mouse I used Barry M Pinky Caramel as my base, Barry M Black, Sinful Colors Snow Me White, Barry M Coral for Minnie's bow and that same coral mixed with Barry M Strawberry Ice Cream for the mouths. Donald and Daffy Duck are done with Snow Me White as the base, Barry M Yellow for the beaks, Barry M Strawberry Ice Cream and Cobalt Blue for the bow and hat and that same blue mixed with white for the eyes. Finally on Pluto I used Butter London Bumster for the base colour and with a bit of black mixed in for the facial lines. I then used the same black and white as before and finished with Strawberry Ice Cream for the tongue. I know that was a lot of polishes but I think they're worth it. 


I want to thank Helena for asking me to do this post as I had so much fun doing this design and I hope you all like it as well!

21 septiembre 2013

Saturday Swatches

Hi Girls!
One of the new things that I am going to start doing here is a new section called Saturday Swatches, where I will start swatching my favourite polishes, or the ones that I think will be more interesting for you.
Today we are going to start with a pretty glitter from the Indie polish brand called Naild'it Unique Nail Polish.


Hola Chicas!
Una de las cosas nuevas que voy a comenzar a hacer por aquí es una nueva sección llamada Saturday Swatches, donde empezare a swatchear mis esmaltes favoritos, o los que me parezcan que son más interesantes para vosotros.
Hoy vamos a empezar con un glitter increíble de la marca de esmaltes Indie llamada Naild'it Unique Nail Polish.

Jellystone is a perfect mix of vivid fuchsia and aqua micro glitter, with tons of hex glitters in pink, purple, teal and silver, combined with bigger pink hex glitters and also tiny teal bars. If you love all kinds of glitters this is your DREAM polish!!


Jellystone es una mezcla perfecta de micro glitter fucsia y aqua, con toneladas de glitter hexagonal en rosa, morado, azul y plateado, combinado con glitter rosa grande y con mini barras de glitter. Si os gusta todo tipo de glitters este es el esmalte de tus SUEÑOS!!

I have to thank Alison for this beauty, because she sent me an enormous package full of Indie polishes as a gift, and this one was on the top of my list waiting until I could get some decent swatches to show you. I love how colourful it is, but still subtle in some way...


Tengo que agradecer a Alison esta maravilla, porque me mando como regalo un paquete enorme lleno de esmaltes Indie, y este estaba el primero de mi lista esperando a que pudiera hacer algunos swatches decentes para enseñároslo. Me encanta lo colorido que es, aun siendo discreto en cierto modo...

Here you can see all the different kinds of glitters... Glitter Party!! I decided to layer it over Kiko 383 making a gradient, and I wasn't at all disappointed with the colour combo! I think they are perfect for each other. The application was flawless, I didn't need to fish for the bigger glitters and I just needed one coat of Seche Vite to smooth it.


Aquí podéis ver todos los tipos de glitter... Glitter Party!! Decidí aplicarlo sobre Kiko 383 haciendo un degradado, y no me decepcionó la combinación de colores para nada! Creo que son perfectos el uno para el otro. La aplicación fue perfecta, no tuve que pescar los glitters más grandes y sólo necesité una capa de Seche Vite para alisarlo.

I hope you liked it, you can find Naild'it Unique Nail Polishes just clicking on their name, and I hope you will stay around waiting for the next Saturday Swatches!
See you ;)


Espero que os haya gustado, podeis encontrar los esmaltes de Naild'it Unique Nail Polish simplemente haciendo click en su nombre, y espero que os quedéis por aquí a la espea del siguiente Saturday Swatches!
Nos vemos ;)

09 septiembre 2013

Nail Wish is at The Clockwise Nail Polish

Hi!!
Today my nails are at The Clockwise Nail Polish blog! I am so excited!. I did some matching nails and keys and I also tried a gradient stamping for the first time, so if you are curious and want to see more images and know how I did it go to Cristina's blog!! See you there!


Hola!!
Hoy mis uñas están en el blog The Clockwise Nail Polish! Estoy tan emocionada! He hecho un conjunto de uñas y llave y también he probado por primera vez un estampado degradado, así que si sois curiosos y quereis ver más fotos y saber cómo lo hice id al blog de Cristina!! Nos vemos allí!


02 septiembre 2013

Guest Post: Spektor's Nails

Hi Everyone!!
I hope you all are having a good Monday! This week we are going to have more amazing guest posts just because I am still with lots of things to do and also I want you to know some of my favourite bloggers! Today is Judith's turn, she is the blogger behind Spektor's Nails and she is so amazing!

------------------------------------------------------------------------------------------------------------

I'm Judith from Spektor's Nails and I'm very excited to be a guest blogger for Helena! 
Obviously I wanted this post to be something very special, so I decided to combine the two things that I'm really fussy about at the moment: 

First, that is the Cheeky stamping plate called Viva Mexico (http://www.cheeky-beauty.com/cheeky-new-2013-collection-of-jumbo-nailart-polish-stamp-stamping-manicure-image-plates-accessories-set-kit-nail-art-jumbo-image-plate-1-viva-mexico/), which is such a beautiful plate! Second, that is the technique of making your own nail decals with stamped designs. 

So what I did is stamp three designs of the Viva Mexico plate onto a base of clear nail polish applied onto a plastic bag. Then I filled out the design with acrylic paint and covered it with another coat of clear nail polish. After letting it dry, I removed the nail polish decals with tweezers and applied them one by one onto a wet coat of white nail polish. This took me forever to do, but it was definitely worth the time! It's probably the most colorful design I ever had on my nails! 

Thank you for reading and thank you Helena for having me on your blog! :) 


28 agosto 2013

SummerNails Challenge #10: Helado/Ice Cream

Hej! (Hi in Swedish)
I am right now on Swedish lands and I am sure I am freezing!! Althought it is already summer... So this theme is not perfect for me right now... or yes because I would be becoming a giant popsicle!!


Hej! (Hola en Sueco)
Ahora mismo estaré en tierras Suecas y estoy segura de que me estaré congelando!! Incluso siendo verano... Así que este tema no es perfecto ahora mismo... o sí porque me estaré convirtiendo en un polo gigante!!

The day I made this little guys I was feeling super kawaii! hehe So here it is a fun manicure, I wore it for a whole week because I loved itand every time I looked at it it cheered me up.


El día que hice a estos pequeñajos me sentía muy kawaii! hehe Así que aquí teneis una manicura divertida, la llevé una semana entera porque me encantó, y cada vez que la miraba me levantaba la moral.

I started with a base of Yes Love Pastel Pink, and stamped with BM (insert number here soon!!) and finally I drew the popsicles with acrylic paints.


Comencé con una base de Yes Love Pastel Pink, y estampé con BM (Escribir número aquí pronto!!) y para terminar dibujé los politos con pinturas acrílicas.

I hope you enjoyed this manicure and the guest posts ones!! Tomorrow there will be a makeup look from the Pokemakeup Challenge and on Friday I will be back with more AMAZING GUEST BLOGGERS!!
Don't miss it!


Espero que os haya gustado la manicura y las de los guest posts!! Mañana habrá un look de maquillaje del Reto Pokemakeup y el Viernes volveré con más GUEST BLOGGERS INCREÍBLES!!
No os lo perdáis!

27 agosto 2013

Guest Post: Nail Polish Wars

Hi Girls!!
You can't imagine how excited I am to have Nicole from Nail Polish Wars here! I have been a long time follower and her work has always been a huge inspiration for me! I hope you enjoy with she has made for you.


Hola Chicas!!
No os podéis imaginar lo emocionada que estoy de tener aquí a Nicole de Nail Polish Wars! He sido una seguidora suya desde hace mucho tiempo y su trabajo siempre ha sido una gran ispiración para mi! Espero que disfruteis de lo que ha hecho para vosotros.

------------------------------------------------------------------------------------------------------------

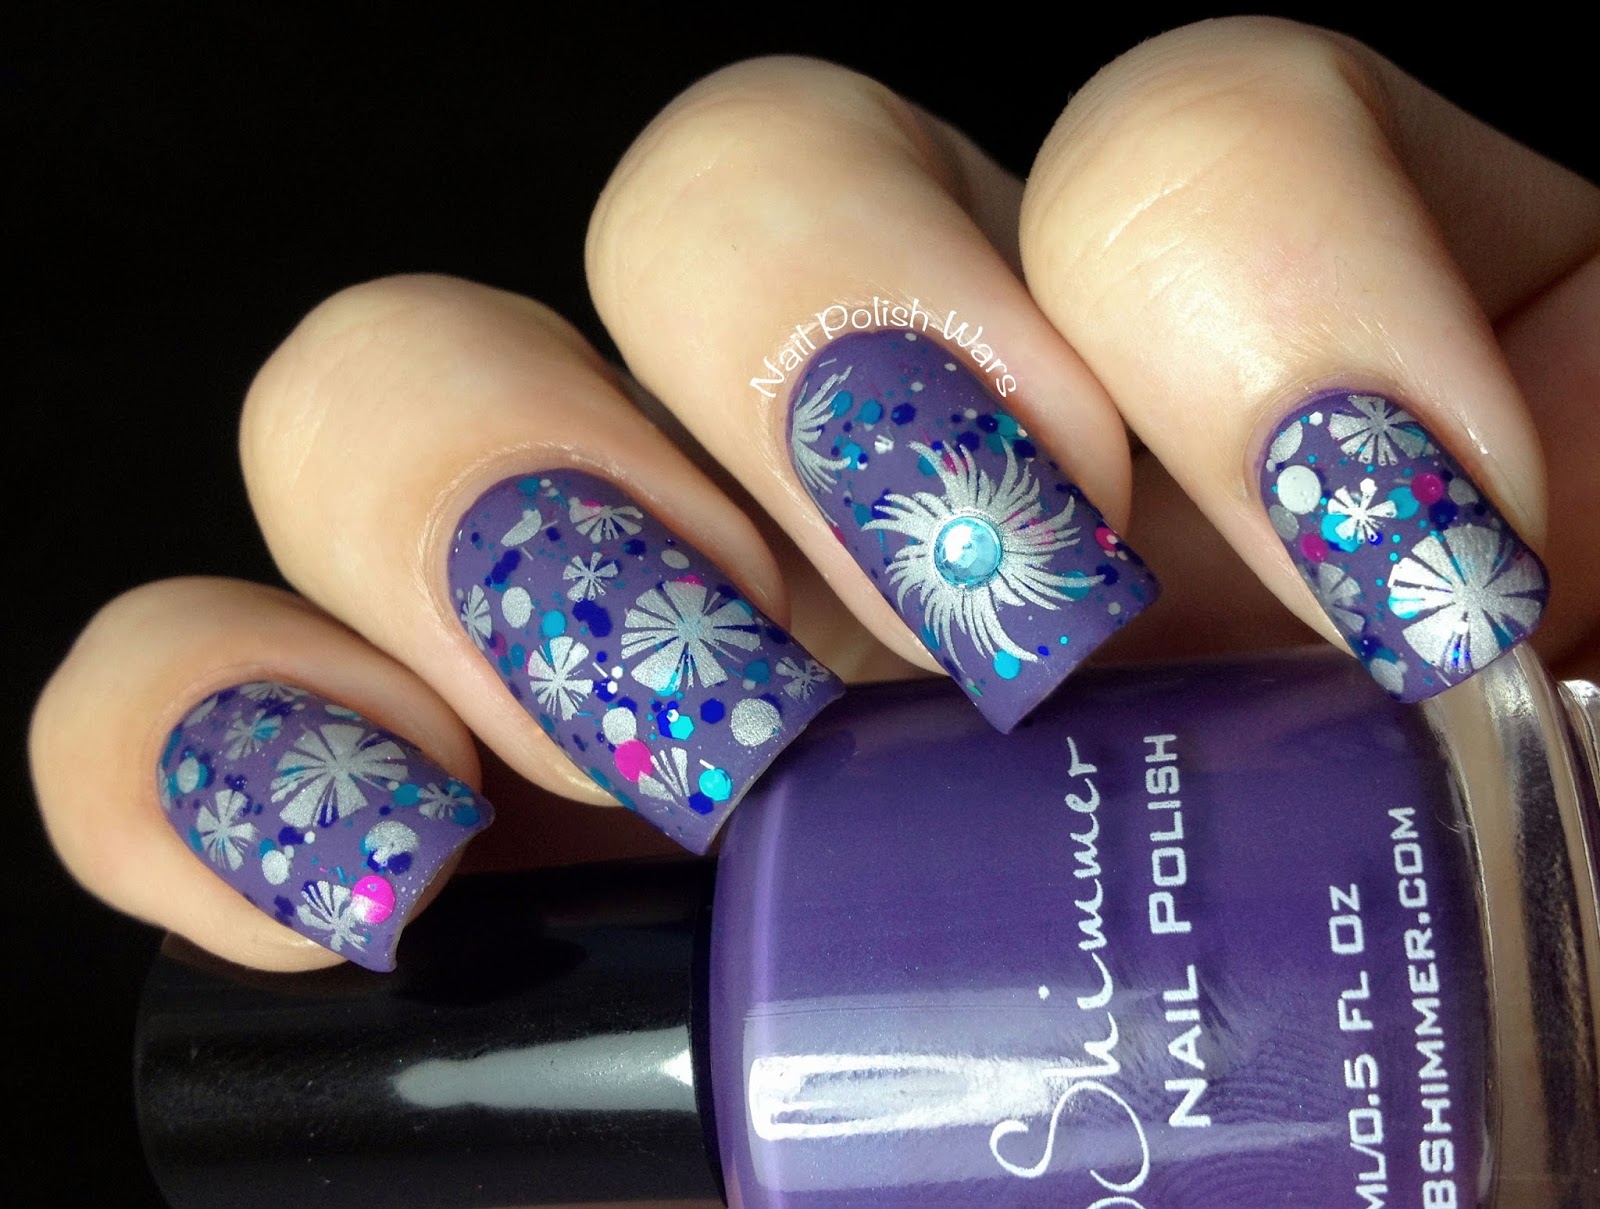
Hi everyone! I'm Nicole from Nail Polish Wars, and I'm so excited to be hanging out here at Nail Wish today!!

I started off with two coats of KBShimmer The Grape Beyond.

Next, I added one coat of KBShimmer Would Jubilee It?, a clear coat loaded with a gorgeous blend of multi-sized blue, teal, and bright pink dots and micro slices.  I followed with one coat of SV.

I paired Barry M Silver Foil with Shany plate SH04 for my ring fingers and Bundle Monster plate BM-213 for my other fingers.

I finished with one coat of Essie Matte About You top coat, and also added a pale blue rhinestone to my ring finger for a little something extra.

Not only do I love mattified glitters, but I also adore the matte silver as well.

I had so much creating this design, and I really hope you enjoyed seeing it as well.

Thanks so much for letting me hang out here at Nail Wish today!!  Happy Painting!

17 julio 2013

SummerNails Challenge 4: Sandía/Watermelon

Hi girls!!
This is a programmed post, so I should be sunbathing at the beach right now... But even being at the beach I am sure I am thinking about you all and I don't want you to miss one of the SummerNails Challenge days!! Today the inspiration is another fruit, my favourite fruit, watermelon!!


Hola chicas!!
Este es un post programado, así que ahora mismo deberia estar tomando el sol en la playa... Pero aun estando en la playa estoy segura de que estaré pensando en vosotros y no quiero que os perdais uno de los días de Reto SummerNails!!
Hoy la inspiración es otra fruta, mi fruta favorita, sandía!!
This is a special manicure for me, because it's the first time I make half moon nails! I never tried this design before because to rock the half moons you have to have very regular nails and mine weren't, but now they are better and I think they look great! I used Kiko 402, a pink holo, for the inside of the watermelon, and China Glaze Holly-Day for the watermelon rind. Everything else was made with acrylic paints.


Esta es una manicura especial para mi, porque es la primera vez que hago las uñas en media luna! Nunca he intentado este diseño antes porque para que las medias lunas queden bien hay que tener uñas muy regulares y las mías no lo eran, pero ahora están mejor y creo que quedan genial! He usado Kiko 402, un holo rosa, para la parte de dentro de la sandía, y China Glaze Holly-Day para la cáscara. Todo lo demás está hecho con pinturas acrílicas.
I love how the dulled holo polish (because of the topcoat) gives so much texture to the inside of the watermelon! See you next week with another SummerNails Manicure.


Me encanta como el esmalte holográfico sin el efecto holo (por culpa del topcoat) le da tanta textura a la parte de dentro de la sandía! Nos vemos la semana que viene con otra Manicura de SummerNails.

10 julio 2013

SummerNails Challenge 3: Fresas/Strawberries

Hi Girls!!
Another day of the SummerNails Challenge, we had to get inspired by strawberries and with the heat wave we are having in Seville the only thing I could think of was Strawberry Milkshake (Iced strawberry milkshake..... yummmmm!!!!)


Hola Chicas!!
Otro día más del Reto SummerNails, nos teníamos que inspirar en fresas y con la ola de calor que tenemos aqui en Sevilla lo único en lo que podía pensar era en Batido de Fresa (Batido de fresa helado... omnomnomnommmmm!!!)
The other day I went to a Chinese Store with my friends and we found some really interesting Yes Love Polishes with jelly base and black glitter, this pastel pink is Yes Love 700 and totally remind me to a strawberry milkshake with chocolate sprinkles. On the ring finger I used Flormar 310 as the base and Yes Love 700 inside the glass. All the details are made with acrylic paints.


El otro día fui a un chino con mis amigas y encontramos unos esmaltes de Yes Love muy interesantes con base jelly y glitter negro, este rosa pastel es el Yes Love 700 y me recuerda totalmente a un batido de fresas con pepitas de chocolate. En el dedo anular use Flormar 310 en la base y el Yes Love 700 dentro del vaso. Todos los detalles estan hechos con pinturas acrílicas.
I hope you liked it and if you are interested on the Yes Love Polishes we bought you can have a look on Mis Potingadas y Más, Xiito bought the entire collection and she has made some swatches ;).
See you soon!!


Espero que os haya gustado y si estais interesados en los esmaltes de Yes Love que compramos podeis echarle un vistazo en Mis Potingadas y Más, Xiito compró la colección completa y ha hecho algunos swatches ;)
Nos vemos Pronto!!

18 junio 2013

Born Pretty Store Glow in the Dark Polish

Hi Everyone!
While the Poke Makeup starts let's see some cool stuff that Born Pretty Store has sent me. This time I have one of their famous Fluorescent Neon Glow in the Dark Polishes. You can say What? Hadn't we seen enough Glow in the dark polishes on Halloween? Well you are right but, these polishes are not the usual glow in the dark polished because they glow in the colour of the nail polish.


Hola a todos!
Mientras comienza el Poke Makeup vamos a ver algunas cositas chulas que me ha enviado Born Pretty Store. Esta vez tengo uno de sus famosos esmaltes Fluorescentes Neon que brillan en la oscuridad. Podeis decir, ¿Qué? ¿No habíamos visto ya suficientes esmaltes glow en Halloween? Bueno, teneis razón pero, estos esmaltes no son los normales Glow in the dark, porque brillan en el color del esmalte.

Yes! I know you have seen this design before (and if you haven't just check this amazing post made by Lucy's Stash). I know hers is much better, but I loved how the glow made the design pop so much and look real 3D. To make this design I painted two coats of BK 10 and, following Copy That, Copy Cat's Tutorial, I painted the accent nails with acrylics.


Si! Ya sé que habeis visto este diseño antes (y si no lo conoceis pasaros por este post tan chulo hecho por Lucy's Stash). Está claro que el suyo está mejor, pero me encantó cómo el brillo hazo que el diseño destacara y pareciera tan 3D. Para hacer este diseño utilicé dos capas de BK 10 y , siguiendo el tutorial de Copy that, Copy Cat, dibujé las accent nails con acrílicos.

 On top of the white squares I used a Glow in the Dark topcoat, so you can see the difference between colours. The regular Glow in the Dark Topcoat glows with that yellow greenish colour of most Glow in the Dark Polishes, and BK 10 glows PINK!! It doesn't glow with a very strong light, but I have read that this colour is the least bright of the collection. Anyway the colour is amazing and I love it!


Encima de los cuadraditos blanco puse un Topcoat Glow in the Dark, así podeis ver la diferencia entre los colores. El Glow top coat normal brilla con esa luz amarillo-verdosa de la mayoria de esmaltes que brillan en la oscuridad, y el BK 10 brilla en ROSA!! No tiene un brillo muy fuerte, pero he leido que es el menos brillante de la colección. De todas formas es increíble y me encanta!

You can find more colours of this collection Here, and remember that, besides Born Pretty Store offers Free Worldwide Shipping, you can use my coupon code for 10% discount!! See you soon!!!


Podeis encontrar más colores de esta colección Aquí, y recordad que, a parte de que Born Pretty Store ofrece Envío Gratuito a todo el Mundo, podeis usar mi cupón con un 10% de descuento!! Nos vemos!!!


27 mayo 2013

Esmaltes Purple Professional

Hi there!!
Today I bring you a little bit different post, because a new brand of Nail Polish called Purple Professional sent me some polishes to show you, and I am really excited because I loved each one I received!
But first of all I want to talk a little about this brand: Purple Professional is a Portuguese Cosmetic brand that is expanding their business internationally, they care about the environment and make very good quality polishes, let's see it!


Hola a todos!!
Hoy os traigo un post un poco diferente, porque una marca nueva de Esmaltes llamada Purple Professional me ha enviado algunos esmaltes para enseñaros, y estoy muy contenta porque me han encantado cada uno de los que me han mandado!
Pero antes de nada os quiero hablar un pelin de la marca: Purple Professional es una marca de Cosmética Portuguesa que se está expandiendo de forma internacional, se preocuan por el medio ambiente y hacen esmaltes de muy buena calidad, vamos a verlo!

How cute is their packaging? I love they have their bottles decorated with little birds and dragonflies... The package reminds me a lot to Catrice Polishes, if it's not the same... Purple Professional's bottles contain 10 ml of nail polish and their brushes are flat with very good quality fibers.


A que es bonito su packaging? Me encanta que hayan decorado sus botes con pajaritos y libélulas... Los botes me recuerdan mucho a los esmaltes de Catrice, si no son los mismos.. Los esmaltes de Purple Professional contienen 10 ml y sus pinceles son planos y con fibras de buena calidad.

The only two things I would complain about these polishes are that some of their shades are really hard to photograph with accurate colour and that they don't have names, just numbers... This is number 39 an orangish coral colour, even if it looks a little bit pinker on the swatches.


Las dos únicas cosas sobre las que me quejaría de estos esmaltes serían que algunos tonos son muy complicados de fotografiar con con color fiel y que no tienen nombres, sólo números... Este es el número 39, un color coral anaranjado, aunque parezca un poco más rosa en los swatches.

This gorgeous colour is number 44. I have seen it described as a strong bubblegum neon pink, but it seems more neon bright purple to me, mostly when I compare it to the next shade they sent me...


Este color tan bonito es el número 44. Lo he visto descrito como un rosa chicle neón, pero a mi me parece más un morado claro neón, sobre todo cuando se compara con el siguiente tono que me enviaron...

This polish is the number 65, a bright neon pink, or a bubblegum pink in my opinion... It was the sheerest of all, because I used two coats for all the swatches and with this colour you can still see through.
I didn't use topcoat on any of the swatches, all the shine you see on the pictures is from the polish (So shiny on their own!) The formula and application were superb, no issues with bald spots or any kind of problems...


Este esmalte es el número 65, un rosa neón brillante, o en mi opinión un rosa chicle... Es el más transparente de todos, porque usé dos capas en todos los swatches y en este todavía se ve a través.
No utilicé topcoat en ninguno de los swatches, todo el brillo que se ve en las fotos es del esmalte (Son tán brillantes por sí solos!!) La fórmula y aplicación fueron impecables, sin problemas con huecos o ningún tipo de problema...

I'm sorry for the long post but, the first time I saw the three shades together I knew I had to do a neon gradient with them, I am really impatient for summer to come and this manicure helped me through it...


Lo siento por el post tan largo, pero la primera vez que vi los tres colores juntos supe que tenía que hacer un degradado neon con ellos, estoy muy impaciente por que llegue el verano y esta manicura me ayuda a superarlo...

At the top of this post I told you that Purple Professional is a brand that care about the environment, and I said it because the best thing about these polishes is that they are 5 FREE, this means that they don't use the next 5 dangerous substances as ingredients of their polishes:
- Toluene
- Formaldehyde
- Phthalates
- Camphor
- Formaldehyde Resin


Al principio del post os dije que Purple Professional es una marca que se preocupa por el medio ambiente, y lo dije porque lo mejor de estos esmaltes es que son 5FREE, esto significa que no utilizan las siguientes sustancias peligrosas como ingredientes de sus esmaltes:
- Tolueno
- Formaldehido
- Ftalatos
- Camphor
- Resina de Formaldehido

Of course I wanted to finish the review with some nail art, using the neon gradient as the base. To make it I first applied one coat of Flormar 400, because when you want your neon colours to really pop it's better to use a white base underneath. Then I made the gradient with a make up sponge and drew the stars by hand with my Black Sharpie Marker.
I hope you liked it!!


Por supuesto tenía que terminar el review con algo de nail art, usando el degradado neon como base. Para hacerlo primero apliqué una capa de Flormar 400, porque cuando quieres que los colores neon resalten es mejor usar una base blanca debajo. Luego hice el degradado con una esponja de maquillaje y dibujé las estrellas a mano con mi Rotulador Negro Permanente.
Espero que os haya gustado!!

16 mayo 2013

Seven Deadly Sins Challenge Day 8: Sloth

Hi Girls!
I told you a few days ago that I feel very identified with the Sin Gluttony, but if I had to choose a sin it would be Sloth... I'm not proud of it, but I just looove to sleep or spend an entire afternoon just doing nothing!
The prompt for today says: "Create a manicure inspired on your laziness... or whatever... I'm so tired..." And this is how I felt yesterday... I didn't want to paint my nails, so I decided to do something quick and I remembered I had to swatch my new Loreal Confetti topper...


Hola Chicas!
Ya os dije hace unos días que me sentía muy identificada con el Pecado Gula, pero si tuviera que escoger un pecado sería el de la Pereza... No estoy muy orgullosa de ello pero esque me encaaanta dormir o pasar una tarde entera sin hacer absolutamente nada!
Las intrucciones de hoy dicen: " Crea una manicura inspirada en tu vagancia... o lo que sea... estoy demasiado cansada..." Y así es justo como me sentía ayer... No quería pintarme las uñas así que decidí hacer algo rápido y recordé que tenía que swatchear mi nuevo topper Loreal Confetti...

I also decided to do some stamping because it's an easy way to get a full nail design... Lazy me... I know sometimes stamping it's not lazy at all because sometimes it's really hard, but you know I usually make my own drawing with acrylic paints, so this is lazy for me...
To make this manicure I used Claire's 137 as the base and applied two coats of Loreal Confetti on my middle finger and pinky, no need of fishing or placing at all. Then I stamped with China Glaze Magical from the Romantique's Collection with BM-310 on my index finger and with BM-215 on my ring finger.


También decidí hacer algo de estampación porque es una forma fácil de conseguir un diseño de uña completo... que vaga... Ya sé que estampar no es siempre de vagos porque a veces es una tecnica dificil, pero ya sabeis que normalmente yo hago mis propios dibujos con pinturas acrílicas, así que para mí si es que soy una vaga...
Para hacer esta manicura he utilizado Claire's 137 como base y he aplicado dos capas de Loreal Confetti en mi dedo corazón y el meñique, sin necesitar pescar o recolocar los glitters. Luego estampé con China Glaze Magical de la Colección Romantique, con BM-310 en el dedo índice y con BM-215 en el anular.

It took me less that half an hour to make it, and I used Seche Vite on top, so in less than two minutes was completely dried. I hope you liked and that you are enjoying this challenge so far because we have already done half of it!!
See you, pretties!!


Tardé menos de media hora en hacerla, y utilicé Seche Vite encima, así que en menos de dos minutos estaba completamente seca. Espero que os haya gustado y que esteis disfrutando el Reto hasta ahora, porque ya hemos hecho la mitad!!
Nos vemos preciosidades!!

25 abril 2013

Seven Deadly Sins Challenge Day 2: Lust

Hi Girls!
Yay! I'm so excited with this challenge that I'm even going ahead! Being responsible and stuff... doing all the manicures before the posting date... I hope I will keep doing it until the end because you all know how I am always late when I have to do a challenge.
Well, the second prompt for Lust says: "Let your body talk and feel free to do whatever you want" so I did something more Lust Inspired...


Hola Chicas!
Yay! Estoy tan emocionada con este reto que voy incluso por delante! Siendo responsable y eso... haciendo todas las manicuras antes de la fecha de subirlas... Espero seguir así hasta el final porque ya sabeis como siempre voy tarde cuando estoy con un reto.
Bueno, las segundas instruciones de Lujuria dicen: "Deja te tu cuerpo te guíe y siéntete libre de hacer lo que quieras" así que he hecho algo más inspirado en la Lujuria...


Corsets! The first time I saw THIS Robin Moses' Design I knew someday I will do something inspired on it... And I love the result, although when I did these nails I had short nails I thought they looked really good, and I also was really happy because I could use my new Silver Acrylic Paint for the first time!


Corsets! La primera vez que vi ESTE Deseño de Robin Moses supe que algún día haría algo inspirado en él... Y me encanta el resultado, aunque cuando hice estas uñas las tenía cortas pensé que quedaban muy bien, y también estaba muy contenta porque pude usar mi Pintura Acrílica Plateada por primera vez!


Here you can see it on full detail with this macro shot. I first applied one coat of Yves Rocher Pastel Brillance, then, with a stripping brush and brown acrylic watered down, I made the lines for the background. The next thing was to freehand the corset with black, white, pink and silver acrylics. Finally I topped everything with one coat of Seche Vite.


Aquí podeis verlo a todo detalle con esta foto macro. Primero apliqué una capa de Yves Rocher Pastel Brillance, luego, con un pincel delineador y acrílica marrón reabajada con agua, hice las líneas del fondo. Lo siguiente fue dibujar a mano el corset con pintura acrílica negra, blanca, rosa y plateada. Finalmente lo cubrí todo con una capa de Seche Vite.


When I tried the silver acrylic I had a feeling and started playing mixing it with other colours, and it seems that if you do that every colour would turn into it's pearl shade! For example: Pink + Silver = Pearl Pink, or White + Silver = Pearl White!! I can't wait to try other colour combinations and see what I can do with them...


Cuando probé el acrílico plateado tuve una corazonada y comencé a jugar mezclandolo con otros colores, y parece que si lo haces cada color se convierte en su propio tono perlado! Por ejemplo: Rosa + Plateado = Rosa Perlado, o Blanco + Plateado = Blanco Perlado!! No puedo esperar para probar otras combinacines de colores y ver que puedo hacer con ellas...


Last pic I promise!! Haha, I hope you are enjoying the challenge, we have already lots of amazing manicures! Just have a look through all the links below!
See you!


Última foto, lo prometo!! Jaja, espero que esteis disfrutando del reto, ya tenemos muchas manicuras increíbles! Solo tienes que echar un vistazo a los links de abajo!
Nos vemos!

23 abril 2013

Seven Deadly Sins Challenge Day 1: Lust


Hi Girls!!
I am so excited today because we are on the first day of a Challenge created by me and with the help of the amazing Alice from OneNailToRuleThemAll (OMG I love her blog name!!!!!). We will be posting one or twice a week (depends on how busy we are) during seven weeks  to make the Seven Deadly Sins. We are are going to be a good number of amazingly talented bloggers (that gives me a lot of fangirl moments) and I hope you enjoy it as much as we are going to do it. Also I forgot to say that the beautiful girls that represent each of the Deadly Sins on our Logo, Instructions and Banners are made by the amazing DeviantArt Artist called Dahlig.


Hola Chicas!!
Hoy estoy muy emocionada porque estamos en el primer día de un Reto creado por mi y con la ayuda de la inreíble Alice de OneNailToRuleThemAll (OMG me encanta su nombre del blog!!!!). Vamos a publicar una o dos veces a la semana (dependiendo de lo ocupada que esté cada una) durante siete semanas para hacer los Siete Pecados Capitales. Somos un buen número de bloggers con talentos increíbles (que me da muchos momentos de fangirl) y espero que lo disfruteis tanto como lo vamos a hacer nosotras. También tengo que decir que se me ha olvidado contaros que las chicas tan guapas que representan cada uno de los Pecado Capitales en nuestro Logo, Instrucciones y Banners están hechas por la Artista de DeviantArt llamada Dahlig.


We are going to start with Lust and the first prompt of the challenge says: "Be a bad girl and make something you have wanted to do soo badly". So I decided to make quilted nails! I had always loved this look because it's elegant and eye catching, but it looked really complicated and I never tried it... So, today is the day! I followed DullLikeGlitter's Tutorial and I used Yes Love Pastel Pink and Essence Matte TopCoat. Then I stick silver beads to every joint.


Vamos a empezar con Lujuria y la primera intrucción del reto dice: "Se una chica mala y haz algo que hayas querido hacer desde hace muucho tiempo". Así que decidí hacer uñas acolchadas! Siempre me ha encantado este look porque es muy elegante y llamativo, pero parecía muy complicado de hacer y nunca lo había intentado... Así que, hoy es el día! He seguido el Tutorial de DullLikeGlitter y he utilizado Yes Love Pastel Pink y Essence Matte TopCoat. Luego pegué las bolitas de caviar plateadas en cada unión.


I loved how it looked, even it's not perfect because in some places I pressed too hard and you can see my nail through the polish... I think the nail that looks better is the ring finger because the squares are perfect and the have that quilted look that I love!
I hope you like it too and don't forget this week would be another manicure inspired on Lust, and I promise the next one would be more accurate with the sin....


Me encantó como quedó, incluso aunque no esté perfecta porque en algunos sitios presioné demasiado fuerte y se puede ver mi uña a través del esmalte... Creo que la uña que mejor está es la del dedo Corazón porque los cuadrados están perfectos y tiene ese aspecto acolchado que me encanta!
Espero que os guste también y no os olvideis de que esta semana habrá otra manicura inspirada en la Lujuria, y os prometo que la próxima será más adecuada al pecado...
Related Posts Plugin for WordPress, Blogger...