Hello girls!
Since I don't have time anymore for being 2-3-4 hours sitting, planning and painting manicures I had to figure out some ways to make some easy but elegant manicures for work using "not so usual" materials. Do you want to see how I made this one? Keep reading!
Hola chicas!
Como ya no tengo tiempo para estar 2-3-4 horas sentada, planeando y pintando mis uñas he tenido que averiguarmelas para hacer manicuras extra rapidas pero elegantes para trabajar utilizando materiales "no muy normales". ¿Quereis ver como he hecho esta? Seguid leyendo!
Mostrando entradas con la etiqueta BornPretty. Mostrar todas las entradas
26 enero 2017
101 Quick manicure
Etiquetas:
Black,
BornPretty,
Dotting,
Gel,
Madam Glam,
Manicuras,
Nude,
OPI,
Studs
26 agosto 2014
Dots! Dots! Dots!
Hi Girls!
This is a fun manicure I have been wanting to do for a while. I have already said a few times on this blog that I love the look of decorations over nude nails and a glossy finish like gel manicures, and now that my nails are super short because they are breaking all the time!! this design seemed perfect to try.
Hola Chicas!
Esta es una manicua divertida que he estado queriendo hacer durante un tiempo. Ya he dicho algunas veces en este blog que me encanta como quedan las decoraciones sobre las uñas sin nada y con un acabado glossy, como las manicuras de gel, y ahora que mis uñas están tan cortas ¡porque se rompen todo el rato! este diseño me pareció perfecto.
29 julio 2014
Cute in Blue
Hi Girls, (and boys if you are over here too)!
I was feeling a little bit down so, what is better than an old movie, some ice cream and paint your nails all at once? So while watching My Fair Lady and eating too much vanilla ice cream I created this super cute skittle design.
Hola Chicas, (y chicos si también estais por aquí)!!
Me sentía un poco de bajón así que, ¿qué mejor que una peli antigua, helado y pintarse las uñas todo a la vez? Así, viendo My Fair Lady y comiendo demasiado helado de vainilla hice este diseño super mono.
Etiquetas:
Blue,
BornPretty,
DependNP,
Dotting,
Essie,
Fimo,
Flakies,
Glitter,
Grey,
Guylond,
Holographic,
Manicuras,
Polish Addict,
Review,
Texture
01 febrero 2014
Snow Is Finally Here!
---------------------------------------------------------------------------------------------------------------------------------------------------
Hi Girls!!
Back to the routine in February, I hope this month would be less hectic and fuller of updates and manicures, but I also want to say that I might expand the blog a little bit talking about other Beauty related things, as I have already been doing. I hope you can understand that, as much as I love nails, I am not a one-dimensional girl and I like a lot of stuff that I also want to share with you! But today we have a nail related post so... Enjoy!
Hola Chicas!!
De vuelta a la rutina en Febrero, espero que este mess sea menos frenético y más lleno de updates y manicuras, pero también quiero contaros que tal vez expanda un pelin el blog hablando de otros temas relacionados con la Belleza, como ya he estado haciendo. Espero que comprendais que, aunque me encanten las uñas, no soy unidimensional y me gustan muchas otras cosas que quiero compartir con vosotras! Aun así hoy tenemos un post de manicura así que... Disfrutadlo!
Hi Girls!!
Back to the routine in February, I hope this month would be less hectic and fuller of updates and manicures, but I also want to say that I might expand the blog a little bit talking about other Beauty related things, as I have already been doing. I hope you can understand that, as much as I love nails, I am not a one-dimensional girl and I like a lot of stuff that I also want to share with you! But today we have a nail related post so... Enjoy!
Hola Chicas!!
De vuelta a la rutina en Febrero, espero que este mess sea menos frenético y más lleno de updates y manicuras, pero también quiero contaros que tal vez expanda un pelin el blog hablando de otros temas relacionados con la Belleza, como ya he estado haciendo. Espero que comprendais que, aunque me encanten las uñas, no soy unidimensional y me gustan muchas otras cosas que quiero compartir con vosotras! Aun así hoy tenemos un post de manicura así que... Disfrutadlo!
30 diciembre 2013
Crumpet's Christmas Winter Challenge #8: New Year's Eve
Hi Girls!
Finally this is the last day of this year's Christmas Challenge, and as usual this last manicure is about New Year's Eve and I knew I wanted to do something special.
Hola Chicas!
Finalmente hoy es el último día del Reto de Navidad de este año, y como es normal esta última manicura es sobre Nochevieja y ya sabía que quería hacer algo especial.
Etiquetas:
BornPretty,
Crumpet Winter Challenge,
Flormar,
Glequins,
Green,
Manicuras,
Red
12 diciembre 2013
Crumpet's Christmas Winter Challenge #3: Holiday Colours
Hello Girls!
Christmas is getting nearer and this challenge is also moving forward and I am liking every day of it! Today I have made a skittle manicure (all nails different but forming a cohesive whole) with my favourite Holiday Colours, white, green, red, golden, silver and black, did I miss any? haha
Hola Chicas!
La Navidad se va acercando y este reto tambien va cogiendo carrerilla y me están gustando cada uno de los días! Hoy he hecho una manicura skittle (todas las uñas diferentes formando un unico conjunto) con mis Colores de Fiesta favoritos, blanco, verde, rojo, dorado, plateado y negro, se me olvida alguno? jaja
The perfect holiday manicure! On my Index Finger I have used a base of China Glaze Holly Day and then topped it with Yes Love Snow Flack 17. The Middle and Ring Fingers have Flormar 310 as the base, but the first one has stripes made with Wynie 302 and BPS Striping Tape; and the second one has different sized dots made with China Glaze Passion. Last, but not least, we have Kiko Starry Black one of the polishes from the Sugar Matt Collection that is an exact dupe for Zoya Pixie Dust Dahlia.
Es la manicura de Navidad perfecta! En mi dedo Índice he utilizado como base China Glaze Holly Day y encima Yes Love Snow Flack 17. Los dedos Corazón y Anular llevan Flormar 310 de base, pero el primero tiene líneas con Wynie 302 y Stipping Tape de BPS; y el segundo puntos de diferentes tamaños hechos con China Glaze Passion. Por último, tenemos Kiko Starry Black, uno de los esmaltes de la Colección Sugar Matt que es un clon exacto de Zoya Pixie Dust Dahlia.
I think my favourite nail is the index, I really like that Yes Love topper and pairing it with Holly Day was a terrific combination! Also I have seen so many times textured polishes used for accent nails and I have never tried it until now, and I think I like it, although texture is not what I really like to feel on my nails...
Creo que mi uña favorita es la ïndice, me encanta ese topper de Yes Love y juntarlo con Holly Day hizo una combinación genial! Además he visto tantas veces los esmaltes con textura como accent nails y nunca lo había intentado hasta ahora, creo que me gusta, aun sabiendo que textura no es lo que más me gusta sentir en las uñas...
Overall I am very happy with how this manicure turned out. What do you think?
See you soon!!
En general estoy muy contenta con como ha salido esta manicura. ¿Qué pensais vosotros?
Nos vemos pronto!!
06 diciembre 2013
Crumpet's Christmas Winter Challenge #1: White Christmas
Hi everyone!!
I am finally back, I have had a few rough weeks but now I am finally on holidays! Another reason why disappeared is that I am having some issues with the new template, because it's interfering with blogger in some way and my posts don't get published on the Blogger Reading Board from where most of you get the notifications from my blog... and I am still trying to figure out what is the problem...
Today is the first day of this year's Winter challenge, I hope you like it because, although it is the Crumpet's Nail Tarts Challenge, I made the themes and the banner (Which you can see on the Facebook group)
Hola a todos!!
Ya estoy de vuelta, he tenido unas semanas estresantes pero ya estoy de vacaciones! Otra razon por la que desaparecí es que estoy teniendo problemas con la plantilla nueva, esta interfiriendo con Blogger de alguna forma y los posts no se publican en la lista de lectura desde la que la mayoria de vosotros recibis las notificaciones del blog... y todavia estoy intentando averiguar cual es el problema...
Hoy es el primer día del Winter Challenge de este año, espero que os guste porque, aunque es el reto de Crumpet's Nail Tarts, yo he hecho los temas y el banner (Que podeis ver en el grupo de Facebook)
Etiquetas:
BornPretty,
Crumpet Winter Challenge,
DependNP,
Flakies,
Grey,
Manicuras,
Review,
Stamping,
Teal,
White
20 noviembre 2013
Neon in Darkness
Hi Everyone!!
I wanted to give you a little break from all the reviews so that's why we are having so much nail art these days. I really needed this also It has been quite a long time since I had been without having reviews to do or challenges, just nail art for pleasure.
Hola a Todas!!
Os quería dar un descanso de todas las reviews que he estado haciendo y por eso hemos estado teniendo tanto nail art estps dias. Realmente me hacía falta a mi tambien, hace ya bastante tiempo que no habia estado sin tener que hacer reviews o retos, solo nail art por placer.
18 noviembre 2013
Beetle Shells
Hi Girls!
This is going to be a quick post just to show you s little bit of Nail Art I did this weekend.
Hola Chicas!
Este va a ser un post cortito, solo para enseñaros este Nail Art que hice en el fin de semana.
This is going to be a quick post just to show you s little bit of Nail Art I did this weekend.
Hola Chicas!
Este va a ser un post cortito, solo para enseñaros este Nail Art que hice en el fin de semana.
Etiquetas:
Black,
Blue,
BornPretty,
China Glaze,
DependNP,
Free Hand,
Golden,
Green,
Manicuras,
Metallic,
Rhinestones,
Studs
03 noviembre 2013
Nail Wish is at Polished Elegance!
Hi Girls!
I'm really excited because today's post is at Polished Elegance! Do you remember Lisa and the amazing Nail Art she did for you at the end of August? Well, this time is my turn and I did these elegant nails just for her and her followers, so if you want to see more pictures of it, rush to her blog!
Hola Chicas!
Estoy super emocionada porque el post de hoy está en Polished Elegance! Os acordais de Lisa y el Nail Art tan increíble que hizo para vosotros a finales de Agosto? Bueno, esta vez me toca a mí y he hecho esta manicura tan elegante solo para ella y sus seguidores, así que si quereis ver más fotos, corred a verlo en su blog!
I'm really excited because today's post is at Polished Elegance! Do you remember Lisa and the amazing Nail Art she did for you at the end of August? Well, this time is my turn and I did these elegant nails just for her and her followers, so if you want to see more pictures of it, rush to her blog!
Hola Chicas!
Estoy super emocionada porque el post de hoy está en Polished Elegance! Os acordais de Lisa y el Nail Art tan increíble que hizo para vosotros a finales de Agosto? Bueno, esta vez me toca a mí y he hecho esta manicura tan elegante solo para ella y sus seguidores, así que si quereis ver más fotos, corred a verlo en su blog!
Etiquetas:
Beads,
Black,
BM214,
BornPretty,
Bundle Monster,
Deliplus,
Essie,
Flakies,
Kiko,
Manicuras,
Nude,
Rhinestones,
Stamping,
Studs
01 noviembre 2013
Stickers from Born Pretty Store
Hi Girls!!
I know yesterday was Halloween and I didn't posted my Halloween costume, but the thing is that here all the Halloween parties start today because of college, so I will do that tomorrow!! Today I brig you some awesome Stickers from Born Pretty Store.
Hola Chicas!
Ya sé que ayer fue Halloween y no subí mi disfraz de Halloween, pero lo que pasa es que aquí todas las fiestas de Halloween comienzan hoy por culpa de la universidad, así que lo subiré mañana!! Hoy os traigo unas Pegatinas de Born Pretty Store.
Etiquetas:
BornPretty,
Catrice,
Manicuras,
Nude,
Pink,
Review,
Stickers,
Yves Rocher
17 octubre 2013
Born Pretty Store Neon Studs
Hi Girls!!
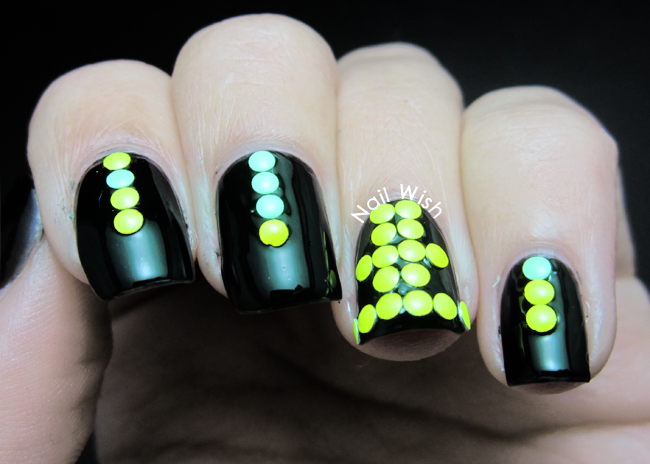
It just started snowing here at Umeå, so before we are all covered up in snow and ready for Halloween, winter and all that stuff I wanted to show you a more colourful manicure I did using the new Neon Studs from Born Pretty Store. You will find more about them after the jump!
Hola Chicas!!
Acaba de empezar a nevar aquí en Umeå, así que antes de que estemos cubiertos de nieve y listos para Halloween, invierno y todo eso os quería enseñar una manicura más colorida que hice usando los nuevos Studs Neon de Born Pretty Store. Podréis ver más sobre ellos tras el salto!
22 septiembre 2013
BornPretty Store Stripping Tape
Hi Girls!
Today I want to show you a new nail art item from BornPretty Store. I have been wanting to try the stripping tape for so long... and I finally have it!!
Hola Chicas!
Hoy os quiero enseñar otro producto de nail art de BornPretty Store. Llevo queriendo probar los stripping tape tanto tiempo... y por fin es mío!!
Source: BornPretty Store
They have a lot of colours to choose from, and I asked for #27 Laser Silver Grey.
I wanted to show you the multiple things you can do with the stripping tape, so I made a skittle manicure, a skittle mani is one where all the nails are different but form a cohesive whole, this time all designs have been made with the same pallet of colours and also using stripping tape.
Tienen muchos colores entre los que escoger, y yo pedí el #27 Laser Silver Grey.
Os quería enseñar todo lo que podéis hacer con el stripping tape, así que he hecho una manicura Skittle, una manicura Skittle es en la que todas las uás son diferentes pero forman un conjunto cohesionado, esta vez todos los diseños están hechos con la misma paleta de colores y usando el stripping tape.
The first nails is the easiest one, just one coat of Yes Love Pastel Purple and a geometric design on top using the tape. The middle is a colour block design with Yes Love Pastel Purple, Flormar 400 and Easy Paris 402.
La primera uña es la más sencilla, simplemente una capa de Yes Love Paste Purple yun diseño geométrico usando el stripping tape. El del dedo corazón es un diseño colour block con Yes Love Pastel Purple, Flormar 400 y Easy Paris 402.
The rest of the nails is what you can do painting on top of the tape and removing it later, on the ring finger we have a gradient from light to dark purple where I placed the stripes and removed after I had done the gradient on top, and finally on the last nail I did he same, painted one coat of Yes Love pastel Purple, placed the tape making stripes and applied one coat of Flormar 400 on top, and before it was dry I removed the stripes showing the colour from underneath.
El resto de las uñas es lo que puedes hacer pintando encima del celo y retirándolo luego, en el dedo anular tenemos un degradado de morado claro a oscuro donde coloqué las tiras y las retiré tras haber hecho el degradado encima, y finalmente, en la última uña hice lo mismo, pinté una capa de Yes Love Pastel Purple, coloqué el celo haciendo líneas y apliqué una capa de Flormar 400 encima, y antes de que estuviera seco retiré las tiras dejando ver el color de debajo.
I hope you liked it! The design took me no longer than 20 min, so it's a good solution for when you don't have time to make something difficult but you don''t want to wear plain nails. Remember that you can find a lot of different stripping tape Here, and that you can use my Coupon Code to get 10% discount!!
See you soon!
Espero que os haya gustado! El diseño no me llevó más de 20 min, así que es una buena solución para cuando no hay tiempo de hacerse algo complicado pero no queremos llevar las uñas lisas. Recordad que podeis encontrar muchos tipos de stripping tape Aquí, y que podéis usar mi Cupon para tener un 10% de descuento!!
Nos vemos pronto!
Etiquetas:
BornPretty,
Easy Paris,
Flormar,
Gradient,
Manicuras,
Purple,
Review,
Tape,
White,
Yes Love
21 agosto 2013
SummerNails Challenge #9: Barcos/Boats
Hi Girls!!
Today I almost forgot about the SummerNails Challenge!! The theme for today is Boats! I wasn't feeling like painting a boat on my nails, so I decided to make some nautical nails instead.
Hola Chicas!
Hoy casi se me olvida el Reto Summer Nails!! Es tema de hoy es Barcos! No me apetecía pintar barquitos en las uñas, así que decidí hacer unas uñas nauticas.
I first applied two coats of Flormar 400 and waited until it was completely dry. While I was waiting I cut two stripes of tape for each finger and then placed them on the nails. On top I made a gradient with Flormar 400 and Kiko 336 and removed the tape.
Primero apliqué dos capas de Flormar 400 y esperé hasta que estuvo completamente seco. Mientras esperaba fui cortando dos tiras de celo para cada dedo y luego las coloqué en las uñas. Encima hice un degradado con Flormar 400 y Kiko 336 y retiré las tiras de celo.
As you can see on the ring finger I made the gradient backwards and placed some round golden studs from Born Pretty Store making an anchor shape.
Como podeis ver en el dedo anular hice el degradado al contrario y coloqué algunas tachuelas redondas doradas de Born Pretty Store haciendo un ancla.
I loved this manicure so much that I wore it for a whole week!! I hope you liked it too.
Me gustó esta manicura tanto que la llevé durante una semana entera!! Espero que os haya gustado a vosotros también.
Today I almost forgot about the SummerNails Challenge!! The theme for today is Boats! I wasn't feeling like painting a boat on my nails, so I decided to make some nautical nails instead.
Hola Chicas!
Hoy casi se me olvida el Reto Summer Nails!! Es tema de hoy es Barcos! No me apetecía pintar barquitos en las uñas, así que decidí hacer unas uñas nauticas.
I first applied two coats of Flormar 400 and waited until it was completely dry. While I was waiting I cut two stripes of tape for each finger and then placed them on the nails. On top I made a gradient with Flormar 400 and Kiko 336 and removed the tape.
Primero apliqué dos capas de Flormar 400 y esperé hasta que estuvo completamente seco. Mientras esperaba fui cortando dos tiras de celo para cada dedo y luego las coloqué en las uñas. Encima hice un degradado con Flormar 400 y Kiko 336 y retiré las tiras de celo.
As you can see on the ring finger I made the gradient backwards and placed some round golden studs from Born Pretty Store making an anchor shape.
Como podeis ver en el dedo anular hice el degradado al contrario y coloqué algunas tachuelas redondas doradas de Born Pretty Store haciendo un ancla.
I loved this manicure so much that I wore it for a whole week!! I hope you liked it too.
Me gustó esta manicura tanto que la llevé durante una semana entera!! Espero que os haya gustado a vosotros también.
Etiquetas:
Blue,
BornPretty,
Flormar,
Gradient,
Kiko,
Manicuras,
Studs,
SummerNails Challenge,
White
17 agosto 2013
Born Pretty Comiss Yogurt Series Nail Polish
Hi Everyone!!
Today I am here to show you some swatches of one of the amazing nail polishes from the Born Pretty Store Yogurt Series. I have been wanting to try these polishes for a long time because they are glitter sandwiches! You can see and buy the whole collection Here.
Hola a todos!!
Hoy estoy aquí para enseñaros algunos swatches de uno de los bonitos esmaltes de la colección Yogurt Series de Born Pretty Store. Llevo queriendo probar estos esmaltes desde hace mucho tiempo porque son glitter sandwiches! Podeis ver y comprar la colección completa Aquí.
This is number #17, a jelly vanilla base with medium hex glitters in yellow and red, it also has silver micro glitter, as you can see on the bottle that gives a subtle sparkle to the nails. This shows two coats over Yes Love Pastel Yellow on the index and ring nails, and three coats on it's own on middle and pinky nails.
Este es el número #17, una base jelly color vainilla con glitter hexagonal de tamaño mediano en color amarillo y rojo, también lleva micro glitter plateado, como podéis ver en el bote, que le da un brillo discreto a las uñas. En esta foto vemos dos capas sobre Yes Love Pastel Yellow en las uñas índice y anular, y tres capas solo en las uñas corazón y meñique.
There was no need of glitter fishing or placing, and they lay perfectly flat. I personally prefer layering it over a yellow base because with three coats it started to get thick and the nail line was still a bit visible.
No hizo falta pescar o recolocar los glitters, y se colocaron totalmente planos. A mí personalmente me gusta más ponerlo sobre la base amarilla porque con tres capas comenzaba a quedar grueso y la línea de la uña aún se podía ver.
I decided to do some nail art on top, do you remember this little guy? It's Leafeon, the Pokemon I chose for This Makeup Look! I hope you liked it and I really recommend that you go and have a look around the other gorgeous shades of this collection and remember that you have a 10% discount if you use my code!
Decidí hacer algo de nail art encima, ¿os acordais de este pequeño? Es Leafeon, el Pokémon que escogí para este Look de Maquillaje! Espero que os haya gustado y de verdad os recomiendo que le echeis un vistazo a los demás tonos de esta colección, y recordad que tenéis un 10% de descuento si usais mi código!
Today I am here to show you some swatches of one of the amazing nail polishes from the Born Pretty Store Yogurt Series. I have been wanting to try these polishes for a long time because they are glitter sandwiches! You can see and buy the whole collection Here.
Hola a todos!!
Hoy estoy aquí para enseñaros algunos swatches de uno de los bonitos esmaltes de la colección Yogurt Series de Born Pretty Store. Llevo queriendo probar estos esmaltes desde hace mucho tiempo porque son glitter sandwiches! Podeis ver y comprar la colección completa Aquí.
This is number #17, a jelly vanilla base with medium hex glitters in yellow and red, it also has silver micro glitter, as you can see on the bottle that gives a subtle sparkle to the nails. This shows two coats over Yes Love Pastel Yellow on the index and ring nails, and three coats on it's own on middle and pinky nails.
Este es el número #17, una base jelly color vainilla con glitter hexagonal de tamaño mediano en color amarillo y rojo, también lleva micro glitter plateado, como podéis ver en el bote, que le da un brillo discreto a las uñas. En esta foto vemos dos capas sobre Yes Love Pastel Yellow en las uñas índice y anular, y tres capas solo en las uñas corazón y meñique.
There was no need of glitter fishing or placing, and they lay perfectly flat. I personally prefer layering it over a yellow base because with three coats it started to get thick and the nail line was still a bit visible.
No hizo falta pescar o recolocar los glitters, y se colocaron totalmente planos. A mí personalmente me gusta más ponerlo sobre la base amarilla porque con tres capas comenzaba a quedar grueso y la línea de la uña aún se podía ver.
I decided to do some nail art on top, do you remember this little guy? It's Leafeon, the Pokemon I chose for This Makeup Look! I hope you liked it and I really recommend that you go and have a look around the other gorgeous shades of this collection and remember that you have a 10% discount if you use my code!
Decidí hacer algo de nail art encima, ¿os acordais de este pequeño? Es Leafeon, el Pokémon que escogí para este Look de Maquillaje! Espero que os haya gustado y de verdad os recomiendo que le echeis un vistazo a los demás tonos de esta colección, y recordad que tenéis un 10% de descuento si usais mi código!
31 julio 2013
SummerNails Challenge 6: Sirena/Mermaid
Hi Everyone!!
Finally we are at a SummerNails Challenge Day that it's not about fruits!! Yayyy!! I have enjoyed them but now it's time to do something different.
I have already done mermaid nails before when we were doing the Disney Challenge, I loved my Little Mermaid nails, but today I wanted to make something different, and easier.
Hola a todos!!
Por fin estamos en un día del Reto SummerNails que no es sobre frutas!! Bienn!! Las he disfrutado, pero ahora es hora de hacer algo diferente.
Ya he hecho anteriormente uñas de Sirena cuando estábamos haciendo el Reto Disney, me encantaron mis uñas de La Sirenita, pero hoy quería hacer algo diferente, y sencillo.
Perfect for summer! But I have to say that I made an awful mistake that was not using a topcoat on top, then I went to bed... and when I woke up I had lost most of the glequins and they were all over my face, body and bed... I have been finding glequins everywhere for a week!!!
Perfectas para el veranito! Pero tengo que decir que cometí un tremendo error, que fue no usar topcoat encima, luego me fui a la cama... y cuando me desperté había perdido la mayoría de los glequins, que estaban pegados por toda mi cara, cuerpo y cama... he estado encontrando glequins por todos lados durante una semana!!!
To make this manicure I first applied one coat of Kiko 401, and then started adding the BPS glequins in Turquoise, Navy Blue, Green, Yellow and Silver, randomly. On the accent nails the glequings are placed on top of each other like fish (or mermaid) scales, on the other fingers they are making waves that remind me of the sea...
Para hacer esta manicura primero apliqué una capa de Kiko 401, y luego comencé a añadir los glequins de BPS en Turquesa, Azul Marino, Verde, Amarillo y Plateado, de forma aleatoria. En las accent nails los glequins están colocados unos encima de otros como escamas de peces (o sirenas), en las otras uñas están haciendo ondas que me recuerdan al mar...
Which one do you prefer? The complicated and beautiful Little Mermaid Nails? Or the simple and neat Mermaid Scales Nails? Anyway I hope you enjoyed both of them!!
See you soon!!
¿Cuales os gustan más? ¿La complicada pero bonita Manicura de La Sirenita? ¿O la simple y pulcra Manicura de Escamas de Sirena? De todas formas espero que disfruteis las dos!!
Nos vemos pronto!!
Finally we are at a SummerNails Challenge Day that it's not about fruits!! Yayyy!! I have enjoyed them but now it's time to do something different.
I have already done mermaid nails before when we were doing the Disney Challenge, I loved my Little Mermaid nails, but today I wanted to make something different, and easier.
Hola a todos!!
Por fin estamos en un día del Reto SummerNails que no es sobre frutas!! Bienn!! Las he disfrutado, pero ahora es hora de hacer algo diferente.
Ya he hecho anteriormente uñas de Sirena cuando estábamos haciendo el Reto Disney, me encantaron mis uñas de La Sirenita, pero hoy quería hacer algo diferente, y sencillo.
Perfect for summer! But I have to say that I made an awful mistake that was not using a topcoat on top, then I went to bed... and when I woke up I had lost most of the glequins and they were all over my face, body and bed... I have been finding glequins everywhere for a week!!!
Perfectas para el veranito! Pero tengo que decir que cometí un tremendo error, que fue no usar topcoat encima, luego me fui a la cama... y cuando me desperté había perdido la mayoría de los glequins, que estaban pegados por toda mi cara, cuerpo y cama... he estado encontrando glequins por todos lados durante una semana!!!
To make this manicure I first applied one coat of Kiko 401, and then started adding the BPS glequins in Turquoise, Navy Blue, Green, Yellow and Silver, randomly. On the accent nails the glequings are placed on top of each other like fish (or mermaid) scales, on the other fingers they are making waves that remind me of the sea...
Para hacer esta manicura primero apliqué una capa de Kiko 401, y luego comencé a añadir los glequins de BPS en Turquesa, Azul Marino, Verde, Amarillo y Plateado, de forma aleatoria. En las accent nails los glequins están colocados unos encima de otros como escamas de peces (o sirenas), en las otras uñas están haciendo ondas que me recuerdan al mar...
Which one do you prefer? The complicated and beautiful Little Mermaid Nails? Or the simple and neat Mermaid Scales Nails? Anyway I hope you enjoyed both of them!!
See you soon!!
¿Cuales os gustan más? ¿La complicada pero bonita Manicura de La Sirenita? ¿O la simple y pulcra Manicura de Escamas de Sirena? De todas formas espero que disfruteis las dos!!
Nos vemos pronto!!
Etiquetas:
Blue,
BornPretty,
Glequins,
Green,
Holographic,
Kiko,
Manicuras,
Silver,
SummerNails Challenge,
Yellow
28 junio 2013
Born Pretty Store Foils Review
Hi there!
Here there is another Born Pretty Review! This time I am reviewing some of their transfer foils. They have a very good selection and you can find it HERE.
The thing that caught my attention about this product was that they say you don't have to apply foil glue to wear them, you can do it just with nail polish (Born Pretty Store Tutorial here) and it is true, but for me it was a little disappointing how difficult it was until I achieved something decent...
Hola!
Aquí teneis otro review de Born Pretty Store! Esta vez os traigo algunos de sus foils. Tienen una buena selección que podeis ver AQUÍ.
Lo que me llamó la atencion de este producto fue que decían que se podían usar sin peamento para foils, simplemente con esmalte (Tutorial de Born Pretty Aquí) y es cierto, pero para mi fue un poco decepcionante lo dificil que fue hasta que conseguí hacer algo decente...
After lots of try and error I decided the best thing I could do with them was a Galaxy Manicure, and it turned out great! I used #27 a foil with lots of different colours, I covered most of the surface of my nails (For me it was impossible to get full coverage, I'm still learning) and then sponged with Deliplush Black nº58 on top of the bald spots to blend them, finally I sprayed some white acrylic paint with my toothbrush and added a few bigger stars.
Tras mucho ensayo y error decidí que lo mejor que podía hacer con ellos era una Manicura de Galaxias, y salió genial! Utilice el #27, un foil con muchos colores diferentes, cubrí la mayor parte de mis uñas (Para mí ha sido imposible hacerlo en uña completa, todavía estoy aprendiendo) y luego le di con la esponjita con Deliplus Negro nº58 encima de los huecos para difuminarlos, para terminar estarcí un poco de pintura acrílica blanca con mi cepillo de dientes y añadí algunas estrellas más grandes.
It was so colourful and sparkly that I had lot's of compliments when I went to college, because they really stood up. I applied Seche Vite on top because Amber from Nails Like Lace (A foil Goddess) told me that she uses it and it doesn't shrink them. Well it worked for me too, but not perfectly, they didn't shrink but they crinkled a bit (which I didn't mind).
Quedó tan colorida y brillante que me hicieron muchos comentarios cuando fui a la facultad, porque llamaban mucho la atencion. Apliqué Seche Vite encima porque Amber de Nails Like Lace (Una diosa de los Foils) me dijo que ella lo usaba y no le encogían. Bueno, conmigo también funcionó, pero no del todo, no encogieron, pero se arrugaron un pelín (Aunque no me importó)
I was not going to post this picture for the main reason that it is burned with too much light, but I wanted to show you how bright the colours were when they are in the sun!
No iba a publicar esta foto porque está quemada con demasiada luz, pero quería enseñaros lo brillantes que se ven los colores cuando les da el sol!
This is what I did with the other foil that BPS sent me, it is the #2, a super holographic Golden colour, and I took the chance to try another way to use the foils that turned to be so much easier!! When I had my base colour, I applied one coat of clear polish and, when it was still wet, I placed some pre-cut strips of foil. Then I applied one coat of Seche Vite to seal them and tadaa!! perfect foil applied. Also this technique has another advantage, this particular colour was dulled by Seche Vite (as most holographics...) when applied the traditional way but doing it this way you can preserve the effect. I used Barry M Gold Foil as the base, Yes Love Golden Glitter on top, and when I had already applied the foil I decided to use L'Oreal Confetti on my ring finger.
Esto es lo que hice con el otro foil que me envió BPS, es el #2, un Dorado super holográfico, y aproveché la oportunidad para probar otra forma de usar los foils que resultó ser mucho más sencilla!! Cuando ya tuve mi color de base, utilicé un esmalte transparente, y cuando aún no estaba seco coloqué unas tiras previamente cortadas del foil. Luego aplique una capa de Seche Vite para sellarlos y tadaa!! foil perfectamente aplicado. Además esta técnica tiene otra ventaja, este color en particular perdía el holográfico con el Seche Vite (como la mayoría...) pero utilizado con este método se conserva el efecto. Utilicé Barry M Gold Foil como base, Yes Love Golden Glitter encima, y luego, cuando ya había puesto los foils, decidí usar L'Oreal Cofetti en el dedo anular.
I hope you liked it! And I have to remind you, as always, that Born Pretty Store has Worldwide Free Shipping!! And with my discount code you get 10% off of your purchase.
See you!!
Espero que os haya gustado! Y os recuerdo, como siempre, que Born Pretty Store tiene Envío Gratuito a Todo el Mundo!! Y que con mi código de descuento teneis un 10% de rebaja en vuestra compra.
Nos vemos!!
Here there is another Born Pretty Review! This time I am reviewing some of their transfer foils. They have a very good selection and you can find it HERE.
The thing that caught my attention about this product was that they say you don't have to apply foil glue to wear them, you can do it just with nail polish (Born Pretty Store Tutorial here) and it is true, but for me it was a little disappointing how difficult it was until I achieved something decent...
Hola!
Aquí teneis otro review de Born Pretty Store! Esta vez os traigo algunos de sus foils. Tienen una buena selección que podeis ver AQUÍ.
Lo que me llamó la atencion de este producto fue que decían que se podían usar sin peamento para foils, simplemente con esmalte (Tutorial de Born Pretty Aquí) y es cierto, pero para mi fue un poco decepcionante lo dificil que fue hasta que conseguí hacer algo decente...
After lots of try and error I decided the best thing I could do with them was a Galaxy Manicure, and it turned out great! I used #27 a foil with lots of different colours, I covered most of the surface of my nails (For me it was impossible to get full coverage, I'm still learning) and then sponged with Deliplush Black nº58 on top of the bald spots to blend them, finally I sprayed some white acrylic paint with my toothbrush and added a few bigger stars.
Tras mucho ensayo y error decidí que lo mejor que podía hacer con ellos era una Manicura de Galaxias, y salió genial! Utilice el #27, un foil con muchos colores diferentes, cubrí la mayor parte de mis uñas (Para mí ha sido imposible hacerlo en uña completa, todavía estoy aprendiendo) y luego le di con la esponjita con Deliplus Negro nº58 encima de los huecos para difuminarlos, para terminar estarcí un poco de pintura acrílica blanca con mi cepillo de dientes y añadí algunas estrellas más grandes.
It was so colourful and sparkly that I had lot's of compliments when I went to college, because they really stood up. I applied Seche Vite on top because Amber from Nails Like Lace (A foil Goddess) told me that she uses it and it doesn't shrink them. Well it worked for me too, but not perfectly, they didn't shrink but they crinkled a bit (which I didn't mind).
Quedó tan colorida y brillante que me hicieron muchos comentarios cuando fui a la facultad, porque llamaban mucho la atencion. Apliqué Seche Vite encima porque Amber de Nails Like Lace (Una diosa de los Foils) me dijo que ella lo usaba y no le encogían. Bueno, conmigo también funcionó, pero no del todo, no encogieron, pero se arrugaron un pelín (Aunque no me importó)
I was not going to post this picture for the main reason that it is burned with too much light, but I wanted to show you how bright the colours were when they are in the sun!
No iba a publicar esta foto porque está quemada con demasiada luz, pero quería enseñaros lo brillantes que se ven los colores cuando les da el sol!
This is what I did with the other foil that BPS sent me, it is the #2, a super holographic Golden colour, and I took the chance to try another way to use the foils that turned to be so much easier!! When I had my base colour, I applied one coat of clear polish and, when it was still wet, I placed some pre-cut strips of foil. Then I applied one coat of Seche Vite to seal them and tadaa!! perfect foil applied. Also this technique has another advantage, this particular colour was dulled by Seche Vite (as most holographics...) when applied the traditional way but doing it this way you can preserve the effect. I used Barry M Gold Foil as the base, Yes Love Golden Glitter on top, and when I had already applied the foil I decided to use L'Oreal Confetti on my ring finger.
Esto es lo que hice con el otro foil que me envió BPS, es el #2, un Dorado super holográfico, y aproveché la oportunidad para probar otra forma de usar los foils que resultó ser mucho más sencilla!! Cuando ya tuve mi color de base, utilicé un esmalte transparente, y cuando aún no estaba seco coloqué unas tiras previamente cortadas del foil. Luego aplique una capa de Seche Vite para sellarlos y tadaa!! foil perfectamente aplicado. Además esta técnica tiene otra ventaja, este color en particular perdía el holográfico con el Seche Vite (como la mayoría...) pero utilizado con este método se conserva el efecto. Utilicé Barry M Gold Foil como base, Yes Love Golden Glitter encima, y luego, cuando ya había puesto los foils, decidí usar L'Oreal Cofetti en el dedo anular.
I hope you liked it! And I have to remind you, as always, that Born Pretty Store has Worldwide Free Shipping!! And with my discount code you get 10% off of your purchase.
See you!!
Espero que os haya gustado! Y os recuerdo, como siempre, que Born Pretty Store tiene Envío Gratuito a Todo el Mundo!! Y que con mi código de descuento teneis un 10% de rebaja en vuestra compra.
Nos vemos!!
18 junio 2013
Born Pretty Store Glow in the Dark Polish
Hi Everyone!
While the Poke Makeup starts let's see some cool stuff that Born Pretty Store has sent me. This time I have one of their famous Fluorescent Neon Glow in the Dark Polishes. You can say What? Hadn't we seen enough Glow in the dark polishes on Halloween? Well you are right but, these polishes are not the usual glow in the dark polished because they glow in the colour of the nail polish.
Hola a todos!
Mientras comienza el Poke Makeup vamos a ver algunas cositas chulas que me ha enviado Born Pretty Store. Esta vez tengo uno de sus famosos esmaltes Fluorescentes Neon que brillan en la oscuridad. Podeis decir, ¿Qué? ¿No habíamos visto ya suficientes esmaltes glow en Halloween? Bueno, teneis razón pero, estos esmaltes no son los normales Glow in the dark, porque brillan en el color del esmalte.
Yes! I know you have seen this design before (and if you haven't just check this amazing post made by Lucy's Stash). I know hers is much better, but I loved how the glow made the design pop so much and look real 3D. To make this design I painted two coats of BK 10 and, following Copy That, Copy Cat's Tutorial, I painted the accent nails with acrylics.
Si! Ya sé que habeis visto este diseño antes (y si no lo conoceis pasaros por este post tan chulo hecho por Lucy's Stash). Está claro que el suyo está mejor, pero me encantó cómo el brillo hazo que el diseño destacara y pareciera tan 3D. Para hacer este diseño utilicé dos capas de BK 10 y , siguiendo el tutorial de Copy that, Copy Cat, dibujé las accent nails con acrílicos.
On top of the white squares I used a Glow in the Dark topcoat, so you can see the difference between colours. The regular Glow in the Dark Topcoat glows with that yellow greenish colour of most Glow in the Dark Polishes, and BK 10 glows PINK!! It doesn't glow with a very strong light, but I have read that this colour is the least bright of the collection. Anyway the colour is amazing and I love it!
Encima de los cuadraditos blanco puse un Topcoat Glow in the Dark, así podeis ver la diferencia entre los colores. El Glow top coat normal brilla con esa luz amarillo-verdosa de la mayoria de esmaltes que brillan en la oscuridad, y el BK 10 brilla en ROSA!! No tiene un brillo muy fuerte, pero he leido que es el menos brillante de la colección. De todas formas es increíble y me encanta!
You can find more colours of this collection Here, and remember that, besides Born Pretty Store offers Free Worldwide Shipping, you can use my coupon code for 10% discount!! See you soon!!!
Podeis encontrar más colores de esta colección Aquí, y recordad que, a parte de que Born Pretty Store ofrece Envío Gratuito a todo el Mundo, podeis usar mi cupón con un 10% de descuento!! Nos vemos!!!
While the Poke Makeup starts let's see some cool stuff that Born Pretty Store has sent me. This time I have one of their famous Fluorescent Neon Glow in the Dark Polishes. You can say What? Hadn't we seen enough Glow in the dark polishes on Halloween? Well you are right but, these polishes are not the usual glow in the dark polished because they glow in the colour of the nail polish.
Hola a todos!
Mientras comienza el Poke Makeup vamos a ver algunas cositas chulas que me ha enviado Born Pretty Store. Esta vez tengo uno de sus famosos esmaltes Fluorescentes Neon que brillan en la oscuridad. Podeis decir, ¿Qué? ¿No habíamos visto ya suficientes esmaltes glow en Halloween? Bueno, teneis razón pero, estos esmaltes no son los normales Glow in the dark, porque brillan en el color del esmalte.
Yes! I know you have seen this design before (and if you haven't just check this amazing post made by Lucy's Stash). I know hers is much better, but I loved how the glow made the design pop so much and look real 3D. To make this design I painted two coats of BK 10 and, following Copy That, Copy Cat's Tutorial, I painted the accent nails with acrylics.
Si! Ya sé que habeis visto este diseño antes (y si no lo conoceis pasaros por este post tan chulo hecho por Lucy's Stash). Está claro que el suyo está mejor, pero me encantó cómo el brillo hazo que el diseño destacara y pareciera tan 3D. Para hacer este diseño utilicé dos capas de BK 10 y , siguiendo el tutorial de Copy that, Copy Cat, dibujé las accent nails con acrílicos.
On top of the white squares I used a Glow in the Dark topcoat, so you can see the difference between colours. The regular Glow in the Dark Topcoat glows with that yellow greenish colour of most Glow in the Dark Polishes, and BK 10 glows PINK!! It doesn't glow with a very strong light, but I have read that this colour is the least bright of the collection. Anyway the colour is amazing and I love it!
Encima de los cuadraditos blanco puse un Topcoat Glow in the Dark, así podeis ver la diferencia entre los colores. El Glow top coat normal brilla con esa luz amarillo-verdosa de la mayoria de esmaltes que brillan en la oscuridad, y el BK 10 brilla en ROSA!! No tiene un brillo muy fuerte, pero he leido que es el menos brillante de la colección. De todas formas es increíble y me encanta!
You can find more colours of this collection Here, and remember that, besides Born Pretty Store offers Free Worldwide Shipping, you can use my coupon code for 10% discount!! See you soon!!!
Podeis encontrar más colores de esta colección Aquí, y recordad que, a parte de que Born Pretty Store ofrece Envío Gratuito a todo el Mundo, podeis usar mi cupón con un 10% de descuento!! Nos vemos!!!
09 mayo 2013
Seven Deadly Sins Challenge Day 6: Greed
Hi Girls!
The prompt for today's Challenge manicure says: "Remember, More is More... Don't hold yourself back!". I was going to use my BornPretty Studs again because I wasn't very happy with the Manicure I did for the Review, and I followed the Challenge Instructions word by word...
Hola Chicas!
Las intrucciones del Reto para hoy dicen: "Recuerda, Más es Más... No te reprimas!". Iba a usar mis Studs de BornPretty otra vez porque no estaba muy feliz con la Manicura que hice para el Review, y seguí las Instrucciones del Reto palabra por palabra...
So, instead of doing a little accent to my nails I decided to fill the whole nail with them!! Like an armour!
I started with two coats of Claire's 137 (No name... :( it's a light mint colour) and then one coat of YSNY 050, a glass flecked topper with pink reflections. Finally I applied the golden studs while it was still wet.
Asi que, en vez de hacer unos pequeños detalles en las uñas decidí llenar la uña completa con ellos!! Como una armadura!
Comencé con dos capas de Claire's 137 (Sin nombre... :( es un color menta claro) y luego una capa de YSNY 050, un topper con flakies que reflejan en rosa. Para termina apliqué los studs dorados mientras estaba aún sin secar.
I wanted the studs to fit my nail perfectly and, as you can see, I made it! I just had to cut them in half with little scissors. They are very easy to cut and I think this is a good way to avoid gaps on the outlines of your nails.
Quería que los studs se ajustaran a mi uña perfectamente y , como podeis ver, lo he conseguido! Sólo tuve que cortarlos por la mitas con unas tijeritas. Son muy fáciles de cortar y creo que es una buena manera de evitar los huevos en los alrededores de las uñas.
I love the colour (I don't know why I don't use it more...) and the texture that the studs give to the look makes it really interesting. I hope you like it too.
Me encanta el color (No sé por qué no lo uso mas...) y la textura que le dan los studs al look lo hacen muy interesante. Espero que os guste a vosotros tambien.
The prompt for today's Challenge manicure says: "Remember, More is More... Don't hold yourself back!". I was going to use my BornPretty Studs again because I wasn't very happy with the Manicure I did for the Review, and I followed the Challenge Instructions word by word...
Hola Chicas!
Las intrucciones del Reto para hoy dicen: "Recuerda, Más es Más... No te reprimas!". Iba a usar mis Studs de BornPretty otra vez porque no estaba muy feliz con la Manicura que hice para el Review, y seguí las Instrucciones del Reto palabra por palabra...
So, instead of doing a little accent to my nails I decided to fill the whole nail with them!! Like an armour!
I started with two coats of Claire's 137 (No name... :( it's a light mint colour) and then one coat of YSNY 050, a glass flecked topper with pink reflections. Finally I applied the golden studs while it was still wet.
Asi que, en vez de hacer unos pequeños detalles en las uñas decidí llenar la uña completa con ellos!! Como una armadura!
Comencé con dos capas de Claire's 137 (Sin nombre... :( es un color menta claro) y luego una capa de YSNY 050, un topper con flakies que reflejan en rosa. Para termina apliqué los studs dorados mientras estaba aún sin secar.
I wanted the studs to fit my nail perfectly and, as you can see, I made it! I just had to cut them in half with little scissors. They are very easy to cut and I think this is a good way to avoid gaps on the outlines of your nails.
Quería que los studs se ajustaran a mi uña perfectamente y , como podeis ver, lo he conseguido! Sólo tuve que cortarlos por la mitas con unas tijeritas. Son muy fáciles de cortar y creo que es una buena manera de evitar los huevos en los alrededores de las uñas.
I love the colour (I don't know why I don't use it more...) and the texture that the studs give to the look makes it really interesting. I hope you like it too.
Me encanta el color (No sé por qué no lo uso mas...) y la textura que le dan los studs al look lo hacen muy interesante. Espero que os guste a vosotros tambien.
05 mayo 2013
Bornpretty Review: 12 Colours Rhinestones Wheel
Hi Girls!
Today I wanted to show you another product from Born Pretty Store. I have to say that I'm really happy to be reviewing this products because they are things that everyone would like to use but need to try before buying. Today I have the 12 Colours Rhinestones Wheel.
Hola Chicas!
Hoy os quiero enseñar otro producto de Born Pretty Store. Os tengo que decir que estoy muy contenta de estar probando estos productos porque son cosas que todos querríamos usar, pero que necesitamos probar antes de decicir comprarlas. Hoy os traigo la Rueda de Brillantitos en 12 Colores.
As you can see I'm going to have rhinestones for a long long time... The quantity of all the products I have reviewed from BornPretty has been amazing! and this is not an exception. It has a good amount of rhinestones of each colour, and even the clear ones are different from the clear rhinestones they sell (You can see a review here) because they are kind of holographic or iridescent.
Como podeis ver voy a tener brillantes durante mucho mucho tiempo... La cantidad de todos los productos que he probado de BornPretty ha sido increíble! y este no es una exepción. Tiene una buena cantidad de brillantes de cada color, e incluso los transparentes son diferentes de los brillantes transparentes que venden a parte (Podeis ver un review aquí) porque son como holográficos o irisados.
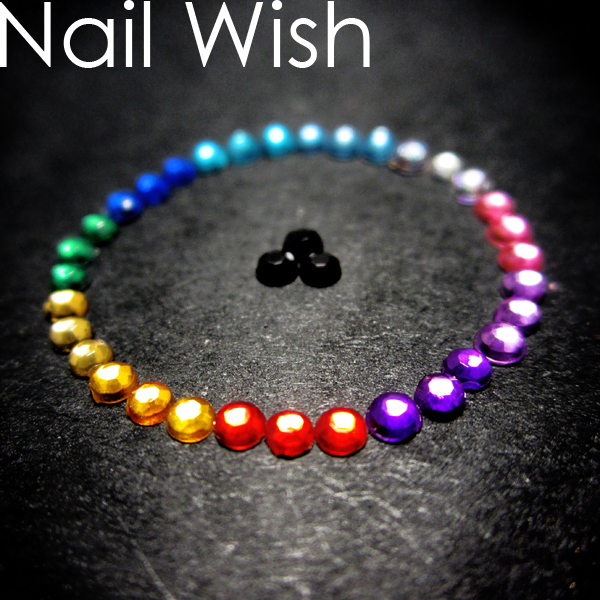
Here you have a comparison between all the colours. With this wheel you will have Red, Yellow, Light Yellow, Green, Navy Blue, Turquoise, Sky Blue, Iridescent Clear, Pink, Violet, Purple and Black. All of them are translucent, except the black ones.
Aquí teneis una comparación entre todos los colores. Con esta rueda tendréis Rojo, Amarillo, Amarillo Claro, Verde, Azul Marino, Turquesa, Celeste, Transparente Irisado, Rosa, Violeta, Morado y Negro. Todos son translúcidos, excepto los negros.
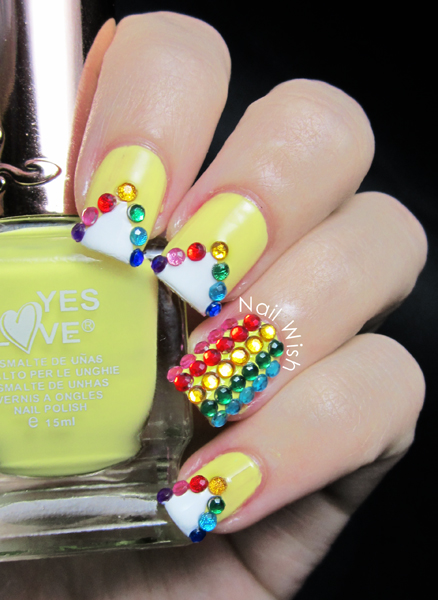
With all those colours I felt that I needed to do something really bright and fun, so I first applied two coats of Yes Love Paste Yellow. When it was completely dried I made the white chevrons with Flormar 400 and the help of pieces of tape. Then I applied one coat of Seche Vite and when it was still wet I stuck the rhinestones following the colours of the rainbow.
Con todos esos colores sentí que tenía que hacer algo verdaderamente llamativo y divertido, así que primero apliqué una capa de Yes Love Pastel Yellow. Cuando estuvo completamente seco hice los triángulos blancos con Flormar 400 y la ayuda de trocos de celo. Luego apliqué una capa de Seche Vite y cuando estaba todavía mojado pegué los brillantes siguiendo los colores del arcoiris.
I hope you liked it, as I said it's really bright, I think, perfect for a parade or a party.... Just perfect to focus the attention of all the ones that surround you on your super shiny nails!! Don't forget to use my discount code to get 10% off from your entire purchase, and remember that Born Pretty Store has FREE WORLDWIDE SHIPPING!!!
See you soon!!
Espero que os hayan gustado, como oshe dicho son muy llamativas, creo que perfectas para un desfile o una fiesta... Simplemente perfectas para captar la atención de todos los que hay a tu alrededor en tus uñas super brillantes!! No os olvideis de usar mi código de descuento para conseguir un 10% menos en tu compra completa, y recordad que Born Pretty Store tiene ENVIO MUNDIAL GRATUITO!!!
Nos vemos pronto!!
Today I wanted to show you another product from Born Pretty Store. I have to say that I'm really happy to be reviewing this products because they are things that everyone would like to use but need to try before buying. Today I have the 12 Colours Rhinestones Wheel.
Hola Chicas!
Hoy os quiero enseñar otro producto de Born Pretty Store. Os tengo que decir que estoy muy contenta de estar probando estos productos porque son cosas que todos querríamos usar, pero que necesitamos probar antes de decicir comprarlas. Hoy os traigo la Rueda de Brillantitos en 12 Colores.
As you can see I'm going to have rhinestones for a long long time... The quantity of all the products I have reviewed from BornPretty has been amazing! and this is not an exception. It has a good amount of rhinestones of each colour, and even the clear ones are different from the clear rhinestones they sell (You can see a review here) because they are kind of holographic or iridescent.
Como podeis ver voy a tener brillantes durante mucho mucho tiempo... La cantidad de todos los productos que he probado de BornPretty ha sido increíble! y este no es una exepción. Tiene una buena cantidad de brillantes de cada color, e incluso los transparentes son diferentes de los brillantes transparentes que venden a parte (Podeis ver un review aquí) porque son como holográficos o irisados.
Here you have a comparison between all the colours. With this wheel you will have Red, Yellow, Light Yellow, Green, Navy Blue, Turquoise, Sky Blue, Iridescent Clear, Pink, Violet, Purple and Black. All of them are translucent, except the black ones.
Aquí teneis una comparación entre todos los colores. Con esta rueda tendréis Rojo, Amarillo, Amarillo Claro, Verde, Azul Marino, Turquesa, Celeste, Transparente Irisado, Rosa, Violeta, Morado y Negro. Todos son translúcidos, excepto los negros.
With all those colours I felt that I needed to do something really bright and fun, so I first applied two coats of Yes Love Paste Yellow. When it was completely dried I made the white chevrons with Flormar 400 and the help of pieces of tape. Then I applied one coat of Seche Vite and when it was still wet I stuck the rhinestones following the colours of the rainbow.
Con todos esos colores sentí que tenía que hacer algo verdaderamente llamativo y divertido, así que primero apliqué una capa de Yes Love Pastel Yellow. Cuando estuvo completamente seco hice los triángulos blancos con Flormar 400 y la ayuda de trocos de celo. Luego apliqué una capa de Seche Vite y cuando estaba todavía mojado pegué los brillantes siguiendo los colores del arcoiris.
I hope you liked it, as I said it's really bright, I think, perfect for a parade or a party.... Just perfect to focus the attention of all the ones that surround you on your super shiny nails!! Don't forget to use my discount code to get 10% off from your entire purchase, and remember that Born Pretty Store has FREE WORLDWIDE SHIPPING!!!
See you soon!!
Espero que os hayan gustado, como oshe dicho son muy llamativas, creo que perfectas para un desfile o una fiesta... Simplemente perfectas para captar la atención de todos los que hay a tu alrededor en tus uñas super brillantes!! No os olvideis de usar mi código de descuento para conseguir un 10% menos en tu compra completa, y recordad que Born Pretty Store tiene ENVIO MUNDIAL GRATUITO!!!
Nos vemos pronto!!
Etiquetas:
BornPretty,
Flormar,
Manicuras,
Pastel,
Review,
Rhinestones,
White,
Yellow,
Yes Love
Suscribirse a:
Entradas (Atom)