31 agosto 2013

Guest Post: Polished Elegance

Hi!!
Today is here Lisa from Polished Elegance, I discovered her blog not so long ago, but I immediately followed her because I lover her hard work, clean manicures and amazing pictures!! I am sure you will love her too.

------------------------------------------------------------------------------------------------------------

Hello! My name is Lisa, and I have my little blog Polished Elegance where I share my adventures in nail polish and nail art. I am so happy to be able to do a guest blog for Helena while she is busy moving, and to my neighbor country no less! I’ve been following her blog for a while and I absolutely love everything she does, and also her creative makeup, it’s so much fun!

I was scratching my head for a few days trying to figure out what to do for this guest post. Then one day, the new polishes I’d ordered from OPI’s San Francisco collection, and my new Cheeky stamping plates dumped into my mail box, on the same day! And I knew I had to use some of these new pretties to create a mani worthy of Helena’s blog ;)

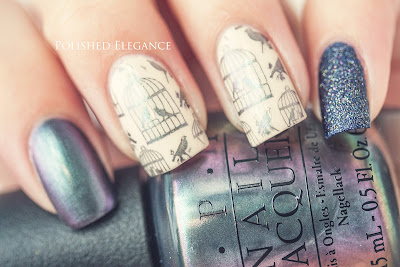
For this mani I applied two coats of OPI – Alcatraz… Rocks on the pinky, two coats of OPI – My Vampire Is Buff on ring and middle, and two coats of OPI – Peace & Love & OPI on my index and thumb.

I applied one coat of Poshé top coat to all nails except pinky, to speed up drying, and when it was dry I stamped on my middle and ring. I stamped using OPI – Peace & Love & OPI and Cheeky jumbo plate #7 – Home Sweet Home. To seal the stamping I applied one more coat of Poshé.


Peace & Love & OPI worked pretty well for stamping actually! It’s not completely opaque as you can see, but that might be because of my stamping skills as well, not just the polish :p It’s a gorgeous shimmery gray duo chrome polish, it shifts to green and pinkish purple and the color shift is pretty visible no matter what kind of light you are in. It also photographed well, so you can easily see the color shift in these pictures, isn’t it pretty?

Alcatraz… Rocks is also from the San Francisco collection, one of the liquid sand polishes, and the only liquid sand I like from that collection. However, it is so incredibly beautiful it weighs up for the two ugly ones I’m not as fond of. In the picture below you can see the glitter sparkle in this polish, and it sparkles like this all the time, even in the shade!

I hope you guys like my mani! And that it’s worthy of being posted here ;) Please do come visit me over at my blog Polished Elegance. I’ll leave you with a couple more pictures of this mani, and thank you so much Helena for letting me spam your blog! ;)


30 agosto 2013

Guest Post: In Jeeb We Trust

Hi Everyone!!
We have today another girl from that I met through the Seven Deadly Sins Challenge. I loved all her work and dedication and I thought you would like it too, so I asked her to make a guest post! I hope you enjoy it.
Bye

------------------------------------------------------------------------------------------------------------

Hey all! Hola a todos!
I'm jeebjeeb from In Jeeb We Trust. I'm so honoured that Helena asked me to do a guest post! I had so much fun taking part in her Seven Deadly Sins challenge a few months ago. Since then I've been drooling over her stunning manicures and eye makeup. (Can you believe her Pokemon eye looks? So awesome!) I was totally shocked when she contacted me. What?! Little old jeebjeeb?! That moment when you feel both yay and oh no! (This is my first guest post.) I decided to play it a little safe with one of my favourite techniques. Splatter :)


I love splatter. The chaos. The colour. The originality. Splatters are like snowflakes, no two are alike. I loved how this manicure turned out. The colours are so fantastic together. What do you think?


As my base (and splatter) I used Zoya - Purity and on my index Sally Hansen - Black Out. My splatter colours are Nubar - On the Radar & My New Obsession. I love the black accent finger. Makes me think of Japanese tea cups. I mean, splatters are the essence of wabi-sabi, are they not? :)

I would like to thank Helena for giving me this moment to shine. Muchas gracias! I hope you enjoyed my art! Have a great day and an awesome manicure!
jeebjeeb

29 agosto 2013

Poke Makeup Challenge #9: Jolteon

Hej!
This is not a programmed post, so it will be short. I am exhausted because I have tons of things to do for finishing the move here to Sweden, and I also have already started going to the University to Orientation courses for International Students so I don't have enough hours to do everything I wanted to do...
But yesterday I promised you that today you were going to have a Pokemon Makeup Look and here it is!


Hej!
Este no es un post programado, así que va a ser cortito. Estoy muy cansada porque tengo millones de cosas que hacer paa terminar la mudanza aquí a Suecia, y también he comenzado ya a ir a la Universidad a Cursos de Orientación para Estudiantes Internacionales, así que no tengo tiempo para hacer todo lo que me gustaría...
Pero ayer os prometí que hoy habría Look de Maquillaje Pokémon y aquí está!

This week the theme is the Electric Type, and following all the Eevee evolutions I had to do Jolteon, and I have to say that I am more than pleased with the result.


Esta semana el tema es el Tipo Eléctrico, y siguiendo con las evoluciones de Eevee tenía que hacer a Jolteon, y tengo que decir que estoy más que contenta con el resultado.

This is by far my favourite makeup, and the first one that came up just as I planned in my mind. In case you are wondering how I did those super sharp lines I used a trick: Tape. I placed it, applied the yellow pigment, removed it and placed a little further and then applied the white eyeshadow carefully, and repeated it for the black eyeshadow. Hopefully you have understood my poor explanation.


Este es con diferencia mi maquillaje favorito, y el primero que sale justo como lo había planeado mentalmente. En el caso en el que os esteis preguntando cómo he hecho esas lineas tan rectas os digo que he usado un truco: Celo. Lo coloqué, apliqué el pigmento amarillo, lo retiré y lo coloqué un poco más lejos y luego aplique la sombra blanca con cuidado, y repetí para la sombra negra. Con suerte habréis entendido mi torpe explicación.

As always I hope you liked it and see you soon with more Guest Posts, and also wish me good luck so I can have a little time to paint my nails and relaz this weekend... See you soon!!


Como siempre, espero que os haya gustado y nos vemos pronto con más Guest Post, y también deseadme buena suerte para que pueda tener un poco de tiempo para pintarme las uñas y relajarme este fin de semana... Nos vemos!!

28 agosto 2013

SummerNails Challenge #10: Helado/Ice Cream

Hej! (Hi in Swedish)
I am right now on Swedish lands and I am sure I am freezing!! Althought it is already summer... So this theme is not perfect for me right now... or yes because I would be becoming a giant popsicle!!


Hej! (Hola en Sueco)
Ahora mismo estaré en tierras Suecas y estoy segura de que me estaré congelando!! Incluso siendo verano... Así que este tema no es perfecto ahora mismo... o sí porque me estaré convirtiendo en un polo gigante!!

The day I made this little guys I was feeling super kawaii! hehe So here it is a fun manicure, I wore it for a whole week because I loved itand every time I looked at it it cheered me up.


El día que hice a estos pequeñajos me sentía muy kawaii! hehe Así que aquí teneis una manicura divertida, la llevé una semana entera porque me encantó, y cada vez que la miraba me levantaba la moral.

I started with a base of Yes Love Pastel Pink, and stamped with BM (insert number here soon!!) and finally I drew the popsicles with acrylic paints.


Comencé con una base de Yes Love Pastel Pink, y estampé con BM (Escribir número aquí pronto!!) y para terminar dibujé los politos con pinturas acrílicas.

I hope you enjoyed this manicure and the guest posts ones!! Tomorrow there will be a makeup look from the Pokemakeup Challenge and on Friday I will be back with more AMAZING GUEST BLOGGERS!!
Don't miss it!


Espero que os haya gustado la manicura y las de los guest posts!! Mañana habrá un look de maquillaje del Reto Pokemakeup y el Viernes volveré con más GUEST BLOGGERS INCREÍBLES!!
No os lo perdáis!

27 agosto 2013

Guest Post: Nail Polish Wars

Hi Girls!!
You can't imagine how excited I am to have Nicole from Nail Polish Wars here! I have been a long time follower and her work has always been a huge inspiration for me! I hope you enjoy with she has made for you.


Hola Chicas!!
No os podéis imaginar lo emocionada que estoy de tener aquí a Nicole de Nail Polish Wars! He sido una seguidora suya desde hace mucho tiempo y su trabajo siempre ha sido una gran ispiración para mi! Espero que disfruteis de lo que ha hecho para vosotros.

------------------------------------------------------------------------------------------------------------

Hi everyone! I'm Nicole from Nail Polish Wars, and I'm so excited to be hanging out here at Nail Wish today!!

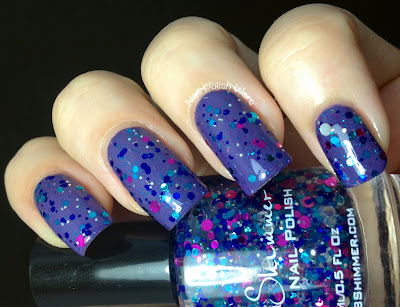
I started off with two coats of KBShimmer The Grape Beyond.

Next, I added one coat of KBShimmer Would Jubilee It?, a clear coat loaded with a gorgeous blend of multi-sized blue, teal, and bright pink dots and micro slices.  I followed with one coat of SV.

I paired Barry M Silver Foil with Shany plate SH04 for my ring fingers and Bundle Monster plate BM-213 for my other fingers.

I finished with one coat of Essie Matte About You top coat, and also added a pale blue rhinestone to my ring finger for a little something extra.

Not only do I love mattified glitters, but I also adore the matte silver as well.

I had so much creating this design, and I really hope you enjoyed seeing it as well.

Thanks so much for letting me hang out here at Nail Wish today!!  Happy Painting!

26 agosto 2013

Guest Post: Nails Like Lace

Hi everyone!
Right now I am taking a plane to Sweden to start my Erasmus experience (That you can follow through my other blog "Un Erasmus de Bolsillo"),so I asked the amazing Amber from Nails Like Lace to do a guest post for you while I am away. I hope you enjoy it!


Hola a todos!
Ahora mismo estoy en un avión de camino a Suecia para comenzar mi experiencia Erasmus (Que podéis seguir desde mi otro blog "Un Erasmus de Bolsillo"), así que le he pedido a la increíble Amber de Nails Like Lace que hiciera un guest post para vosotros mientras estoy fuera, espero que os guste!

------------------------------------------------------------------------------------------------------------

Hello lovely Nail Wish readers! Amber from NailsLikeLace here today! I was so honoured when Helena asked me to guest post, that there was no way I could say no!

You may or may not know that I am a HUGE fan of fishtail braid manicures. It is one of my all-time favourite looks. So today, I have one to share with you!

I used black and white acrylic paint for the fishtail braid, with Claire's color-changing polish Day Dream on the rest of my nails.

One of the things I love about this pretty glitter is that it is gorgeous with the fishtail braid indoors, and outside!


The color shift is intense, and it just sparkles like crazy! 

Unfortunately, topcoat does diminish the color-change effect a little. It isn't much, but it is noticeable. Topcoat is necessary for a smooth finish, though, with this one!

So I hope you liked my fishtail braid! They are actually a lot easier to create than they look, and are so much fun!

Everyone have a wonderful day, and thank you so much again to Helena for having me!!

¡Buenos días!

23 agosto 2013

A very special Announcement

Hi Everyone!
I have something very special to tell you. I am leaving my home for a whole year!!! In case you don't know it I live in Spain, but this year I am going to be part of an Erasmus Programme and I am going to spend my last year of college living in Sweden! I will be leaving on August 26th.


Hola a todos!
Tengo algo muy especial que deciros. Me voy de mi casa durante un año entero!!! Por si no lo sabeis yo vivo en España, pero este año me han concedido una Beca Erasmus y voy a pasar mi último año de universidad viviendo en Suecia! Me iré el día 26 de Agosto.

I am really excited and this is going to be a big change for me. I will continue blogging (of course) but I have no clue how it is going to be my life there and the first months I could have some troubles to keep up with all the things here, I am not going to have all my polish stash with me (for a whole year!!) and I will need to build another lightbox...


Estoy muy emocionada, esto va a ser un gran cambio para mi. Continuaré bloggeando (por supuesto) pero no tengo ni idea de cómo va a ser mi vida allí y los primeros meses podría tener algunos problemas para mantener las cosas aquí, no voy a tener toda mi colección de esmaltes conmigo (durante un año entero!!) y también necesitaré hacerme otra lightbox...

If you are nosy like me I invite you to have a look around my new blog Un Erasmus de Bolsillo, where I am going to write everything about my Erasmus experience, it's in Spanish, but Google Translate always help!

I am not really sure if I am going to be able to post the next weeks because of the move, so I have asked a few of my favourite bloggers to come here a do some amazing guest posts for you! So I warn you that next week we will have one different Nail Artist every day!! Yay!!!

See you Soon!!!


Si sois cotillas como yo os invito a pasaros por mi nuevo blog Un Erasmus de Bolsillo, donde voy a escribir todo sobre mi experencia Erasmus.

No estoy muy segura de si voy a poder actualizar las semanas próximas por culpa de la mudanza, así que les he pedido a algunas de mis bloggers favoritas que vinieran e hicieran unos guest posts increíbles para vosotras! Así que os advierto que la semana que viene tendremos una Artista del Nail Art cada día!! Bien!!

Nos vemos!!!

22 agosto 2013

Poke Makeup Challenge #8: Kabuto

Hi Everyone!!
I think today's makeup is one of my favourites of this challenge, and I know that I always say that but I really mean it! This is my favourite Rock Pokémon but I also chose it because of it's colours.


Hola a Todos!!
Creo que el maquillaje de hoy es uno de mis favoritos de este reto, y ya se que siempre digo lo mismo pero lo digo de verdad! Este es mi Pokémon Roca favorito pero también lo he escogido por sus colores.

It was so easy that I couldn't believe that I liked it so much! I just made a black to brown smokey placing first a trip of tape on the corner of the eye to create a very sharp edge on the end. Then I painted the "legs" with yellow pigment from The Body Needs 2 and (again don't kill me) the eyes with acrylic paint and a dotting tool.


Fue tan sencillo que no podía creer que me gustara tanto! Simplemente hice un smokey de negro a marrón colocando primero una tira de celo en la esquina final del ojo para hacer una línea muy definida al final. Luego pinté las "patitas" con pigmento amarillo de The Body Needs 2 y (de nuevo no me matéis) los ojos con pintura acrílica y un dotting tool.

I just love super dark eyeshadows, they make everyone's eye sparkle!! What I also liked about this look was that when I opened the eyes the two pink dots hid inside the eyelid and left a (somehow) wearable makeup look. See?


Es que me encantan las sombras super oscuras, hacen que cualquier ojo brille!! Lo que tabién me gustó mucho de este look fue que cuando abría los ojos los puntos rosas se escondían dentro del párpado y quedaba (de alguna forma) un look bastante ponible. ¿Veis?

Also the tape trick worked really well and I can tell you in advance that I will be using it soon in a more artistic way...


El truco del celo funcionó genial y os puedo adelantar que lo volveré a usar proto de forma un poco más artística...

21 agosto 2013

SummerNails Challenge #9: Barcos/Boats

Hi Girls!!
Today I almost forgot about the SummerNails Challenge!! The theme for today is Boats! I wasn't feeling like painting a boat on my nails, so I decided to make some nautical nails instead.


Hola Chicas!
Hoy casi se me olvida el Reto Summer Nails!! Es tema de hoy es Barcos! No me apetecía pintar barquitos en las uñas, así que decidí hacer unas uñas nauticas.

I first applied two coats of Flormar 400 and waited until it was completely dry. While I was waiting I cut two stripes of tape for each finger and then placed them on the nails. On top I made a gradient with Flormar 400 and Kiko 336 and removed the tape.


Primero apliqué dos capas de Flormar 400 y esperé hasta que estuvo completamente seco. Mientras esperaba fui cortando dos tiras de celo para cada dedo y luego las coloqué en las uñas. Encima hice un degradado con Flormar 400 y Kiko 336 y retiré las tiras de celo.

As you can see on the ring finger I made the gradient backwards and placed some round golden studs from Born Pretty Store making an anchor shape.


Como podeis ver en el dedo anular hice el degradado al contrario y coloqué algunas tachuelas redondas doradas de Born Pretty Store haciendo un ancla.

I loved this manicure so much that I wore it for a whole week!! I hope you liked it too.


Me gustó esta manicura tanto que la llevé durante una semana entera!! Espero que os haya gustado a vosotros también.

17 agosto 2013

Born Pretty Comiss Yogurt Series Nail Polish

Hi Everyone!!
Today I am here to show you some swatches of one of the amazing nail polishes from the Born Pretty Store Yogurt Series. I have been wanting to try these polishes for a long time because they are glitter sandwiches! You can see and buy the whole collection Here.


Hola a todos!!
Hoy estoy aquí para enseñaros algunos swatches de uno de los bonitos esmaltes de la colección Yogurt Series de Born Pretty Store. Llevo queriendo probar estos esmaltes desde hace mucho tiempo porque son glitter sandwiches! Podeis ver y comprar la colección completa Aquí.

This is number #17, a jelly vanilla base with medium hex glitters in yellow and red, it also has silver micro glitter, as you can see on the bottle that gives a subtle sparkle to the nails. This shows two coats over Yes Love Pastel Yellow on the index and ring nails, and three coats on it's own on middle and pinky nails.


Este es el número #17, una base jelly color vainilla con glitter hexagonal de tamaño mediano en color amarillo y rojo, también lleva micro glitter plateado, como podéis ver en el bote, que le da un brillo discreto a las uñas. En esta foto vemos dos capas sobre Yes Love Pastel Yellow en las uñas índice y anular, y tres capas solo en las uñas corazón y meñique.

There was no need of glitter fishing or placing, and they lay perfectly flat. I personally prefer layering it over a yellow base because with three coats it started to get thick and the nail line was still a bit visible.


No hizo falta pescar o recolocar los glitters, y se colocaron totalmente planos. A mí personalmente me gusta más ponerlo sobre la base amarilla porque con tres capas comenzaba a quedar grueso y la línea de la uña aún se podía ver.

I decided to do some nail art on top, do you remember this little guy? It's Leafeon, the Pokemon I chose for This Makeup Look! I hope you liked it and I really recommend that you go and have a look around the other gorgeous shades of this collection and remember that you have a 10% discount if you use my code!


Decidí hacer algo de nail art encima, ¿os acordais de este pequeño? Es Leafeon, el Pokémon que escogí para este Look de Maquillaje! Espero que os haya gustado y de verdad os recomiendo que le echeis un vistazo a los demás tonos de esta colección, y recordad que tenéis un 10% de descuento si usais mi código!


15 agosto 2013

Poke Makeup Challenge #7: Leafeon

Hi Girls!
As I told you yesterday, today I am going to show you another Pokémon make up. This week the theme is the Plant Type, so I chose one of the new evolutions of Eevee, Leafeon.


Hola Chicas!
Como os dije ayer, hot os voy a enseñar otro de los maquillajes Pokémon. Esta semana el tema es el Tipo Planta, así que he escogido una de las nuevas evoluciones de Eevee, Leafeon.

As you can see I went a little crazy with it and made a whole leaf! I wanted to recreate Leafeon's ears and everything I could think of was just panting one.


Como podéis ver se me fue un poco la cabeza e hice una hoja entera! Quería recrear las orejad de Leafeon y lo único que se me ocurrió fue pintar una.

I don't have a dark green eyeshadow or pigment, that's why I had to use blue eyeshadow instead. I don't remember what exact eyeshadows I used but I don't have so many so I would say a beige one, green one, blue one and a brown one hehehe, and of course my Catrice Liquid Eyeliner Dating Joe Black.


No tengo sombra o pigmento verde oscuro, por eso tuve que usar sombra de ojos azul en su lugar. No recuerdo exactamente que sombras utilicé pero no tengo tantas, así que diría que una beige, una verde, azul y una marron jejeje, y por supuesto mi Catrice Liquid Eyeliner Dating Joe Black.

This look was more like face painting that a makeup look for me because I liked the colours but it was too defined. I hope you enjoyed it!


Este look ha sido más como algo de caracterización que de maquillaje porque aunque me gustaron mucho los colores el dibujo estaba demasiado definido. Espero que os haya gustado!

14 agosto 2013

SummerNails Challenge #8: Palmeras/Palm Trees

Hi Everyone!
Here it is another day of the SummerNails Challenge, I am a little bit out of inspiration these days, so I'm just going to say that this one was one of my favourites manis so far because you all know I love gradient backgrounds...


Hola a todos!
Aqui estamos otro dia del eto SummerNails, estoy un poco sin inspiración estos días así que sólo voy a decir que esta ha sido una de mis manicuras favoritas de lo que llevamos porque ya sabeis que me encantan los fondos en degradado...

This time I decided to do another kind of gradient, instead of doing it with the make up sponge I made it just with brush strokes of acrylic paint. So this manicure doesn't have a lot of nail polish, just the sky blue base that I made with Yes Love Y36.


Esta vez he decidido hacer otro tipo de degradado, en vez de hacerlo con la esponja de maquillaje lo he hecho solo con pinceladas de pintura acrílica. Así que esta manicura no lleva casi esmalte de uñas, sólo la base azul cielo que hice con Yes Love Y36.

The palm trees were (obviously) the trickiest part of the design, the leaves needed super thin lines, but the good thing was that they are messy so if you make any mistake nobody would notice.


Las palmeras fueron (obviamente) la parte más difícil del diseño, las hojas necesitan líneas super finas, pero lo bueno es que son desordenadas así que si uno se equivoca nadie lo notará.

Well, as always I hope you liked it and don't forget that tomorrow I will be back with another makeup look for the Pokemon Challenge!!! Don't miss it!


Bueno, como siempre, espero que os haya gustado y no os olvideis que mañana volveré con otro look de maquillaje del Reto Pokémon!! No os lo perdais!
Related Posts Plugin for WordPress, Blogger...