Mostrando entradas con la etiqueta Pastel. Mostrar todas las entradas

18 octubre 2014

Pastel Galaxy Hand


Hi Girls!
It is being quite difficult to keep up with my new job and all the things I need to do for the blog. The truth is that I am having trouble to find time to paint my nails and do my makeup, even more to find the inspiration to do things that I really like. But Halloween is coming and this is something that always get my mind to work and this came up the other day.


Hola Chicas!
Esta siendo complicado llevar adelante mi trabajo nuevo y todas las cosas que necesito para el blog. La verdad esque estoy teniendo problemas para encontrar tiempo para pintarme las uñas o maquillarme, más incluso para encontrar la inspiración necesaria para hacer algo que realmente me guste. Pero Halloween está a la vuelta de la esquina y siempre es algo que hace trabajar a mi mente, y esto es lo que salió el otro día.

07 agosto 2013

SummerNails Challenge #7: Olas/Waves

Hi girls!!
It's amazing how fast the time runs... It's another day of the SummerNails Challenge and the theme is Waves! Of course, I immediately thought of the sea and it's big foamy waves...


Hola Chicas!! Es increíble cómo corre el tiempo... Hoy es otro de los días del Reto SummerNails y el tema es Olas! Por supuesto yo pensé inmediatamente en el mar y sus grandes olas con espuma...

How amazing is this design?? And super-appropriate for summer!! I have to say (and you may all already know) this is not my design, it's Nailasaurus' I Wanna go Surfing design. She made an awesomely easy tutorial that I followed step by step, I even did the whole manicure with nail polish! No Acrlics.


A que es un diseño increíble?? Y super-apropiado para el verano!! Tengo que decir (aunque la mayoría puede que ya lo sepais) que este no es mi diseño, es el diseño de Nailasaurus I Wanna go Surfing. Ella tiene un tutorial increíblemente sencillo que he seguido paso por paso, incluso he hecho la manicura entera con esmaltes! Sin acrílicos.

 I used Yes Love Y36 for the sky blue colour of the background and then mixed Kiko 336, Claire's Mood Colour Change Peaceful/Confident and Astor Color Pop 184 as the tutorial said, with brush strokes. Finally, with a make up sponge, I dabbed some white polish, Flormar 400, on the tips to recreate the foam. Seche Vite and it's done!


Utilicé Yes Love Y36 para el color azul cielo de fondo y luego mezclé Kiko 336, Claire's Mood Colour Change Peaceful/Confident y Astor Color Pop 184 como decía el tutorial, con pinceladas. Para terminar, con una esponja de maquillaje, di toquecitos en las puntas con esmalte blanco, Flormar 400, para recrear la espuma. Seche Vite y terminada!

I hope you liked it and don't forget to have a look around the other participants of the challenge!!!
See you soon!!


Espero que os haya gustado y no os olvidéis de echar un vistazo a las demás participantes de reto!!
Nos vemos!!

16 mayo 2013

Seven Deadly Sins Challenge Day 8: Sloth

Hi Girls!
I told you a few days ago that I feel very identified with the Sin Gluttony, but if I had to choose a sin it would be Sloth... I'm not proud of it, but I just looove to sleep or spend an entire afternoon just doing nothing!
The prompt for today says: "Create a manicure inspired on your laziness... or whatever... I'm so tired..." And this is how I felt yesterday... I didn't want to paint my nails, so I decided to do something quick and I remembered I had to swatch my new Loreal Confetti topper...


Hola Chicas!
Ya os dije hace unos días que me sentía muy identificada con el Pecado Gula, pero si tuviera que escoger un pecado sería el de la Pereza... No estoy muy orgullosa de ello pero esque me encaaanta dormir o pasar una tarde entera sin hacer absolutamente nada!
Las intrucciones de hoy dicen: " Crea una manicura inspirada en tu vagancia... o lo que sea... estoy demasiado cansada..." Y así es justo como me sentía ayer... No quería pintarme las uñas así que decidí hacer algo rápido y recordé que tenía que swatchear mi nuevo topper Loreal Confetti...

I also decided to do some stamping because it's an easy way to get a full nail design... Lazy me... I know sometimes stamping it's not lazy at all because sometimes it's really hard, but you know I usually make my own drawing with acrylic paints, so this is lazy for me...
To make this manicure I used Claire's 137 as the base and applied two coats of Loreal Confetti on my middle finger and pinky, no need of fishing or placing at all. Then I stamped with China Glaze Magical from the Romantique's Collection with BM-310 on my index finger and with BM-215 on my ring finger.


También decidí hacer algo de estampación porque es una forma fácil de conseguir un diseño de uña completo... que vaga... Ya sé que estampar no es siempre de vagos porque a veces es una tecnica dificil, pero ya sabeis que normalmente yo hago mis propios dibujos con pinturas acrílicas, así que para mí si es que soy una vaga...
Para hacer esta manicura he utilizado Claire's 137 como base y he aplicado dos capas de Loreal Confetti en mi dedo corazón y el meñique, sin necesitar pescar o recolocar los glitters. Luego estampé con China Glaze Magical de la Colección Romantique, con BM-310 en el dedo índice y con BM-215 en el anular.

It took me less that half an hour to make it, and I used Seche Vite on top, so in less than two minutes was completely dried. I hope you liked and that you are enjoying this challenge so far because we have already done half of it!!
See you, pretties!!


Tardé menos de media hora en hacerla, y utilicé Seche Vite encima, así que en menos de dos minutos estaba completamente seca. Espero que os haya gustado y que esteis disfrutando el Reto hasta ahora, porque ya hemos hecho la mitad!!
Nos vemos preciosidades!!

09 mayo 2013

Seven Deadly Sins Challenge Day 6: Greed

Hi Girls!
The prompt for today's Challenge manicure says: "Remember, More is More... Don't hold yourself back!". I was going to use my BornPretty Studs again because I wasn't very happy with the Manicure I did for the Review, and I followed the Challenge Instructions word by word...


Hola Chicas!
Las intrucciones del Reto para hoy dicen: "Recuerda, Más es Más... No te reprimas!". Iba a usar mis Studs de BornPretty otra vez porque no estaba muy feliz con la Manicura que hice para el Review, y seguí las Instrucciones del Reto palabra por palabra...

 So, instead of doing a little accent to my nails I decided to fill the whole nail with them!! Like an armour!
I started with two coats of Claire's 137 (No name... :(  it's a light mint colour) and then one coat of YSNY 050, a glass flecked topper with pink reflections. Finally I applied the golden studs while it was still wet.


Asi que, en vez de hacer unos pequeños detalles en las uñas decidí llenar la uña completa con ellos!! Como una armadura!
Comencé con dos capas de Claire's 137 (Sin nombre... :( es un color menta claro) y luego una capa de YSNY 050, un topper con flakies que reflejan en rosa. Para termina apliqué los studs dorados mientras estaba aún sin secar.

I wanted the studs to fit my nail perfectly and, as you can see, I made it! I just had to cut them in half with little scissors. They are very easy to cut and I think this is a good way to avoid gaps on the outlines of your nails.


Quería que los studs se ajustaran a mi uña perfectamente y , como podeis ver, lo he conseguido! Sólo tuve que cortarlos por la mitas con unas tijeritas. Son muy fáciles de cortar y creo que es una buena manera de evitar los huevos en los alrededores de las uñas.

I love the colour (I don't know why I don't use it more...) and the texture that the studs give to the look makes it really interesting. I hope you like it too.


Me encanta el color (No sé por qué no lo uso mas...) y la textura que le dan los studs al look lo hacen muy interesante. Espero que os guste a vosotros tambien.

05 mayo 2013

Bornpretty Review: 12 Colours Rhinestones Wheel

Hi Girls!
Today I wanted to show you another product from Born Pretty Store. I have to say that I'm really happy to be reviewing this products because they are things that everyone would like to use but need to try before buying. Today I have the 12 Colours Rhinestones Wheel.


Hola Chicas!
Hoy os quiero enseñar otro producto de Born Pretty Store. Os tengo que decir que estoy muy contenta de estar probando estos productos porque son cosas que todos querríamos usar, pero que necesitamos probar antes de decicir comprarlas. Hoy os traigo la Rueda de Brillantitos en 12 Colores.


As you can see I'm going to have rhinestones for a long long time... The quantity of all the products I have reviewed from BornPretty has been amazing! and this is not an exception. It has a good amount of rhinestones of each colour, and even the clear ones are different from the clear rhinestones they sell (You can see a review here) because they are kind of holographic or iridescent.


Como podeis ver voy a tener brillantes durante mucho mucho tiempo... La cantidad de todos los productos que he probado de BornPretty ha sido increíble! y este no es una exepción. Tiene una buena cantidad de brillantes de cada color, e incluso los transparentes son diferentes de los brillantes transparentes que venden a parte (Podeis ver un review aquí) porque son como holográficos o irisados.


Here you have a comparison between all the colours. With this wheel you will have Red, Yellow, Light Yellow, Green, Navy Blue, Turquoise, Sky Blue, Iridescent Clear, Pink, Violet, Purple and Black. All of them are translucent, except the black ones.


Aquí teneis una comparación entre todos los colores. Con esta rueda tendréis Rojo, Amarillo, Amarillo Claro, Verde, Azul Marino, Turquesa, Celeste, Transparente Irisado, Rosa, Violeta, Morado y Negro. Todos son translúcidos, excepto los negros.


With all those colours I felt that I needed to do something really bright and fun, so I first applied two coats of Yes Love Paste Yellow. When it was completely dried I made the white chevrons with Flormar 400 and the help of pieces of tape. Then I applied one coat of Seche Vite and when it was still wet I stuck the rhinestones following the colours of the rainbow.


Con todos esos colores sentí que tenía que hacer algo verdaderamente llamativo y divertido, así que primero apliqué una capa de Yes Love Pastel Yellow. Cuando estuvo completamente seco hice los triángulos blancos con Flormar 400 y la ayuda de trocos de celo. Luego apliqué una capa de Seche Vite y cuando estaba todavía mojado pegué los brillantes siguiendo los colores del arcoiris.


I hope you liked it, as I said it's really bright, I think, perfect for a parade or a party.... Just perfect to focus the attention of all the ones that surround you on your super shiny nails!! Don't forget  to use my discount code to get 10% off from your entire purchase, and remember that Born Pretty Store has FREE WORLDWIDE SHIPPING!!!
See you soon!!


Espero que os hayan gustado, como oshe dicho son muy llamativas, creo que perfectas para un desfile o una fiesta... Simplemente perfectas para captar la atención de todos los que hay a tu alrededor en tus uñas super brillantes!! No os olvideis de usar mi código de descuento para conseguir un 10% menos en tu compra completa, y recordad que Born Pretty Store tiene ENVIO MUNDIAL GRATUITO!!!
Nos vemos pronto!!

23 abril 2013

Seven Deadly Sins Challenge Day 1: Lust


Hi Girls!!
I am so excited today because we are on the first day of a Challenge created by me and with the help of the amazing Alice from OneNailToRuleThemAll (OMG I love her blog name!!!!!). We will be posting one or twice a week (depends on how busy we are) during seven weeks  to make the Seven Deadly Sins. We are are going to be a good number of amazingly talented bloggers (that gives me a lot of fangirl moments) and I hope you enjoy it as much as we are going to do it. Also I forgot to say that the beautiful girls that represent each of the Deadly Sins on our Logo, Instructions and Banners are made by the amazing DeviantArt Artist called Dahlig.


Hola Chicas!!
Hoy estoy muy emocionada porque estamos en el primer día de un Reto creado por mi y con la ayuda de la inreíble Alice de OneNailToRuleThemAll (OMG me encanta su nombre del blog!!!!). Vamos a publicar una o dos veces a la semana (dependiendo de lo ocupada que esté cada una) durante siete semanas para hacer los Siete Pecados Capitales. Somos un buen número de bloggers con talentos increíbles (que me da muchos momentos de fangirl) y espero que lo disfruteis tanto como lo vamos a hacer nosotras. También tengo que decir que se me ha olvidado contaros que las chicas tan guapas que representan cada uno de los Pecado Capitales en nuestro Logo, Instrucciones y Banners están hechas por la Artista de DeviantArt llamada Dahlig.


We are going to start with Lust and the first prompt of the challenge says: "Be a bad girl and make something you have wanted to do soo badly". So I decided to make quilted nails! I had always loved this look because it's elegant and eye catching, but it looked really complicated and I never tried it... So, today is the day! I followed DullLikeGlitter's Tutorial and I used Yes Love Pastel Pink and Essence Matte TopCoat. Then I stick silver beads to every joint.


Vamos a empezar con Lujuria y la primera intrucción del reto dice: "Se una chica mala y haz algo que hayas querido hacer desde hace muucho tiempo". Así que decidí hacer uñas acolchadas! Siempre me ha encantado este look porque es muy elegante y llamativo, pero parecía muy complicado de hacer y nunca lo había intentado... Así que, hoy es el día! He seguido el Tutorial de DullLikeGlitter y he utilizado Yes Love Pastel Pink y Essence Matte TopCoat. Luego pegué las bolitas de caviar plateadas en cada unión.


I loved how it looked, even it's not perfect because in some places I pressed too hard and you can see my nail through the polish... I think the nail that looks better is the ring finger because the squares are perfect and the have that quilted look that I love!
I hope you like it too and don't forget this week would be another manicure inspired on Lust, and I promise the next one would be more accurate with the sin....


Me encantó como quedó, incluso aunque no esté perfecta porque en algunos sitios presioné demasiado fuerte y se puede ver mi uña a través del esmalte... Creo que la uña que mejor está es la del dedo Corazón porque los cuadrados están perfectos y tiene ese aspecto acolchado que me encanta!
Espero que os guste también y no os olvideis de que esta semana habrá otra manicura inspirada en la Lujuria, y os prometo que la próxima será más adecuada al pecado...

21 abril 2013

Reto Zodíaco: Tauro

Hi Girls!
Today I start a new Challenge and it's theme is Zodiac Signs. The creator of the idea is Nati from Nataliciosa.com and about 20 bloggers are doing it. We are going to take it easy and make each sign on their corresponding dates, so this challenge it's going to take a whole year!
The ones that are born between April 21st and May 20th are under the influence of Taurus, they are supposed to be stubborn and grumpy, but quiet and patient.


Hola Chicas!
Hoy comienzo un reto nuevo y su tema es los Signos del Zodíaco. La creadora de la idea es Nati de Nataliciosa.com y alrededor de 20 bloggers están participando. Vamos a tomárnoslo con calma y hacer cada signo en sus fechas correspondientes, así que este reto nos va a llevar un año entero!
Los nacidos entre el 21 de Abril y el 20 de Mayo están bajo la influencia de Tauro, y se supone que son cabezotas y gruñones, aunque también son calmados y muy pacientes.


I decided to go with a simple and easy manicure because I wanted to focus on the background colour. I used Yes Love Pastel Blue as the base and then applied one coat of one of my little nail treasures, Essie Shine of the Times, then I freehanded the Taurus Sign with White and Black Acrylics. I used this picture made by Nati as my inspiration.


Decidí hacer una manicura simple y sencilla porque me quería centrar en el color de fondo. He utilizado Yes Love Pastel Blue como base y luego he aplicado una capa de uno de mis tesoros, Essie Shine of the Times, luego dibujé a mano el Signo de Tauro con Acrílicas Blanca y Negra. He utilizado esta imagen que creó Nati como inspiración.


I promise I will put more effort on the next one, but now I'm on to simple and neat manicures and I also was just waiting for an excuse to wear my Essie polish again. Hahaha...
Let's see more pictures!!


Os prometo que me esforzaré más la próxima vez, pero ahora mismo me tiran más las manicuras simples y llanas y también estaba esperando una excusa para usar mi esmalte Essie otra vez. Jajaja...
Vamos a ver más fotos!!


The last one is my absolute favourite because it shows all the colours of the flakies. Do you agree with me?
I hope you liked it, here you can see the other challengers, I am sure they have made some amazing work!


La última es la que más me gusta de todas porque muestra todos los colores de los flakies. Estais de acuerdo?
Espero que os haya gustado, aquí podeis ver a las otras participantes, estoy segura de que habrán hecho un trabajo increíble!

31 diciembre 2012

Reto Oh Oh Oh! #9: Confetti!

Happy New Year to Everyone!!!
Here at my house everything is a mess! We are waiting for all the family to come for dinner and the table is half set, the dinner is being cooked...
We have to say goodbye to the old year 2012 as well as this wonderful Challenge. This is the last manicure of the Oh Oh Oh! Challenge created by Xiito and I want to dedicate it to her because I know she loves the white base manicures.


Feliz Año Nuevo a Todos!!!
Aquí en mi casa todo está hecho un desastre! Estamos esperando a que la familia venga a cenar y la mesa esta medio puesta, la cena se esta haciendo...
Tenemos que decirle adiós al Año Viejo 2012 igual que a este maravilloso Reto. Esta es la última manicura del Reto Oh Oh Oh! creado por Xiito y se la quiero dedicar a ella porque sé que le encantan las manicuras con base blanca.


What's better to make confetti than a jelly sandwich with Flormar 400 and Essence Circus Confetti? I loved this combination, it reminds me of China Glaze It's A Trap-eze from the Cirque du Soleil Collection, but less packed and with a milky base instead of jelly. For the ring finger I decided to mix some pastel beads and make a caviar nail. What do you think?


Qué mejor para hacer confetti que un jelly sandwich con Flormar 400 y Essence Circus Confetti? Me ha encantado esta combinación, me recuerda al It's A Trap-eze de la Coleccion Cirque du Soleil, pero menos compacto y con base milky en vez de jelly. Para el dedo anular decidí mezclar algunas bolitas de color pastel y hacer una uña caviar. ¿Que os parece?


This manicure is not what I'm going to wear on New Year's Eve, I will update those on Wednesday. I hope you liked as much as I do. Have fun tonight!!!


Esta manicura no es la que voy a llevar en Noche Vieja, esa la subiré para enseñárosla el miércoles. Espero que os haya gustado tanto como a mi. Pasadlo bien esta noche!!!

30 agosto 2012

Disney Challenge Day 16: Mary Poppins

With a spoonful of sugar helps the medicine go down...

I loved all the songs in this movie, when I was little I used to like more the movies that had songs that I liked to sing. :3
Mary Poppins is a 1964 musical film starring two of my most favourite actors ever, Julie Andrews and Dick Van Dike, produced by Walt Disney and based on the Mary Poppins book series by P.L. Travers. There is also a musical based on the same books.
I wanted to do something simple and quick because I am painting my room, so I don't have a lot of time to spent on my nails. I hope you like it.


                                ------------------------------------------------------------


Con un poco de azúcar esa píldora que os dan, esa píldora que os dan pasará mejor...

Me encantaban todas las canciones de esta película, cuando era pequeña me solían gustar más las películas con canciones que me gustaban cantar. :3
Mary Poppins es una película musical de 1964 en la que aparecen dos de mis actores preferidos, Julie Andrews y Dick Van Dike, producida por Walt Disney y basada en la serie de libros de Mary Poppins de P.L. Travers. También hay un musical basado en los mismos libros.
Quería hacer algo rápido y simple porque estoy pintando mi habitación y no tengo mucho tiempo para pintarme las uñas. Espero que os guste.


There she is! Mary Poppins flying through all the roofs and chimeneys of London, with his umbrella. It's not very visible but I made a gradient in the background, from white on the tips to baby blue. I think you can see it better on my ring finger.


                                ------------------------------------------------------------


¡Ahí la teneis! Mary Poppins volando a través de los tejados y chimeneas de Londres, con su paraguas. No se ve demasiado pero he hecho un degradado en el fondo, de blanco en las puntas hasta celeste. Creo que donde mejor se ve es en el dedo anular.


I'm sorry I forgot to clean that black blob on my ring finger, I didn't notice it until I was editing the pictures.
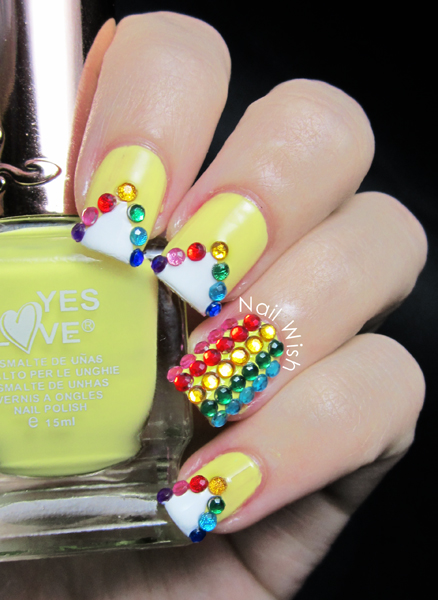
To make this manicure I used my new Yes Love Pastel Blue polish and made a gradient with Nagelim White. Yes Love Pastel Blue is really creamy and shiny, If I hadn't painted with acrylics on top I wouldn't have needed a topcoat.


                                ------------------------------------------------------------


Siento haber olvidado limpiar ese punto negro de mi dedo anular, no me di cuenta hasta que estaba editando las fotos. Para hacer esta manicura he usado mi esmalte Yes Love Pastel Blue nuevo e hice un degradado con el Nagelim White. Yes Love Pastel Blue es muy cremoso y brillante, si no hubiera dibujado encima con los acrílicos no hubiera necesitado topcoat.


Related Posts Plugin for WordPress, Blogger...