Mostrando entradas con la etiqueta Flormar. Mostrar todas las entradas

14 febrero 2017

I am BANANAS about you!


Hello and Happy Valentine's Day!!
I think it is one of the first days that I achieve to have a Valentine manicure for the actual day. This time I not only have done it on time, but I freehanded the design!


Hola y Feliz San Valentín!
Creo que es uno de los primeros dias que consigo tener una manicura de San Valentin para el dia que es. Esta vez no solo lo tengo a tiempo sino que lo he dibujado a mano!

30 diciembre 2013

Crumpet's Christmas Winter Challenge #8: New Year's Eve


Hi Girls!
Finally this is the last day of this year's Christmas Challenge, and as usual this last manicure is about New Year's Eve and I knew I wanted to do something special.


Hola Chicas!
Finalmente hoy es el último día del Reto de Navidad de este año, y como es normal esta última manicura es sobre Nochevieja y ya sabía que quería hacer algo especial.

12 diciembre 2013

Crumpet's Christmas Winter Challenge #3: Holiday Colours


Hello Girls!
Christmas is getting nearer and this challenge is also moving forward and I am liking every day of it! Today I have made a skittle manicure (all nails different but forming a cohesive whole) with my favourite Holiday Colours, white, green, red, golden, silver and black, did I miss any? haha


Hola Chicas!
La Navidad se va acercando y este reto tambien va cogiendo carrerilla y me están gustando cada uno de los días! Hoy he hecho una manicura skittle (todas las uñas diferentes formando un unico conjunto) con mis Colores de Fiesta favoritos, blanco, verde, rojo, dorado, plateado y negro, se me olvida alguno? jaja

The perfect holiday manicure! On my Index Finger I have used a base of China Glaze Holly Day and then topped it with Yes Love Snow Flack 17. The Middle and Ring Fingers have Flormar 310 as the base, but the first one has stripes made with Wynie 302 and BPS Striping Tape; and the second one has different sized dots made with China Glaze Passion. Last, but not least, we have Kiko Starry Black one of the polishes from the Sugar Matt Collection that is an exact dupe for Zoya Pixie Dust Dahlia.


Es la manicura de Navidad perfecta! En mi dedo Índice he utilizado como base China Glaze Holly Day y encima Yes Love Snow Flack 17. Los dedos Corazón y Anular llevan Flormar 310 de base, pero el primero tiene líneas con Wynie 302 y Stipping Tape de BPS; y el segundo puntos de diferentes tamaños hechos con China Glaze Passion. Por último, tenemos Kiko Starry Black, uno de los esmaltes de la Colección Sugar Matt que es un clon exacto de Zoya Pixie Dust Dahlia.

I think my favourite nail is the index, I really like that Yes Love topper and pairing it with Holly Day was a terrific combination! Also I have seen so many times textured polishes used for accent nails and I have never tried it until now, and I think I like it, although texture is not what I really like to feel on my nails...


Creo que mi uña favorita es la ïndice, me encanta ese topper de Yes Love y juntarlo con Holly Day hizo una combinación genial! Además he visto tantas veces los esmaltes con textura como accent nails y nunca lo había intentado hasta ahora, creo que me gusta, aun sabiendo que textura no es lo que más me gusta sentir en las uñas...

Overall I am very happy with how this manicure turned out. What do you think?
See you soon!!


En general estoy muy contenta con como ha salido esta manicura. ¿Qué pensais vosotros?
Nos vemos pronto!!

08 diciembre 2013

Crumpet's Christmas Winter Challenge #2: Winter Nature

Hi Girls!
Seriously... this thing of posting and no one getting the updates and reading it is making me really sad... I am working on a solution but I may have to start the blog layout from scratch and I have no ideas... So if you are reading this I would appreciate a comment, just to know that you are still out there...
Today I am bringing you the second manicure of the Crupet's Christmas Winter Challenge, inspired on Winter Nature.


Hola Chicas!
De verdad... esto de hacer entradas y que a nadie le lleguen las actualizaciones y nadie lo lea me pone tan triste... Estoy trabajando en la solucion pero puede que tenga que comenzar con la plantilla del blod desde cero y no tengo ideas... Así que si estais leyendo esto me alegraria mucho que me dejarais algun comentario, solo para saber que seguis por ahi...
Hoy os traigo la segunda manicura del reto de Navidad de The Crumpet, inspirada en Naturaleza Navideña.


23 noviembre 2013

Reto Zodíaco: Sagitario


Hi Girls!
This manicure is special for me because finally we are doing my own zodiac sign, Sagittarius, and I knew what I wanted to do since this challenge started, I hope you like it.


Hola Chicas!
Esta manicura es especial para mi porque por fin hacemos mi signo del zodíaco, Sagitario, y sabía lo que quería hacer desde que comenzamos este reto, espero que os guste.

17 noviembre 2013

Saturday (Sunday) Swatches and Nail Art

Hi Girls!
I am here today with this late Saturday Swatch that I turned into a Nail Art because I didn't had time to do it yesterday. If you like it there will be more pictures after the jump!


Hola Chicas!
Hoy estoy aqui con un tardío Saturday Swatch que he convertido en Nail Art porque no me dio tiempo de hacerlo ayer. Si os gusta habrá más fotos tras el salto!


30 octubre 2013

Creepy Porcelain Doll

Hi Girls!
Thank you so much for supporting me with my Youtube start yesterday, it meant a lot to me. But onto the Halloween posts again... if you follow me on Instagram you would have already seen that my Halloween costume this year is going to be a Creepy Doll and I have been playing not only with makeup but with nails too. More pictures and a Tutorial! After the jump.


Hola Chicas!
Gracias por vuestra acogida en mis comienzos con Youtube ayer, significa mucho para mi. Pero siguiendo con los posts de Halloween... si me seguís en Instagram habréis visto ya que mi disfraz de Halloween de este año va a ser Muñeca de Porcelana y he estado no sólo juagndo con el maquillaje, sino también con las uñas. Más fotos y un Tutorial después del salto.


21 octubre 2013

Skulls and Roses

Hi Girls!
This year I have not joined any Halloween Challenge, but that doesn't mean that we are not going to have any Halloween manicures around here, in fact, from today every manicure will be Halloween themed (except maybe one review I prepared a long time ago), starting with this Skulls and Roses design.


Hola Chicas!
Este año no me he unido a ningúr Reto de Halloween, pero eso no significa que no vayamos a tener manicuras de Halloween por aquí, es más, desde hoy todas las manicuras van a ser de temática Halloween (excepto tal vez algun review que tenía preparado hace tiempo), comenzando por este diseño de Calaveras y Rosas.


22 septiembre 2013

BornPretty Store Stripping Tape

Hi Girls!
Today I want to show you a new nail art item from BornPretty Store. I have been wanting to try the stripping tape for so long... and I finally have it!!


Hola Chicas!
Hoy os quiero enseñar otro producto de nail art de BornPretty Store. Llevo queriendo probar los stripping tape tanto tiempo... y por fin es mío!!

Source: BornPretty Store

They have a lot of colours to choose from, and I asked for #27 Laser Silver Grey. 
I wanted to show you the multiple things you can do with the stripping tape, so I made a skittle manicure, a skittle mani is one where all the nails are different but form a cohesive whole, this time all designs have been made with the same pallet of colours and also using stripping tape.


Tienen muchos colores entre los que escoger, y yo pedí el #27 Laser Silver Grey.
Os quería enseñar todo lo que podéis hacer con el stripping tape, así que he hecho una manicura Skittle, una manicura Skittle es en la que todas las uás son diferentes pero forman un conjunto cohesionado, esta vez todos los diseños están hechos con la misma paleta de colores y usando el stripping tape.

The first nails is the easiest one, just one coat of Yes Love Pastel Purple and a geometric design on top using the tape. The middle is a colour block design with Yes Love Pastel Purple, Flormar 400 and Easy Paris 402.


La primera uña es la más sencilla, simplemente una capa de Yes Love Paste Purple yun diseño geométrico usando el stripping tape. El del dedo corazón es un diseño colour block con Yes Love Pastel Purple, Flormar 400 y Easy Paris 402.

The rest of the nails is what you can do painting on top of the tape and removing it later, on the ring finger we have a gradient from light to dark purple where I placed the stripes and removed after I had done the gradient on top, and finally on the last nail I did he same, painted one coat of Yes Love pastel Purple, placed the tape making stripes and applied one coat of Flormar 400 on top, and before it was dry I removed the stripes showing the colour from underneath.


El resto de las uñas es lo que puedes hacer pintando encima del celo y retirándolo luego, en el dedo anular tenemos un degradado de morado claro a oscuro donde coloqué las tiras y las retiré tras haber hecho el degradado encima, y finalmente, en la última uña hice lo mismo, pinté una capa de Yes Love Pastel Purple, coloqué el celo haciendo líneas y apliqué una capa de Flormar 400 encima, y antes de que estuviera seco retiré las tiras dejando ver el color de debajo.

I hope you liked it! The design took me no longer than 20 min, so it's a good solution for when you don't have time to make something difficult but you don''t want to wear plain nails. Remember that you can find a lot of different stripping tape Here, and that you can use my Coupon Code to get 10% discount!!
See you soon!


Espero que os haya gustado! El diseño no me llevó más de 20 min, así que es una buena solución para cuando no hay tiempo de hacerse algo complicado pero no queremos llevar las uñas lisas. Recordad que podeis encontrar muchos tipos de stripping tape Aquí, y que podéis usar mi Cupon para tener un 10% de descuento!!
Nos vemos pronto!

09 septiembre 2013

Nail Wish is at The Clockwise Nail Polish

Hi!!
Today my nails are at The Clockwise Nail Polish blog! I am so excited!. I did some matching nails and keys and I also tried a gradient stamping for the first time, so if you are curious and want to see more images and know how I did it go to Cristina's blog!! See you there!


Hola!!
Hoy mis uñas están en el blog The Clockwise Nail Polish! Estoy tan emocionada! He hecho un conjunto de uñas y llave y también he probado por primera vez un estampado degradado, así que si sois curiosos y quereis ver más fotos y saber cómo lo hice id al blog de Cristina!! Nos vemos allí!


21 agosto 2013

SummerNails Challenge #9: Barcos/Boats

Hi Girls!!
Today I almost forgot about the SummerNails Challenge!! The theme for today is Boats! I wasn't feeling like painting a boat on my nails, so I decided to make some nautical nails instead.


Hola Chicas!
Hoy casi se me olvida el Reto Summer Nails!! Es tema de hoy es Barcos! No me apetecía pintar barquitos en las uñas, así que decidí hacer unas uñas nauticas.

I first applied two coats of Flormar 400 and waited until it was completely dry. While I was waiting I cut two stripes of tape for each finger and then placed them on the nails. On top I made a gradient with Flormar 400 and Kiko 336 and removed the tape.


Primero apliqué dos capas de Flormar 400 y esperé hasta que estuvo completamente seco. Mientras esperaba fui cortando dos tiras de celo para cada dedo y luego las coloqué en las uñas. Encima hice un degradado con Flormar 400 y Kiko 336 y retiré las tiras de celo.

As you can see on the ring finger I made the gradient backwards and placed some round golden studs from Born Pretty Store making an anchor shape.


Como podeis ver en el dedo anular hice el degradado al contrario y coloqué algunas tachuelas redondas doradas de Born Pretty Store haciendo un ancla.

I loved this manicure so much that I wore it for a whole week!! I hope you liked it too.


Me gustó esta manicura tanto que la llevé durante una semana entera!! Espero que os haya gustado a vosotros también.

07 agosto 2013

SummerNails Challenge #7: Olas/Waves

Hi girls!!
It's amazing how fast the time runs... It's another day of the SummerNails Challenge and the theme is Waves! Of course, I immediately thought of the sea and it's big foamy waves...


Hola Chicas!! Es increíble cómo corre el tiempo... Hoy es otro de los días del Reto SummerNails y el tema es Olas! Por supuesto yo pensé inmediatamente en el mar y sus grandes olas con espuma...

How amazing is this design?? And super-appropriate for summer!! I have to say (and you may all already know) this is not my design, it's Nailasaurus' I Wanna go Surfing design. She made an awesomely easy tutorial that I followed step by step, I even did the whole manicure with nail polish! No Acrlics.


A que es un diseño increíble?? Y super-apropiado para el verano!! Tengo que decir (aunque la mayoría puede que ya lo sepais) que este no es mi diseño, es el diseño de Nailasaurus I Wanna go Surfing. Ella tiene un tutorial increíblemente sencillo que he seguido paso por paso, incluso he hecho la manicura entera con esmaltes! Sin acrílicos.

 I used Yes Love Y36 for the sky blue colour of the background and then mixed Kiko 336, Claire's Mood Colour Change Peaceful/Confident and Astor Color Pop 184 as the tutorial said, with brush strokes. Finally, with a make up sponge, I dabbed some white polish, Flormar 400, on the tips to recreate the foam. Seche Vite and it's done!


Utilicé Yes Love Y36 para el color azul cielo de fondo y luego mezclé Kiko 336, Claire's Mood Colour Change Peaceful/Confident y Astor Color Pop 184 como decía el tutorial, con pinceladas. Para terminar, con una esponja de maquillaje, di toquecitos en las puntas con esmalte blanco, Flormar 400, para recrear la espuma. Seche Vite y terminada!

I hope you liked it and don't forget to have a look around the other participants of the challenge!!!
See you soon!!


Espero que os haya gustado y no os olvidéis de echar un vistazo a las demás participantes de reto!!
Nos vemos!!

23 julio 2013

Reto Zodíaco: Leo

Hi Girls!
I have been delaying this post because I am not very pleased with the result. But I didn't have time to redo it so I am taking this as an opportunity to learn to not to be so perfectionist and accept my mistakes. First of all I want to show you my inspiration.


Hola Chicas!
He estado posponiendo este post porque no estoy muy contenta con el resultado. Pero no tenía tiempo para rehacerla y estoy aprovechando esto como una oportunidad para aprender a no ser tan perfeccionista y aceptar mis errores. Primero os quiero enseñar mi inspiración.

So pretty that I fell in love with it and thought I could recreate it (more or less hahaha) I am showing you this image first because all the people that I showed my manicure had troubles recognizing what it was...


Es tan bonita que me enamoré y pensé que podría recrearla (mas o menos hahaha) Os estoy enseñando esto primero porque todas las personas a las que les enseñé mi manicura han tenido problemas reconociendo lo que era...

Well, at least I can see it hahaha. I want to say that I am not fishing for compliments when I say that I don't like something that I have done... I am just a perfectionist and when something does not match what I was expecting I feel really disappointed, but sometimes I think that this kind of post help me in some way...


Bueno, al menos yo puedo verlo jajaja. Quiero deciros que no estoy buscando elogios cuando digo que algo que he hecho no me gusta... Sólo soy una perfeccionista y cuando algo no coincide con mis espectativas me siento muy decepcionada, pero a veces pienso que este tipo de post me ayuda de alguna forma...

There is the lion of Leo!!! I used Flormar U08 for the base and everything else is done with different shades of blue acrylic paints.


Ahí esta el león de Leo!!! He usado Flormar U08 para la base y todo lo demas está hecho con diferentes tonos de pinturas acrílicas azules.

Well, one positive thing is that I really like the index nail, a perfect galaxy manicure!!
See you soon!


Bueno, una cosa positiva es que me gusta mucho la uña del índice, una manicura de galaxia perfecta!!
Nos vemos pronto!

10 julio 2013

SummerNails Challenge 3: Fresas/Strawberries

Hi Girls!!
Another day of the SummerNails Challenge, we had to get inspired by strawberries and with the heat wave we are having in Seville the only thing I could think of was Strawberry Milkshake (Iced strawberry milkshake..... yummmmm!!!!)


Hola Chicas!!
Otro día más del Reto SummerNails, nos teníamos que inspirar en fresas y con la ola de calor que tenemos aqui en Sevilla lo único en lo que podía pensar era en Batido de Fresa (Batido de fresa helado... omnomnomnommmmm!!!)
The other day I went to a Chinese Store with my friends and we found some really interesting Yes Love Polishes with jelly base and black glitter, this pastel pink is Yes Love 700 and totally remind me to a strawberry milkshake with chocolate sprinkles. On the ring finger I used Flormar 310 as the base and Yes Love 700 inside the glass. All the details are made with acrylic paints.


El otro día fui a un chino con mis amigas y encontramos unos esmaltes de Yes Love muy interesantes con base jelly y glitter negro, este rosa pastel es el Yes Love 700 y me recuerda totalmente a un batido de fresas con pepitas de chocolate. En el dedo anular use Flormar 310 en la base y el Yes Love 700 dentro del vaso. Todos los detalles estan hechos con pinturas acrílicas.
I hope you liked it and if you are interested on the Yes Love Polishes we bought you can have a look on Mis Potingadas y Más, Xiito bought the entire collection and she has made some swatches ;).
See you soon!!


Espero que os haya gustado y si estais interesados en los esmaltes de Yes Love que compramos podeis echarle un vistazo en Mis Potingadas y Más, Xiito compró la colección completa y ha hecho algunos swatches ;)
Nos vemos Pronto!!

03 julio 2013

SummerNails Challenge 2: Playa/Beach

Hi Girls!!
Today I finished my exams!! YAYYY!!! And to celebrate it I have recreated for today's Summer Nails Challenge theme, one of my all time favourites manicure: Chalkboard Nails' Beauty and the Beach.


Hola Chicas!!
Hoy he terminado los exámenes!! BIENNN!!! Y para celebrarlo he recreado para el tema de hoy del Reto SummerNails, una de mis manicuras preferidas desde siempre: Beauty and the Beach de Chalkboard Nails.

This was the first manicure I saw from Chalkboard Nails, and I fell in love with it, (and with all her other manicures hehe). I didn't want to copy it exactly, but everything was so perfect that I only changed the position of the designs. (Her sand nails are on the Index and Middle finger, and the other three have the water design).


Esta fue la primera manicura que vi de Chalkboard Nails, y me enamoré de ella (y de todas sus otras manicuras jaja). No quería copiarla exactamente, pero todo estaba tan bien hecho que solo cambié la posición de los diseños. (En la suya  las uñas de arena están en los dedos Índice y Corazón, y los otros tres tienen el diseño del agua).

For the water nails I made a gradient using Flormar 310 and Yes Love Y36. Then, using white acrylics, I freehanded water reflections. To make the sand nails I started with one coat of Essence Gold Rush, but it ended almost covered with tiny dots of different shades of nudes. I freehanded the little starfish with acrylic paints too.


Para las uñas de agua hice un degradado con Flormar 310 y Yes Love Y36. Luego, usando acrílica blanca, dibujé los reflejos del agua. Para hacer la arena comencé con una capa de Essence Gold Rush, pero quedó casi cubierta por los mini puntitos de diferentes tonos de nudes. Dibujé la pequeña estrella de mar también con acrílicos.

I have to remove this manicure soon to make some more, but when I take vacations to go to the beach I will be wearing these again for sure!! I hope you liked it!
See you soon!!


Me tengo que quitar la manicura para hacer otras pocas, pero cuando me pille vacaciones para ir a la playa me las pintaré así de nuevo seguro!! Espero que os haya gustado!
Nos vemos pronto!!

22 junio 2013

Reto Zodíaco: Cáncer

Hi everyone!!
This week I am really happy because I have passed all the exams that I have done! To celebrate it I have some real Nail Art. And what I mean for real is nail art made with acrylics and no tricks like plastic bags or markers ;) Also I am in love with the result so, I cant wait to show you the Cancer manicure.


Hola a todos!!
Esta semana estoy muy contenta porque he aprobado todos los examenes que he hecho hasta ahora! Para celebrarlo os traigo Nail Art de verdad. Y a o que me reviero con "de verdad" es a nail art hecho con pinturas acrílicas, sin trucos como bolsas de plástico o rotuladores permanentes ;) Además estoy encantada con el resultado así que no puedo esperar para enseñaros esta manicura de Cáncer.

Hi little guy Crab!! hehe I found this image on Google looking for inspiration and I knew immediately that I needed to introduce him on the manicure. Besides the background everything is made with acrylic paints.


Hola pequeño cangrejito!! jeje Encontré esta imagen en Google mientras buscaba inspiración y supe enseguida que tenía que introducirlo en la manicura. A parte del fondo todo está hecho con pinturas acrílicas.

To make the background I used the Watercolour Technique, applying first a white base with Flormar 310 and then making random dots with Ecovital Manantial and Easy Paris 402, then I spread the blobs gently with a soft brush dipped in nail polish remover. Creating this amazing effect.


Para hacer el fondo utilicé la Técnica de Acuarela, aplicando primero una base blanca con Flormar 310 y luego haciendo puntos al azar con Ecovital Manantial y Easy Paris 402, luego extendí las gotitas con cuidado usando un pincel suave mojado en quitaesmaltes. Creando este efecto tan bonito.

Purple and white are the colours for this zodiac sign and that's why I chose to make that background. Also people born under the influence of cancer are shy people that love their home, and think about it as their own peaceful place. I hope you all enjoyed this manicure!!


El morado y el blanco son los colores de este signo del zodíaco, por eso he escogido hacer este fondo. También sabemos que las personas que nacen bajo la influencia de Cáncer son personas tímidas que aman su cas, y piensan en ella como su propio refugio de paz. Espero que os haya gustado la manicura!!

27 mayo 2013

Esmaltes Purple Professional

Hi there!!
Today I bring you a little bit different post, because a new brand of Nail Polish called Purple Professional sent me some polishes to show you, and I am really excited because I loved each one I received!
But first of all I want to talk a little about this brand: Purple Professional is a Portuguese Cosmetic brand that is expanding their business internationally, they care about the environment and make very good quality polishes, let's see it!


Hola a todos!!
Hoy os traigo un post un poco diferente, porque una marca nueva de Esmaltes llamada Purple Professional me ha enviado algunos esmaltes para enseñaros, y estoy muy contenta porque me han encantado cada uno de los que me han mandado!
Pero antes de nada os quiero hablar un pelin de la marca: Purple Professional es una marca de Cosmética Portuguesa que se está expandiendo de forma internacional, se preocuan por el medio ambiente y hacen esmaltes de muy buena calidad, vamos a verlo!

How cute is their packaging? I love they have their bottles decorated with little birds and dragonflies... The package reminds me a lot to Catrice Polishes, if it's not the same... Purple Professional's bottles contain 10 ml of nail polish and their brushes are flat with very good quality fibers.


A que es bonito su packaging? Me encanta que hayan decorado sus botes con pajaritos y libélulas... Los botes me recuerdan mucho a los esmaltes de Catrice, si no son los mismos.. Los esmaltes de Purple Professional contienen 10 ml y sus pinceles son planos y con fibras de buena calidad.

The only two things I would complain about these polishes are that some of their shades are really hard to photograph with accurate colour and that they don't have names, just numbers... This is number 39 an orangish coral colour, even if it looks a little bit pinker on the swatches.


Las dos únicas cosas sobre las que me quejaría de estos esmaltes serían que algunos tonos son muy complicados de fotografiar con con color fiel y que no tienen nombres, sólo números... Este es el número 39, un color coral anaranjado, aunque parezca un poco más rosa en los swatches.

This gorgeous colour is number 44. I have seen it described as a strong bubblegum neon pink, but it seems more neon bright purple to me, mostly when I compare it to the next shade they sent me...


Este color tan bonito es el número 44. Lo he visto descrito como un rosa chicle neón, pero a mi me parece más un morado claro neón, sobre todo cuando se compara con el siguiente tono que me enviaron...

This polish is the number 65, a bright neon pink, or a bubblegum pink in my opinion... It was the sheerest of all, because I used two coats for all the swatches and with this colour you can still see through.
I didn't use topcoat on any of the swatches, all the shine you see on the pictures is from the polish (So shiny on their own!) The formula and application were superb, no issues with bald spots or any kind of problems...


Este esmalte es el número 65, un rosa neón brillante, o en mi opinión un rosa chicle... Es el más transparente de todos, porque usé dos capas en todos los swatches y en este todavía se ve a través.
No utilicé topcoat en ninguno de los swatches, todo el brillo que se ve en las fotos es del esmalte (Son tán brillantes por sí solos!!) La fórmula y aplicación fueron impecables, sin problemas con huecos o ningún tipo de problema...

I'm sorry for the long post but, the first time I saw the three shades together I knew I had to do a neon gradient with them, I am really impatient for summer to come and this manicure helped me through it...


Lo siento por el post tan largo, pero la primera vez que vi los tres colores juntos supe que tenía que hacer un degradado neon con ellos, estoy muy impaciente por que llegue el verano y esta manicura me ayuda a superarlo...

At the top of this post I told you that Purple Professional is a brand that care about the environment, and I said it because the best thing about these polishes is that they are 5 FREE, this means that they don't use the next 5 dangerous substances as ingredients of their polishes:
- Toluene
- Formaldehyde
- Phthalates
- Camphor
- Formaldehyde Resin


Al principio del post os dije que Purple Professional es una marca que se preocupa por el medio ambiente, y lo dije porque lo mejor de estos esmaltes es que son 5FREE, esto significa que no utilizan las siguientes sustancias peligrosas como ingredientes de sus esmaltes:
- Tolueno
- Formaldehido
- Ftalatos
- Camphor
- Resina de Formaldehido

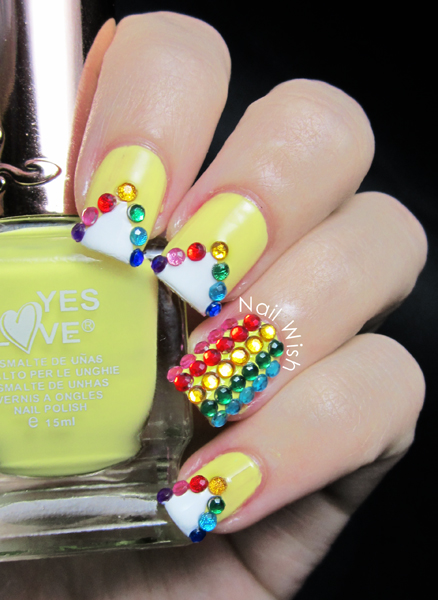
Of course I wanted to finish the review with some nail art, using the neon gradient as the base. To make it I first applied one coat of Flormar 400, because when you want your neon colours to really pop it's better to use a white base underneath. Then I made the gradient with a make up sponge and drew the stars by hand with my Black Sharpie Marker.
I hope you liked it!!


Por supuesto tenía que terminar el review con algo de nail art, usando el degradado neon como base. Para hacerlo primero apliqué una capa de Flormar 400, porque cuando quieres que los colores neon resalten es mejor usar una base blanca debajo. Luego hice el degradado con una esponja de maquillaje y dibujé las estrellas a mano con mi Rotulador Negro Permanente.
Espero que os haya gustado!!

24 mayo 2013

Reto Zodíaco: Géminis

Hi Girls!!
This week is being absolutely crazy! I officially started my final exams and this is taking a lot of time of my free/nail art time... But the true reason for the delay of all the manicures of this week has been that I ran out of nail polish remover and I had to wait until I had time to go to buy some more to paint my nails. Anyway here it is the manicure for the Zodiac Challenge, today the inspiration is Gemini.


Hola Chicas!!
Esta semana está siendo de locos! He comenzado oficialmente mis examenes finales y están llevándose gran parte de mi tiempo libre/nail art... Pero la verdadera razón del retraso de las manicuras de esta semana ha sido que me quedé sin quitaesmaltes y he tenido que esperar hasta que he tenido tiempo para ir a comprar más para poder pintarme las uñas. De todas formas aquí teneis la manicura del Reto del Zodíaco, hoy la inspiración es Geminis.

The ones that are born between May 21st and June 20th are under the influence of Gemini, they are supposed to be playful, elegant, intelligent and love family. The colour of this sign is yellow, but I don't think that colours goes well with my skintone, so I decided to use a very bright golden glitter instead, and make a gradient with it. 


Los que han nacido entre el 21 de Mayo y el 20 de Junio están bajo la influencia de Geminis, supuestamente son juguetones, elegantes, inteligentes y amantes de la familia. El color de este signo es el amarillo, pero no creo que este color vaya bien con mi tono de piel, así que he utilizado glitter de un color dorado brillante, y he hecho un degradado con él.


For the two girls I used This Picture as inspiration. I drew the hair and faces without the black lines with acrylic paints and then outlined it and made the small details with the Black Sharpie Marker, I also added Gemini's Signs with it. The polishes I used for this manicure were Flormar 400 for the base and Easy Paris Golden Glitter.
I hope you liked it!!! Good Night!


Para las dos chicas he utilizado como inspiración Esta Imagen. Dibujé el pelo y las caras sin las líneas negras con pinturas acrílicas y luego repasé y añadí los detalles cn el Rotulador Indeleble Negro, también dibujé los Signos de Géminis con él. Los esmaltes que he utilizado para esta manicura han sido Flormar 400 para la base y Easy Paris Golden Glitter.
Espero que os haya gustado!! Buenas Noches!

05 mayo 2013

Bornpretty Review: 12 Colours Rhinestones Wheel

Hi Girls!
Today I wanted to show you another product from Born Pretty Store. I have to say that I'm really happy to be reviewing this products because they are things that everyone would like to use but need to try before buying. Today I have the 12 Colours Rhinestones Wheel.


Hola Chicas!
Hoy os quiero enseñar otro producto de Born Pretty Store. Os tengo que decir que estoy muy contenta de estar probando estos productos porque son cosas que todos querríamos usar, pero que necesitamos probar antes de decicir comprarlas. Hoy os traigo la Rueda de Brillantitos en 12 Colores.


As you can see I'm going to have rhinestones for a long long time... The quantity of all the products I have reviewed from BornPretty has been amazing! and this is not an exception. It has a good amount of rhinestones of each colour, and even the clear ones are different from the clear rhinestones they sell (You can see a review here) because they are kind of holographic or iridescent.


Como podeis ver voy a tener brillantes durante mucho mucho tiempo... La cantidad de todos los productos que he probado de BornPretty ha sido increíble! y este no es una exepción. Tiene una buena cantidad de brillantes de cada color, e incluso los transparentes son diferentes de los brillantes transparentes que venden a parte (Podeis ver un review aquí) porque son como holográficos o irisados.


Here you have a comparison between all the colours. With this wheel you will have Red, Yellow, Light Yellow, Green, Navy Blue, Turquoise, Sky Blue, Iridescent Clear, Pink, Violet, Purple and Black. All of them are translucent, except the black ones.


Aquí teneis una comparación entre todos los colores. Con esta rueda tendréis Rojo, Amarillo, Amarillo Claro, Verde, Azul Marino, Turquesa, Celeste, Transparente Irisado, Rosa, Violeta, Morado y Negro. Todos son translúcidos, excepto los negros.


With all those colours I felt that I needed to do something really bright and fun, so I first applied two coats of Yes Love Paste Yellow. When it was completely dried I made the white chevrons with Flormar 400 and the help of pieces of tape. Then I applied one coat of Seche Vite and when it was still wet I stuck the rhinestones following the colours of the rainbow.


Con todos esos colores sentí que tenía que hacer algo verdaderamente llamativo y divertido, así que primero apliqué una capa de Yes Love Pastel Yellow. Cuando estuvo completamente seco hice los triángulos blancos con Flormar 400 y la ayuda de trocos de celo. Luego apliqué una capa de Seche Vite y cuando estaba todavía mojado pegué los brillantes siguiendo los colores del arcoiris.


I hope you liked it, as I said it's really bright, I think, perfect for a parade or a party.... Just perfect to focus the attention of all the ones that surround you on your super shiny nails!! Don't forget  to use my discount code to get 10% off from your entire purchase, and remember that Born Pretty Store has FREE WORLDWIDE SHIPPING!!!
See you soon!!


Espero que os hayan gustado, como oshe dicho son muy llamativas, creo que perfectas para un desfile o una fiesta... Simplemente perfectas para captar la atención de todos los que hay a tu alrededor en tus uñas super brillantes!! No os olvideis de usar mi código de descuento para conseguir un 10% menos en tu compra completa, y recordad que Born Pretty Store tiene ENVIO MUNDIAL GRATUITO!!!
Nos vemos pronto!!

30 abril 2013

Seven Deadly Sins Challenge Day 3: Gluttony

Hi Girls!
New week, new Deadly Sin! This one is Gluttony, one of my favourites because I love food!!! I love eating all the nasty greasy food I should not be eaten because It's unhealthy, but well, I don't have enough money to eat fast food everyday, so I think I'm behaving well. Also one interesting fact is that when I have been eating a lot of meat my body "tells" me that I need vegetables and I surprise myself doing just a salad for dinner and enjoying it!


Hola Chicas!
Nueva semana, nuevo Pecado! Este es Gula, uno de mis favoritos porque me encanta la comida!!! Me encanta comer toda la comida grasienta y asquerosa que sé que no deberá comer porque no es sano, pero bueno, no tengo suficiente dinero como para comer comida rápida todos los días, así que creo que me estoy portando bien. También una cosa curiosa es que cuando llevo mucho tiempo comiendo carne mi cuerpo me "dice" que necesito verduras, y me sorprendo a mi misma cenando solo una ensalada y disfrutándolo!


The prompt for the first manicure says: "Delight yourself with a Sugar Spun manicure".
And that's what I did, but more than sugar I wanted it to look like melted chocolate, and I think it does! I used Flormar 400 for the base, and Kiko 323 for the melted chocolate. I wanted to see two different kinds of chocolate, dark and with milk, so for the second one I mixed the white and the brown.


Las instrucciones para la primera manicura dice: "Date el gusto con una manicura Sugar Spun".
Y eso es lo que hice, pero más que azúcar quería que pareciera chocolate derretido, y creo que lo parece! He utilizado Flormar 400 para la base y Kiko 323 para el chocolate derretido. Quería ver dos tipos diferentes de chocolate, negro y con leche, así que para el segundo mezclé el blanco y el marrón.


For all of those who don't know how to do the Sugar Spun technique I will give you some directions, but I warn you I'm not even near of master this technique...

1. Prep your base colour and let it dry completely.
2. Put a big blob of the colour you want to use for the sugar spun on a piece of paper and start stirring it with a toothpick until it becomes sticky and starts making strings when you pull out the toothpick.
3. Start pulling the polish strings on the top of your nail, try to cover the nail evenly, or the part where you want the sugar spun look (It depends on your design)
4. Apply topcoat (or not)

On this manicure I did't used topcoat because I wanted the texture, and if you apply topcoat you even the surface of the nail.


Para todos los que no sepan como hacer la técnia del Sugar Spun os voy a dar algunas instrucciones, pero os aviso que a mi no se me da demasiado bien...

1. Prepara tu color de base y dejalo secar completamente.
2. Pon un poco de esmalte en un papel y comienza a removerlo con un palillo hasta que se ponga pegajoso y empiece a hacer hilos cuando sacas el palillo.
3. Comienza a sacar los hilos de esmalte y a ponerlos encima de tu uña, intenta cubrir la uña uniformemente, o la parte en la que quieras el sugar spun (depende de tu diseño)
4. Aplica una capa de topcoat (o no)

Ene esta manicura no he utilizado topcoat porque queía aprovechar la textura, y si aplicas topcoat se iguala la superficie de la uña.


I hope you liked it and find the directions useful, if you don't there are lots of amazing video tutorials on Youtube :) Now I'm going to eat a big piece of chocolate, and you should do it too!!!!


Espero que os haya gustado y que os sirvan las instrucciones, si no hay un montón de videos muy buenos en Youtube :) Ahora me voy a comerme un trozo enorme de chocolate y vosotros deberíais hacerlo tambien!!!
Related Posts Plugin for WordPress, Blogger...