Mostrando entradas con la etiqueta Stamping. Mostrar todas las entradas

25 julio 2014

Deal Extreme Cheeky Jumbo Stamping Plate

Hi Girls!!
What did I say? I promised next post would be nail related and here it is. Since this winter my nails started to be really weak and break a lot, so I have not been able to try this amazing stamping plate from Deal Extreme.


Hola Chicas!!
¿Qué os dije? Os prometí que el siguiente post sería de uñas y aquí lo teneis. Desde este invierno mis uñas comenzaron a estar muy débiles y a romperse todo el rato, así que no he podido probar esta placa de estampación de Deal Extreme tan chula.

05 marzo 2014

MoYou London Plate Review

Hi Girls!
I have today a very special post! I have known MoYou London stamping plates for a long time because they are true art pieces, and I am very excited to be reviewing two of their plates, I feel honoured!


Hola Chicas!
Hoy os traigo un post muy especial! Conozco las placas de estampación de MoYou London desde hace tiempo porque son verdaderas obras de arte, y estoy muy emocionada de poder hacer review de dos de sus placas, me siento honrada!

06 diciembre 2013

Crumpet's Christmas Winter Challenge #1: White Christmas


Hi everyone!!
I am finally back, I have had a few rough weeks but now I am finally on holidays! Another reason why disappeared is that I am having some issues with the new template, because it's interfering with blogger in some way and my posts don't get published on the Blogger Reading Board from where most of you get the notifications from my blog... and I am still trying to figure out what is the problem...
Today is the first day of this year's Winter challenge, I hope you like it because, although it is the Crumpet's Nail Tarts Challenge, I made the themes and the banner (Which you can see on the Facebook group)


Hola a todos!!
Ya estoy de vuelta, he tenido unas semanas estresantes pero ya estoy de vacaciones! Otra razon por la que desaparecí es que estoy teniendo problemas con la plantilla nueva, esta interfiriendo con Blogger de alguna forma y los posts no se publican en la lista de lectura desde la que la mayoria de vosotros recibis las notificaciones del blog... y todavia estoy intentando averiguar cual es el problema...
Hoy es el primer día del Winter Challenge de este año, espero que os guste porque, aunque es el reto de Crumpet's Nail Tarts, yo he hecho los temas y el banner (Que podeis ver en el grupo de Facebook)

03 noviembre 2013

Nail Wish is at Polished Elegance!

Hi Girls!
I'm really excited because today's post is at Polished Elegance! Do you remember Lisa and the amazing Nail Art she did for you at the end of August? Well, this time is my turn and I did these elegant nails just for her and her followers, so if you want to see more pictures of it, rush to her blog!


Hola Chicas!
Estoy super emocionada porque el post de hoy está en Polished Elegance! Os acordais de Lisa y el Nail Art tan increíble que hizo para vosotros a finales de Agosto? Bueno, esta vez me toca a mí y he hecho esta manicura tan elegante solo para ella y sus seguidores, así que si quereis ver más fotos, corred a verlo en su blog!


21 octubre 2013

Skulls and Roses

Hi Girls!
This year I have not joined any Halloween Challenge, but that doesn't mean that we are not going to have any Halloween manicures around here, in fact, from today every manicure will be Halloween themed (except maybe one review I prepared a long time ago), starting with this Skulls and Roses design.


Hola Chicas!
Este año no me he unido a ningúr Reto de Halloween, pero eso no significa que no vayamos a tener manicuras de Halloween por aquí, es más, desde hoy todas las manicuras van a ser de temática Halloween (excepto tal vez algun review que tenía preparado hace tiempo), comenzando por este diseño de Calaveras y Rosas.


09 septiembre 2013

Nail Wish is at The Clockwise Nail Polish

Hi!!
Today my nails are at The Clockwise Nail Polish blog! I am so excited!. I did some matching nails and keys and I also tried a gradient stamping for the first time, so if you are curious and want to see more images and know how I did it go to Cristina's blog!! See you there!


Hola!!
Hoy mis uñas están en el blog The Clockwise Nail Polish! Estoy tan emocionada! He hecho un conjunto de uñas y llave y también he probado por primera vez un estampado degradado, así que si sois curiosos y quereis ver más fotos y saber cómo lo hice id al blog de Cristina!! Nos vemos allí!


02 septiembre 2013

Guest Post: Spektor's Nails

Hi Everyone!!
I hope you all are having a good Monday! This week we are going to have more amazing guest posts just because I am still with lots of things to do and also I want you to know some of my favourite bloggers! Today is Judith's turn, she is the blogger behind Spektor's Nails and she is so amazing!

------------------------------------------------------------------------------------------------------------

I'm Judith from Spektor's Nails and I'm very excited to be a guest blogger for Helena! 
Obviously I wanted this post to be something very special, so I decided to combine the two things that I'm really fussy about at the moment: 

First, that is the Cheeky stamping plate called Viva Mexico (http://www.cheeky-beauty.com/cheeky-new-2013-collection-of-jumbo-nailart-polish-stamp-stamping-manicure-image-plates-accessories-set-kit-nail-art-jumbo-image-plate-1-viva-mexico/), which is such a beautiful plate! Second, that is the technique of making your own nail decals with stamped designs. 

So what I did is stamp three designs of the Viva Mexico plate onto a base of clear nail polish applied onto a plastic bag. Then I filled out the design with acrylic paint and covered it with another coat of clear nail polish. After letting it dry, I removed the nail polish decals with tweezers and applied them one by one onto a wet coat of white nail polish. This took me forever to do, but it was definitely worth the time! It's probably the most colorful design I ever had on my nails! 

Thank you for reading and thank you Helena for having me on your blog! :) 


31 agosto 2013

Guest Post: Polished Elegance

Hi!!
Today is here Lisa from Polished Elegance, I discovered her blog not so long ago, but I immediately followed her because I lover her hard work, clean manicures and amazing pictures!! I am sure you will love her too.

------------------------------------------------------------------------------------------------------------

Hello! My name is Lisa, and I have my little blog Polished Elegance where I share my adventures in nail polish and nail art. I am so happy to be able to do a guest blog for Helena while she is busy moving, and to my neighbor country no less! I’ve been following her blog for a while and I absolutely love everything she does, and also her creative makeup, it’s so much fun!

I was scratching my head for a few days trying to figure out what to do for this guest post. Then one day, the new polishes I’d ordered from OPI’s San Francisco collection, and my new Cheeky stamping plates dumped into my mail box, on the same day! And I knew I had to use some of these new pretties to create a mani worthy of Helena’s blog ;)

For this mani I applied two coats of OPI – Alcatraz… Rocks on the pinky, two coats of OPI – My Vampire Is Buff on ring and middle, and two coats of OPI – Peace & Love & OPI on my index and thumb.

I applied one coat of Poshé top coat to all nails except pinky, to speed up drying, and when it was dry I stamped on my middle and ring. I stamped using OPI – Peace & Love & OPI and Cheeky jumbo plate #7 – Home Sweet Home. To seal the stamping I applied one more coat of Poshé.


Peace & Love & OPI worked pretty well for stamping actually! It’s not completely opaque as you can see, but that might be because of my stamping skills as well, not just the polish :p It’s a gorgeous shimmery gray duo chrome polish, it shifts to green and pinkish purple and the color shift is pretty visible no matter what kind of light you are in. It also photographed well, so you can easily see the color shift in these pictures, isn’t it pretty?

Alcatraz… Rocks is also from the San Francisco collection, one of the liquid sand polishes, and the only liquid sand I like from that collection. However, it is so incredibly beautiful it weighs up for the two ugly ones I’m not as fond of. In the picture below you can see the glitter sparkle in this polish, and it sparkles like this all the time, even in the shade!

I hope you guys like my mani! And that it’s worthy of being posted here ;) Please do come visit me over at my blog Polished Elegance. I’ll leave you with a couple more pictures of this mani, and thank you so much Helena for letting me spam your blog! ;)


28 agosto 2013

SummerNails Challenge #10: Helado/Ice Cream

Hej! (Hi in Swedish)
I am right now on Swedish lands and I am sure I am freezing!! Althought it is already summer... So this theme is not perfect for me right now... or yes because I would be becoming a giant popsicle!!


Hej! (Hola en Sueco)
Ahora mismo estaré en tierras Suecas y estoy segura de que me estaré congelando!! Incluso siendo verano... Así que este tema no es perfecto ahora mismo... o sí porque me estaré convirtiendo en un polo gigante!!

The day I made this little guys I was feeling super kawaii! hehe So here it is a fun manicure, I wore it for a whole week because I loved itand every time I looked at it it cheered me up.


El día que hice a estos pequeñajos me sentía muy kawaii! hehe Así que aquí teneis una manicura divertida, la llevé una semana entera porque me encantó, y cada vez que la miraba me levantaba la moral.

I started with a base of Yes Love Pastel Pink, and stamped with BM (insert number here soon!!) and finally I drew the popsicles with acrylic paints.


Comencé con una base de Yes Love Pastel Pink, y estampé con BM (Escribir número aquí pronto!!) y para terminar dibujé los politos con pinturas acrílicas.

I hope you enjoyed this manicure and the guest posts ones!! Tomorrow there will be a makeup look from the Pokemakeup Challenge and on Friday I will be back with more AMAZING GUEST BLOGGERS!!
Don't miss it!


Espero que os haya gustado la manicura y las de los guest posts!! Mañana habrá un look de maquillaje del Reto Pokemakeup y el Viernes volveré con más GUEST BLOGGERS INCREÍBLES!!
No os lo perdáis!

27 agosto 2013

Guest Post: Nail Polish Wars

Hi Girls!!
You can't imagine how excited I am to have Nicole from Nail Polish Wars here! I have been a long time follower and her work has always been a huge inspiration for me! I hope you enjoy with she has made for you.


Hola Chicas!!
No os podéis imaginar lo emocionada que estoy de tener aquí a Nicole de Nail Polish Wars! He sido una seguidora suya desde hace mucho tiempo y su trabajo siempre ha sido una gran ispiración para mi! Espero que disfruteis de lo que ha hecho para vosotros.

------------------------------------------------------------------------------------------------------------

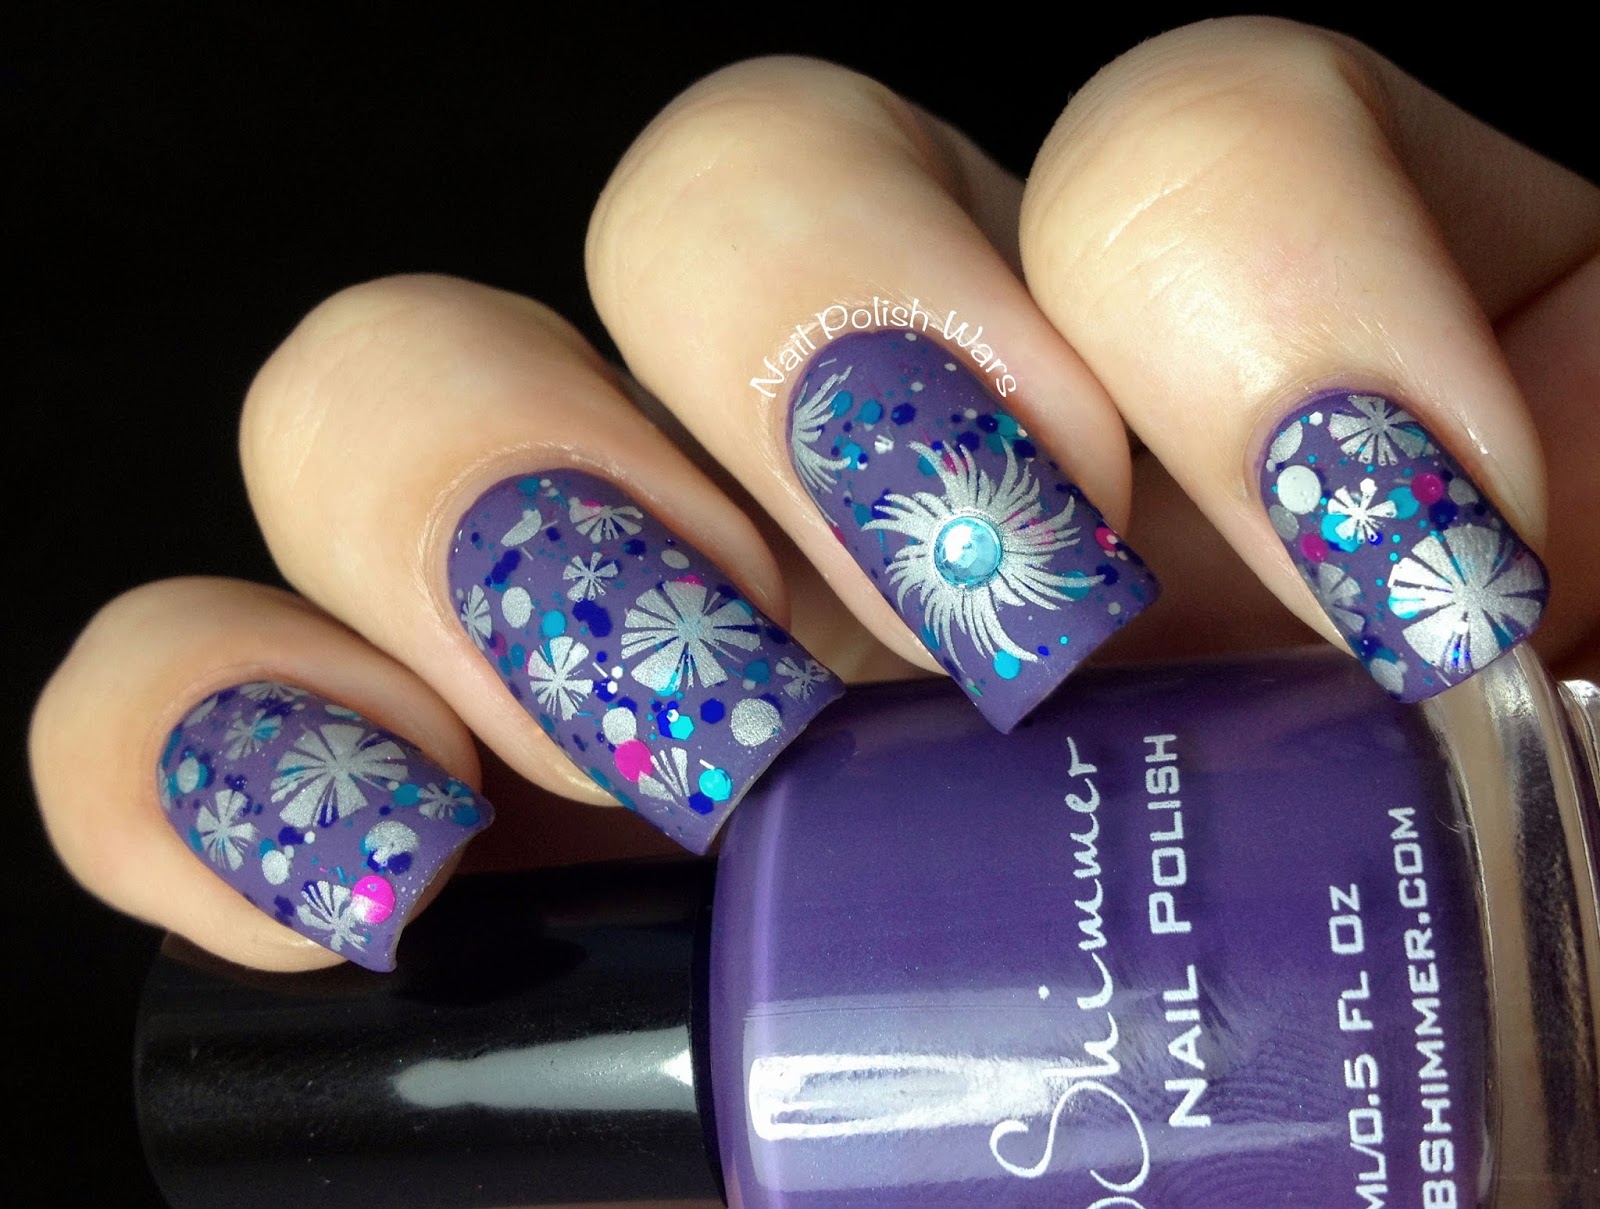
Hi everyone! I'm Nicole from Nail Polish Wars, and I'm so excited to be hanging out here at Nail Wish today!!

I started off with two coats of KBShimmer The Grape Beyond.

Next, I added one coat of KBShimmer Would Jubilee It?, a clear coat loaded with a gorgeous blend of multi-sized blue, teal, and bright pink dots and micro slices.  I followed with one coat of SV.

I paired Barry M Silver Foil with Shany plate SH04 for my ring fingers and Bundle Monster plate BM-213 for my other fingers.

I finished with one coat of Essie Matte About You top coat, and also added a pale blue rhinestone to my ring finger for a little something extra.

Not only do I love mattified glitters, but I also adore the matte silver as well.

I had so much creating this design, and I really hope you enjoyed seeing it as well.

Thanks so much for letting me hang out here at Nail Wish today!!  Happy Painting!

16 mayo 2013

Seven Deadly Sins Challenge Day 8: Sloth

Hi Girls!
I told you a few days ago that I feel very identified with the Sin Gluttony, but if I had to choose a sin it would be Sloth... I'm not proud of it, but I just looove to sleep or spend an entire afternoon just doing nothing!
The prompt for today says: "Create a manicure inspired on your laziness... or whatever... I'm so tired..." And this is how I felt yesterday... I didn't want to paint my nails, so I decided to do something quick and I remembered I had to swatch my new Loreal Confetti topper...


Hola Chicas!
Ya os dije hace unos días que me sentía muy identificada con el Pecado Gula, pero si tuviera que escoger un pecado sería el de la Pereza... No estoy muy orgullosa de ello pero esque me encaaanta dormir o pasar una tarde entera sin hacer absolutamente nada!
Las intrucciones de hoy dicen: " Crea una manicura inspirada en tu vagancia... o lo que sea... estoy demasiado cansada..." Y así es justo como me sentía ayer... No quería pintarme las uñas así que decidí hacer algo rápido y recordé que tenía que swatchear mi nuevo topper Loreal Confetti...

I also decided to do some stamping because it's an easy way to get a full nail design... Lazy me... I know sometimes stamping it's not lazy at all because sometimes it's really hard, but you know I usually make my own drawing with acrylic paints, so this is lazy for me...
To make this manicure I used Claire's 137 as the base and applied two coats of Loreal Confetti on my middle finger and pinky, no need of fishing or placing at all. Then I stamped with China Glaze Magical from the Romantique's Collection with BM-310 on my index finger and with BM-215 on my ring finger.


También decidí hacer algo de estampación porque es una forma fácil de conseguir un diseño de uña completo... que vaga... Ya sé que estampar no es siempre de vagos porque a veces es una tecnica dificil, pero ya sabeis que normalmente yo hago mis propios dibujos con pinturas acrílicas, así que para mí si es que soy una vaga...
Para hacer esta manicura he utilizado Claire's 137 como base y he aplicado dos capas de Loreal Confetti en mi dedo corazón y el meñique, sin necesitar pescar o recolocar los glitters. Luego estampé con China Glaze Magical de la Colección Romantique, con BM-310 en el dedo índice y con BM-215 en el anular.

It took me less that half an hour to make it, and I used Seche Vite on top, so in less than two minutes was completely dried. I hope you liked and that you are enjoying this challenge so far because we have already done half of it!!
See you, pretties!!


Tardé menos de media hora en hacerla, y utilicé Seche Vite encima, así que en menos de dos minutos estaba completamente seca. Espero que os haya gustado y que esteis disfrutando el Reto hasta ahora, porque ya hemos hecho la mitad!!
Nos vemos preciosidades!!

02 febrero 2013

Valentine NAC #1: Pink or Red

Hi Everyone!
First of all I want to tell you that I have joined Drama Queen Nail's Contest with my Girly manicure with Born Pretty Rhinestones. I would be very grateful if you could go and Like my entry, but just if you really like it of course. If you want to see my entry just click HERE.


Hola a Todos!
Lo primero que os quería decir es que estoy participando en el Concurso de Drama Queen Nails com mi manicura de los Rhinestones de Born Pretty. Estaría muy agradecida si pudierais ir y darle a Me Gusta a mi participación, pero solo si de verdad os gusta, claro. Si quereis ver mi participación solo teneis que pinchar AQUÍ.


And now I want to introduce you to the Valentines NAC (Nail Art Challenge). I just have joined and today the theme is Red or Pink. I am a very indecisive person but this time I knew I was going to go with Pink, but the problem was... What should I do? and inspiration was gone... So, after lots of trial and error, I ended up doing two different manicures, just like the last time...


Y ahora os presento al Valentines NAC (Nail Art Challenge). Acaba de empezar y el tema de hoy es Rojo o Rosa. Soy una persona muy indecisa, pero esta vez tenía claro que iba a ir a por el Rosa, pero el problema era... Qué hago con él? y la inspiracion estaba de vacaciones... Así que tras muchos intentos acabé con dos manicuras diferentes, justo como la otra vez...


Let's go this time with the strongest first. I used one coat of Yes Love Pastel Pink and topped it with one coat of the Duochrome Topper Sinful Colors Let Me Go. Finally I cut some zigzag stripes of tape painted them with Fuchsia Glitter and used them as stickers.


Vamos a empezar con la más fuerte esta vez. Primero apliqué una capa de Yes Love Pastel Pink y lo cubrí con el Topcoat Duochrome Sinful Colors Let Me Go. Para terminar corté tiras de celo en zigzag, las cubrí con Glitter Fucsia y las usé como pegatinas.


I don't know why but this manicure reminds me of Girls Power!! Also... can you see the hint of blue and green that Let Me Go gives to the Pink colour? I love it!!
The next manicure is the opposite, it makes me feel calm and looks so romantic... Perfect for Valentine's Day...


No se por qué pero esta manicura me recuerda al Girls Power!! Además... ¿podéis ver el ligero reflejo azul y verde que le da al rosa el Let Me Go? Me encanta!!
La siguiente manicura el todo lo contrario, me hace sentir en calma y es tan romántica... Perfecta para el día de San Valentín.


I knew this year I would be wearing the new Bundle Monster Plates a lot for Valentine's Day, they have so many great designs! This is from BM-323, and how delicate are these roses? So pretty! I used Flormar 400 as the base and stamped with Yes Love N04 a metallic pink that stamps like heaven (Thank You Ana from Está Cerrada La Droguería)


Sabía que este año llevaría mucho las nuevas Placas Bundle Monster por San Valentín, tienen tantos diseños geniales! Este es de la placa BM-323, y ¿veis que delicadas son las rosas? Preciosas! He utilizado Flormar 400 para la base y he estampado con Yes Love N04, un rosa metálico que estampa de maravilla (Gracias Ana de Está Cerrada La Droguería)


I hope this hasn't been too long for you girls! As always I hope you liked both manicures and stay tuned if you want to get more inspiration for Valentine's Day!! Don't forget to have a look around Drama Queen Nails Contest and of course the other challengers of this challenge.


Espero que no haya sido demasiado largo para vosotras! Como siempre espero que os hayan gustado las dos manicuras y no os vayais muy lejos si queréis encontrar más inspiración para el Día de Sna Valentín!!
No os olvideis de echar un vistazo al Concurso de Drama Queen Nails y por supuesto a las otras participantes de este reto.

28 enero 2013

Two Sides of the Same Coin

Hi Girls!!
This is the last item that Born Pretty Store has sent me. I have been looking for small rhinestones everywhere because my nails are very small and the ones that I had were too big, so when I saw Born Pretty Store had a set of Three Different Sizes Clear Rhinestones I decided I wanted them!


Hola Chicas!!
Este es el último de los productos que me ha enviado Born Pretty Store. He estado buscando Rhinestones pequeños por todos lados porque mis uñas son muy pequeñas y los que ya tenía eran demasiado grandes, así que cuando vi que Born Pretty Store tenía un set con Rhinestones Transparentes de Tres Tamaños Diferentes decidí que quería probarlos!


The first thing that comes to my mind when I think of rhinestones is a sparkly and girly manicure like the one I did above. I used three coats of China Glaze Princess Grace and then I stamped a design from the BM-214 plate with Deliplus nº47. With the help of two pieces of scotch tape I applied a coat of clear polish on a triangle shape and then I sprinkled some holographic glitter. Finally using some clear polish I stuck the rhinestones following the lines of the glitter.


Lo primero que se me viene a la cabeza cuando pienso en rhinestones es una manicura con brillitos y girly como la que he hecho. Usé tres capas de China Glaze Princess Grace y luego estampé un diseño de la placa BM-214 con Deliplus nº47. Con la ayuda de dos trozos de celo apliqué una capa de esmalte transparente en forma de triángulo y luego espolvoreé un poco de glitter holográfico. Para terminar, utilizando esmalte transparente pegué los rhinestones siguiendo la forma del glitter.


As I liked this manicure so much I entered an Instagram Contest with it, but I will tell you about it another day.
Also I know there are a lot of people who doesn't like pink and girly manicures, so I did another mani to show you "the other side of the coin".


Como me encantó esta manicura tanto la he presentado para un concurso de Instagram, pero ya os lo contaré más adelante.
También he querido tener en cuenta que hay mucha gente a la que no tienen por qué gustarles las manicuras rosas y de chicas, así que he hecho otra mani para mostraros "el otro lado de la moneda".


This manicure was made with the smallest size of the Born Pretty Store Rhinestones, and I loved how Rocker it looks, I also think this would look great with some cool Skull Stamping. Don't you think so?


Esta manicura está hecha con los Rhinestones de tamaño más pequeño de Born Pretty Store, I me encanta lo Rockera que ha quedado, también creo que quedaría genial con algún estampado de calaveras. ¿No creeis?


With this manicure the rhinestones didn't fell off in two days because I used a top coat after using them, but with my first manicure I didn't use a top coat, in about an hour the big ones were the only ones that were still on my nails.
I hope you liked them and don't forget to use my discount code if you buy something from Born Pretty Store.
Bye Bye


Con esta manicura los rhinestones no se cayeron en dos días porque le puse top coat después de usarlos, pero con la primera manicura no usé top coat, en una hora los rhinestones grandes eran los unicos que quedaban en mis uñas.
Espero que os hayan gustado, y no os olvideis de usar mi cupón de descuento si comprais en Born Pretty Store.
Bye Bye


25 enero 2013

Louis Vuitton Nails

Hi Girls!!
This is a programmed post, because right now I am studying really really hard for my final exam that is next Wednesday. I'm so nervous!!
Do you remember the Glequins that Born Pretty Store sent me? They also sent me as a gift this Stamping Plate. At first I was going to try the English Flag Stamping first, because it looks really interesting that you need to use two stamps to make one design, but finally I decided to try one of the designs I have been dying to have since I bought my first plate, the Louis Vuitton Logo!


Hola Chicas!!
Este es un post programado, porque ahora mismo estoy estudiando muy muy fuerte oara mi examen final, que el es Miércoles. Estoy tan nerviosa!!
Os acordais de los Glequins que me envió Born Pretty Store? También me enviaron de regalo esta Placa de estampación. Al principio iba a probar la estampación de la bandera Inglesa, porque me parece muy interesante que esté diseñado para usar dos estampados diferentes para conseguir un único diseño, pero al final decidí probar uno de los dibujos que llevo queriendo tener desde que compré mi primera placa, el Logo de Louis Vuitton!


I also loved this manicure because the base colour is China Glaze For Audrey, a Chistmas Gift to myself, and I discovered is really good for stamping!! A pretty colour that stamps very well over dark colours? What else can I ask for? The brown polish is Kiko 323 (Such an ugly name for such a pretty colour)


También me ha encantado esta manicure porque el color de base es China Glaze For Audrey, un Regalto de Navidad de mí para mí, y he descubierto que estampa genial!! Un color tan bonito que estampa tan bien sobre colores oscuros? Qué más puedo pedir? El esmalte marrón es Kiko 323 (Un nombre demasiado feo para un color tan bonito)


This is the Stamping Plate QA39, and you can find it at Born Pretty Store just clicking the link.
I liked the designs a lot, but I was worried because I had heard the Born Pretty Designs were too small and I was afraid they didn't cover my entire nail, well, I was wrong, I am not sure if they have increased the size or not, but they fit perfectly and I compared them to my Bundle Monster Plates and more or less they were the same size.


Esta es la placa de estampación QA39 que podeis encontrar pinchando en el enlace en la tienda de Born Pretty.
Me encantaron los diseños, pero estaba preocupada porque había oído que eran demasiado pequeños y tenía miedo de que no me cubrieran la uña completa, bueno, pues estaba equivocada, no estoy segura de si han aumentado el tamaño o no, pero son perfectos, además los comparé con las Placas de Bundle Monster y más o menos son del mismo tamaño.


The designs were very well engraved and they transferred to the stamper perfectly. And, in case you were wondering, I use a Credit Card to scrap the polish and a Konad Stamper.
These looked so well that my mother, who doesn't like to wear anything on her nails, asked me to make the same on hers.


Los diseños están muy bién grabados y se transfirieron al tampón perfectamente. Y, en el caso de que os lo estéis preguntando, suelo usar una Tarjeta de Crédito para retirar el exceso de esmalte y un Tampón de Konad.
Esta manicura quedó tan bonita que hast ami madre, a la que no le gusta llevar nada en las uñas, me pidió que le hiciera lo mismo en las suyas.


I hope you liked them, they are very simple but pretty I think, and don't forget that I have a Discount Code that gives you 10% off and that Born Pretty Store has FREE SHIPPING WORLDWIDE! I think it deserves to have a look!


Espero que os hayan gustado, son muy simples pero bonitas, y no olvideis que tengo un Código de Descuento que os da un 10% de rebaja y que Born Pretty Store tiene ENVÏO GRATUITO A TODO EL MUNDO! Creo que merece la pena pasarse a dar una vuelta!


27 diciembre 2012

Reto Oh Oh Oh #8: Regalos

Hi!!
Thank you for all your support through my illness... (It sounds like I'm dying) I'm feeling much better. Sadly the Christmas challenges are ending and this is one of the last days. If you were looking for Christmas gift nails I have the ones I did for the Winter Challenge Here, but today I have another kind of Christmas gift nails.


Hola!!
Gracias por vuestro apoyo durante mi enfermedad... (Suena como si me estuviera muriendo) Ya me siento mucho mejor. Tristemente los retos de Navidad ya se están terminando y hoy es uno de los últimos días. Si estabais buscando una manicura de regalos de navidad podeis ver la que hice para el Winter Challenge Aquí, pero hoy  traigo otro tipo de uñas con regalitos navideños.


And you might say... Gifts? I can't see gifts anywhere over here... Well, they are!! One of my Christmas/Birthday Gifts have been the 2012 Bundle Monster set! Which I have been wanting to have since they were released, but for cosmic reasons, I have been not able to buy.


Y podréis decir... Regalos? No veo regalos por ningún lado... Bueno, sí que los hay!! uno de mis Regalos de Navidad/Cumpleaños ha sido el Set del 2012 de Placas de Estampación de Bundle Monster! Las cuales he estado deseando tener desde que las sacaron, pero por razones cósmicas, no he podido comprar.


For this skittle stamping manicure I used two different stamping plates, two gradients and silver holographic glequins.

Index: H&M Miss Stone Heart sponged with Flormar 400
Middle: H&M Miss Stone Heart stamped with the heart design from BM-317 using Easy Paris nº48.
Ring: Flormar 400 sponged with H&M Miss Stone Heart and then stamped with the text design from BM-311.
Pinky: H&M Miss Stone Heart and framed with silver holographic glequins.


Para esta manicura skittle he utilizado dos placas de estampación diferentes, dos degradados y glequins holográficos plateados.

Índice: H&M Miss Stone Heart degradado con Flormar 400
Medio: H&M Miss Stone Heart estampado con el diseño de corazones de la placa BM-317 usando Easy Paris nº48.
Anular: Flormar 400 degradado con H&M Miss Stone Heart y luego estampado con el diseño de texto de la placa BM-311.
Meñique: H&M Miss Stone Heart enmarcado con glequins holográficos plateados.


I have to thank Xiito and Pili for this amazing gift! It's awesome to have friends that share your interests and obsessions!! haha And thank you for reading!!


Tengo que darle las gracias a Xiito y a Pili por este regalazo! Es genial tener amigas que comparten tus intereses y obsesiones!! haha Y gracias a vosotros por leer!!

04 agosto 2012

Secretary's Nail Art Guest Post

Hi Girls!
While I'm on Italy, enjoying my holidays again :) The generous Dina from Secretary's Nail Art is going to show you a beautiful manicure. I am sure you are going to like it!

                                ------------------------------------------------------------

Hola Chicas!
Mientras estoy en Italia, disfrutando de nuevo de mis vacaciones :) La generosa Dina de Secretary's Nail Art os va a enseñar una manicura maravillosa. ¡Estoy segura de que os va a encantar!


Greetings everyone. I am Dina, from Secretary`s Nail Art I have been asked to do a Guest Post while Helena is away. 
She does some amazing nail art, and I hope you will like what I have for you today. 


I wanted a flirty and girly manicure, and since I just got nail mail from Models Own, they seems like a good idea to start.

This is two coats of Gold Rush from Models Own. 


Isn`t it lovely. 

Lately I have been loving gradients, and this was no exception. I cut a tiny piece of make-up sponge, and used Mystic Mauve from Models Own. Sponging from the middle and working it up to the tip of the nails. 


Then I grabbed my Bundlemonster plate from the the 2012 collection, number 314. I stamped using my WnW Black Creme, its one of my favorite stamping polishes. 


xoxo


I told you you were going to like it! I have to get my hands on the new Bundle Monster Plates, the new designs are amazing!
See You soon!

                                          ------------------------------------------------------------

¡Os dije que os iba a gustar! Tengo que poner mis manos en las nuevas placas de Bundle Monster, ¡los nuevos diseños son increíbles!
¡Nos vemos pronto!
Related Posts Plugin for WordPress, Blogger...